Developer Options are a set of hidden settings in Android that you can quickly enable to gain access to advanced settings for your phone or tablet, so that you can tweak your Android in a better way.
If you’ve been in the Android world for a few years, you’ve probably seen in countless tutorials and videos how to speed up the animations from these settings so that it seems that your mobile is going a little faster.
Today, we’ll review some more options that will allow you to fully utilize these developer settings.
How to unlock and access Developer Options
You can unlock the developer settings to access advanced settings that hide all Android phones. To do so, you just have to follow these steps:
- Open Settings.
- Go to About Device.
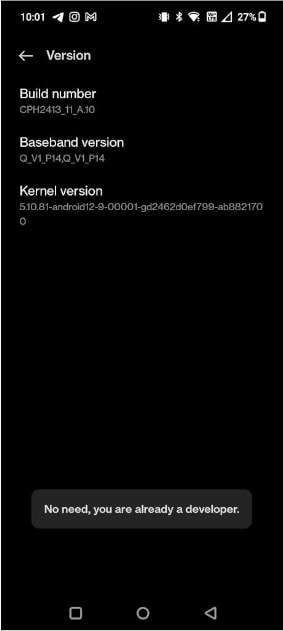
- Tap the build number several times in a row.
When you have done it, a flash message will appear that will tell you that you have already unlocked the developer settings, and after that, you just have to look for that option in Settings.
In many Android smartphones, you can find them in the System Setting section in Settings Menu, while in other devices, such as Xiaomi, it will be in Additional Settings, so the most comfortable thing is to search for it in the upper search bar.
Uses of Developer Options
1. Select a default mode for when you connect via USB
Whenever you connect your mobile to the computer via a USB cable, a series of options appear, such as activating file transfer, sharing the internet via USB or transferring photos. And you can set one of these options as default.
To do this, you just have to scroll down to the Default USB Configuration option, and once there, select the one you prefer. You should remember that the option you choose will apply even when your phone is locked, so if you hit file transfer, anyone who finds your phone can see the files inside from a computer.
2. USB Debugging
Without mentioning USB debugging, no collection of Android Developer Options tips would be complete. It is necessary for developers and beneficial to everyone else.
USB debugging allows your Android device to connect with your computer by executing commands. When combined with the Android SDK on your computer, you may send commands to your phone to install apps, gather logging data, or even root it.
It’s a really useful feature. However, to maintain security, you should only enable this option when necessary and then turn it off.
Android needs you to manually accept any USB debugging connections to new PCs to ensure your safety. Someone who took your phone when it was enabled for USB debugging could still meddle with it by authorizing the connection to their PC. To reset any device you’ve previously trusted, press the Revoke USB debugging authorizations option underneath the slider.
3. Make screen touches visible
Developer Options that allow you to display a point on the screen, as a cursor where you touch the screen, which can be useful while screen recording.
To activate it, you must go to the Show touches option in the Developer Options. This is subtle, while pointer location can give you much more precision about where you tap.
4. Check memory usage
You can check the average memory (RAM) usage for 3 hours/6 hours/12 hours/1 day. It can also be displayed for each app to see which apps use more RAM.
5. Activate a floating clock
If you hate having to look at the notification bar for the time while playing games or opening an app in full screen, you’ll love this UI tweak as it will overlay a small tab with a clock that you’ll see in any app.
You can activate the Floating Clock option from the Developer Options. You will see that it is immediately placed in the upper left part under the notification bar, which you can move anywhere on the screen you want.
6. Change the animation scale
Various animations are available on your smartphone, such as while switching between applications. You can change how long it takes. For example, if you change the window animation scale from 1x to .5x, the time until the dialogue is displayed (time to fade in softly) will be shortened, and it will be displayed suddenly.
It is convenient for people who want quick responses because they do not need animation. Turning off all these animations on an under-spec device can make things feel snappier and can also save battery life.
7. Completely change the size of what appears on your mobile
If you go to the Smallest Width option, you can modify the density of pixels that appear on the screen, making more content fit on it, at the cost of being artificial occasionally.
You can change the width as you need and keep the result that you like the most. Of course, don’t forget the default number, just in case you want to switch back.
8. OEM Unlocking
As you may know, most Android smartphones allow you to install a custom ROM, which replaces the default operating system with a new one. You must first unlock your bootloader to do so. The flashing procedure overwrites the present OS and will fail if this is not done.
It is important to note that activating this setting does not unlock the bootloader; rather, it allows the phone to do so later via fastboot instructions. As a result, unless you intend to install a custom ROM on your device, you should not enable this. Turning it on makes your phone more susceptible.
9. Make any application open in multiwindow mode
For some years now, Android mobiles have included the option to open two windows with two different applications to take full advantage of multitasking, although not all of them can be used in this mode.
You’ll need to turn on the Enable Non-Resizable in multiwindow (or some other name, depending on the manufacturer), making all apps resizable, no matter what is displayed. This can lead to them not looking right, but they can be used.
10. Show refresh rate
You can view the current screen refresh rate on the top left by enabling this option. Recently, smartphones with high refresh rates, such as 90Hz and 120Hz, have increased.
11. Select Mock Location App
It’s no secret that our phones track our whereabouts daily, which creates privacy issues. But did you know that your Android device may report false locations instead of your actual location? This option needs the installation of an additional application capable of creating mimic places, such as Location Changer.
You may use the app to make your phone pretend that you’re anyplace you want once you’ve installed it and chosen it in the Developer option. Remember, though, that this simply spoofs GPS coordinates; applications and websites can discover your true location using other data points, such as your IP address. You may want to utilize a VPN on Android to further obscure this information.
Although it is “for developers”, I would like to use something that general users can use. Changing the animation scale is interesting because if you turn it off when you feel that your smartphone is slowing down, it will suddenly start to snap.

