Did you recently bought a new Windows 10 PC or have upgraded to the latest version of the Windows OS, chances are your disk encryption key has been uploaded to Microsoft’s servers — which means you’re not 100 percent in control of the privacy of your data.
Since the launch of Windows 8.1, Microsoft is offering disk encryption as a built-in feature for Windows laptops, Windows phones and other devices. The Intercept reports that this is probably the case if you’ve logged in to Windows 10 with your Microsoft account. That’s useful for accessing your hard drive after something’s gone wrong, but it also means that if a hacker gains access to your Microsoft account, they could make a copy of it for misuse.
Also Read : How To Increase Internet Speed In Windows
So What is Disk Encryption ?
Disk encryption is a simplified version of the BitLocker drive encryption that made its debut in Windows Vista in 2006. The full BitLocker requires a Pro or Enterprise edition of Windows, and includes options such as integration with Active Directory, support for encrypting removable media, and the use of passwords or USB keys to unlock the encrypted disk.
Disk encryption is more restricted. It only supports internal system drives, and it requires the use of Secure Boot, Trusted Platform Module 2.0 (TPM), and Connected Standby-capable hardware. This is because Disk encryption is designed to be automatic; it uses the TPM to store the password used to decrypt the disk, and it uses Secure Boot to ensure that nothing has tampered with the system to compromise that password.
The final constraint for Disk encryption is that you must sign in to Windows with a Microsoft account or a Windows domain account to turn it on. This is because full disk encryption opens the door to all kinds of new data loss opportunities. If, for example, you have your system’s motherboard replaced due to a hardware problem, then you will lose access to the disk, because the decryption keys needed to read the disk are stored in the motherboard-mounted TPM. Some disk encryption users may feel that this is a price worth paying for security, but for an automatic feature such as device encryption, it’s an undesirable risk.
Also Read : InFocus Kangaroo Launched As World’s Smallest Windows 10 PC
How to Remove Disk Encryption Key from Microsoft Account ?
Although there’s no way to prevent a new Windows powered computer from uploading the disk encryption key at the very first time you log into your Microsoft account, you can delete the existing encryption key from your Microsoft account and generate a new one.
Follow the below steps to remove disk encryption key from your Microsoft account :
• Open recovery key page in OneDrive and log in with your Microsoft Account
• You will find list of recovery keys backed up to your Microsoft Account. If you don’t see any recovery keys, then you either don’t have an encrypted disk, or Microsoft doesn’t have a copy of your recovery key. This might be the case if you’re using BitLocker and didn’t upload your recovery key when you first turned it on.If you have recovery key, take a backup (screenshot) of it locally and now go ahead and delete your recovery key from Microsoft Account.
Generate a New Disk Encryption Key Without Giving a Copy to Microsoft
Also Read : Mozilla Finally Introduced 64-Bit Firefox for Windows
In order to generate a new disk encryption key, this time without giving a copy to Microsoft, you need decrypt your whole hard disk and then re-encrypt it, but this time in such a way that you’ll actually get asked how you want to backup your recovery key.
• So first go to Start, type “Bitlocker”, and click “Manage BitLocker”.
• Click “Turn off BitLocker” and it will decrypt your disk.
• Once done, Click “Turn on BitLocker” again.
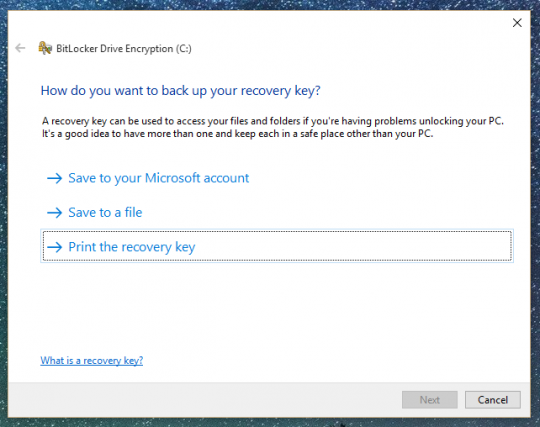
• Now Windows will ask you: How you want to backup your Recovery Key. Make sure to DO NOT Choose “Save to your Microsoft Account”. If you choose to save it to a file, it will make you save it onto a disk that you’re not currently encrypting, such as a USB stick. Or you can choose to print it and keep a hard copy.
• On the next page it will ask you if you want to encrypt used disk space only (faster) or encrypt your entire disk including empty space (slower). If you want to be on the safe side, choose the latter. Then on the next page it will ask you if you wish to run the BitLocker system check, which you should probably do.
• Finally, it will make you reboot your computer
When you boot back up your hard disk will be encrypting in the background. At this point you can check your Microsoft account again to see if Windows uploaded your recovery key – it shouldn’t have.
Now just wait for your disk to finish encrypting. Congratulations: Your disk is encrypted and Microsoft no longer has the ability to unlock it.
This is only possible if you have Windows Pro or Enterprise. Unfortunately, the only thing you can do if you have the Home edition is upgrade to a more expensive edition or use non-Microsoft disk encryption software.
Also Read : Microsoft Joint Hands with a Chinese Partner to Accelerate Adoption of the Windows 10 Operating System
Did you follow above mentioned steps, if not do now? Have any doubts during process feel free to comment!


All I know is that when my hard drive crashed I re-installed Windows 10 and all of my programs and settings magically came back. It was kind of scary but also a huge relief.
Some of those files were pictures from birthday parties and weddings, etc. Some of the files were things like my resume and tax records.
It’s kind of scary but I don’t worry about hackers seeing how poor I am or applying for jobs in my name.
I can understand why it could worry other people but for me the convenience is worth the security tradeoff- I am pretty sure there are bigger fish for hackers to go after rather than some poor technical writer at Ga Tech LOL.