


Kali Linux, by Offensive Security recently released its new version of penetration testing platform Kali Linux v2021.1 with some new features. Also, Microsoft released its most advanced final version of the Windows Operating System, Windows 10.
So how it will be when these two killer badass OSs come in the same device. In this article, we are going to guide you on how to dual boot Kali Linux v2021.1 with Microsoft Windows 10. Dual boot means running two separate OS in the same HDD.
If you are not a fan of Windows 10, then don’t worry — with this tutorial you can also dual boot Kali Linux with Windows 7/8/8.1.
Before starting tutorial checkout — 5 things to do before dual booting Linux with Windows
Materials Required:
Before starting this tutorial first checkout materials required :
- Of course a PC/Laptop .. lol
- 4GB Pendrive (Minimum)
- At least Dual-Core (either Intel or AMD) with minimum 1GB of RAM
- Windows 10 or any other version of Windows (already installed)
- Kali Linux (latest version) → Get It Now
- Rufus → Get It Now
- Some Patience
Video tutorial available at the end of the article.
So let’s start:
Dual Boot Kali Linux v2021.1 With Windows 10:
Step 1:
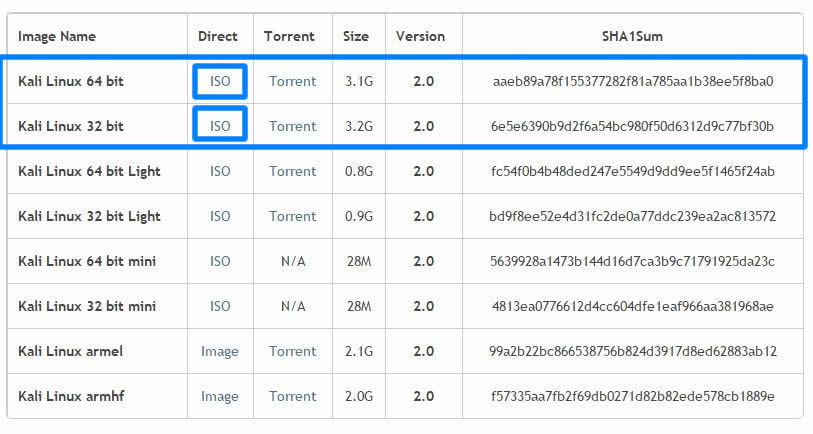
First, download Kali Linux latest version ISO file from the above-provided link. Download either 32 bit or 64 bit, that’s your choice.

Step 2:
After downloading Kali Linux the next step is the creation of a bootable USB. For that, we need Rufus – a utility that helps to create bootable USB flash drives. So download it from the above link and install it.
Step 3:
Let’s start making a bootable USB. First, connect your USB drive. As already said we need a minimum 4GB memory pen drive.
Now run Rufus and follow steps to create a bootable USB.
Step 4:
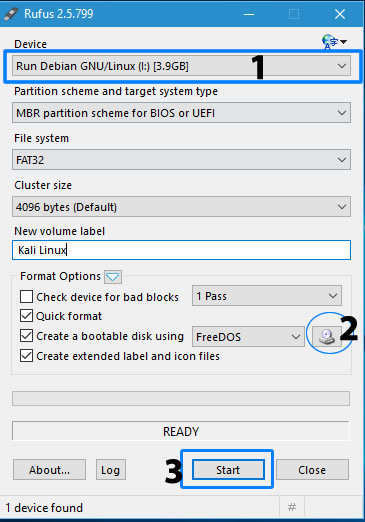
Now you get a screen like the below image.

Step 5:
First, check your USB drive is selected. Then click the small CD drive icon below (2) and locate the Kali Linux iso file that you downloaded from Kali official website. And finally, click “Start” and wait for the process to complete.
Step 6:
After process completion, click the close button to exit from the Rufus window and yes, here is your Kali Linux bootable USB drive.
Other than dual booting Kali Linux with Windows, you can also use this bootable USB to live boot Kali — means run Kali without installing it but with some limited features and functions.
Step 7:
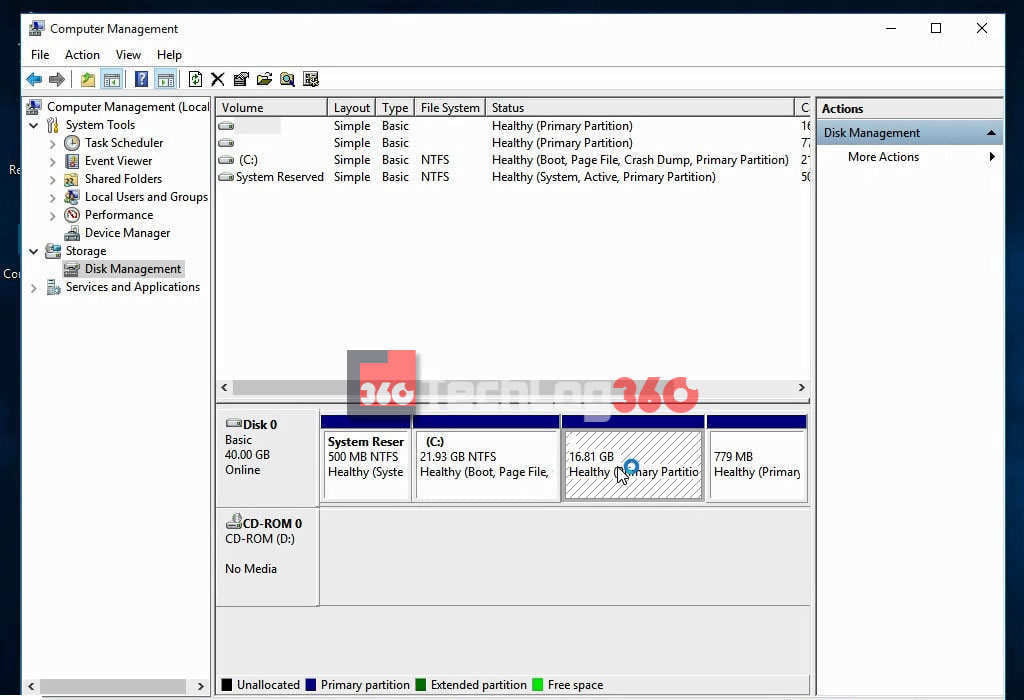
Next, we are going to create a separate partition for the Kali Linux installation. So open your Disk Management settings or Run “diskmgmt.msc” command in Windows.
Create a new partition of size about 15-20GB minimum by shrinking an existing volume. Here we created a new partition of size 17GB.

Step 8:
Initial processes are all done. Downloaded Kali Linux ISO, created a bootable USB drive and created a separate partition for Kali Linux installation.
Before going on keep in mind always Disable Secure Boot and Fast Boot option in BIOS.
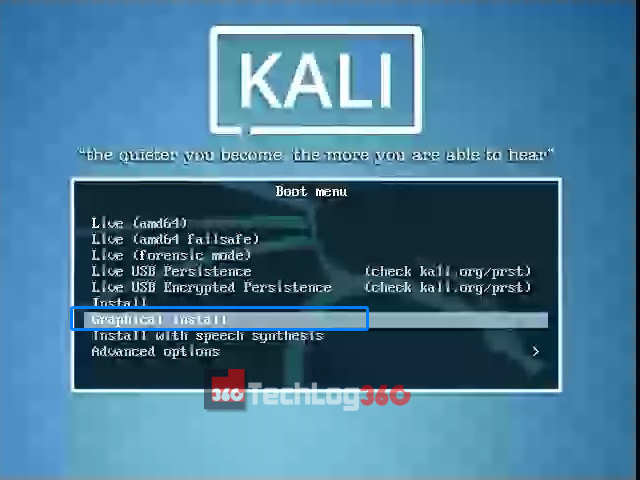
Now restart your PC/Laptop and go to boot manager and select the option boot as USB [Options will be different for different brands]. Now you will see the installation window of Kali Linux.
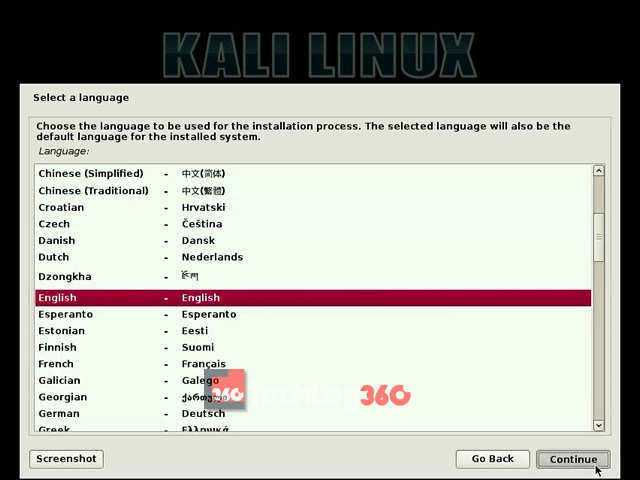
There are different options to install Kali Linux. Here you have to choose “Graphical Install” to start with ease.

Step 9:
Choose the language to be used for the installation process. And press “Continue”.
Step 10:
Choose your country and continue the installation process.

Step 11:
Next set type of keyboard layout. Here I choose “American English”.

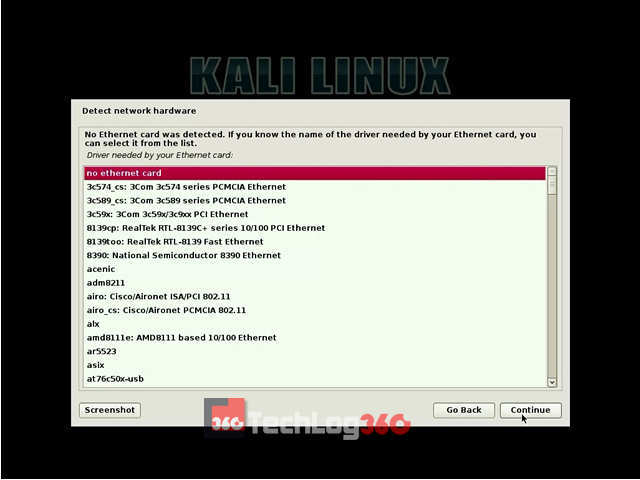
Step 12:
Next step set IP configurations. You can configure your network automatically or manually.
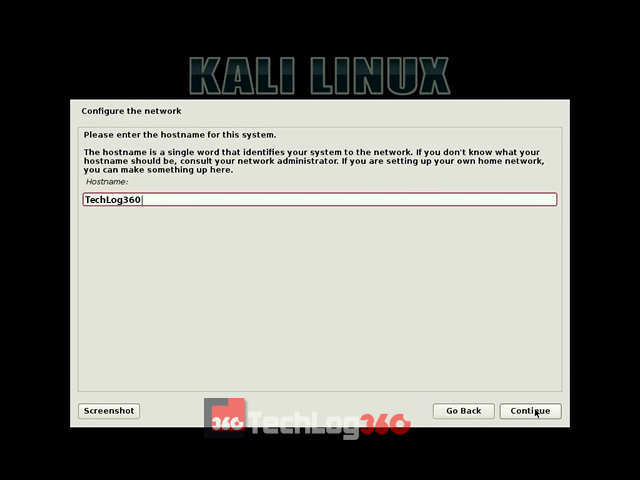
Step 13:
Now the installation will ask for a Hostname. Set any name you want. It’s kinda like a username.
Also Read: The best Linux distro for beginners
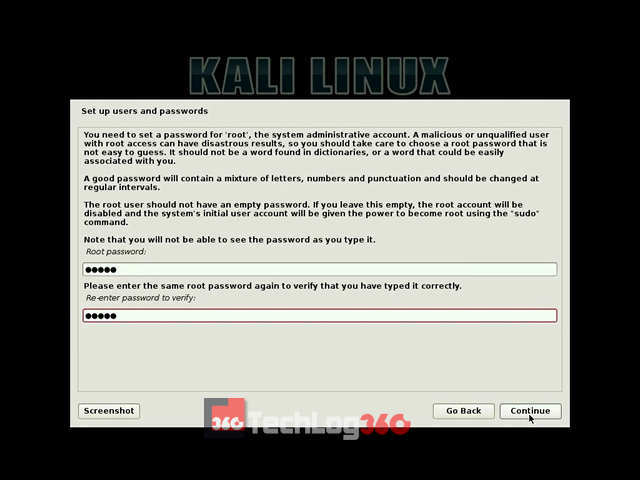
Step 14:
In this step, you have to enter a password for “root user “. After entering the administrative account password click “Continue”.
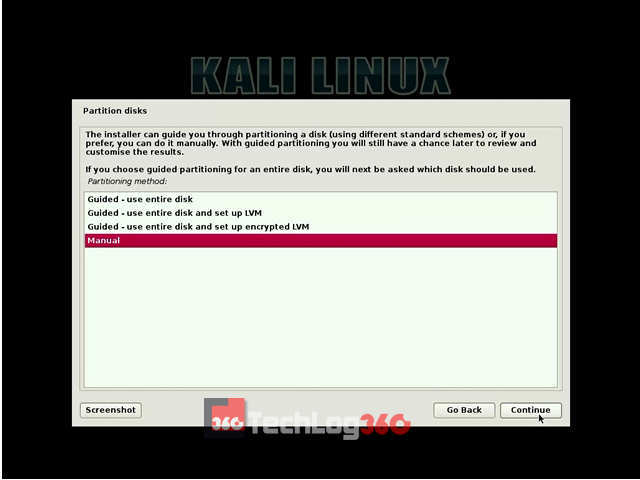
Step 15:
Next, choose the partitioning method as “Manual“.
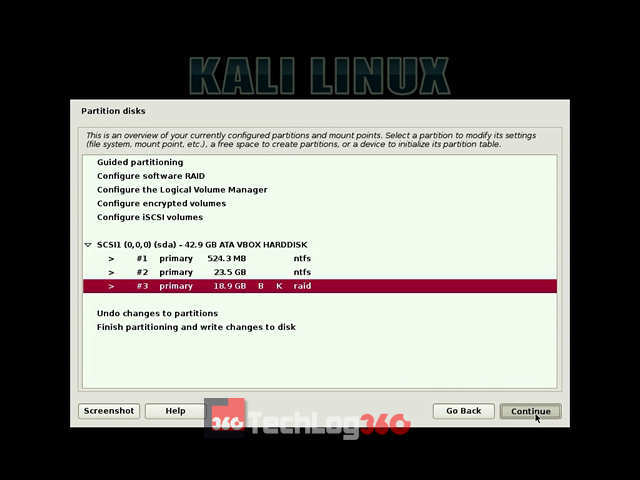
Step 16:
Carefully do this step. Only choose the partition that we created earlier for Kali installation and press “Continue”.
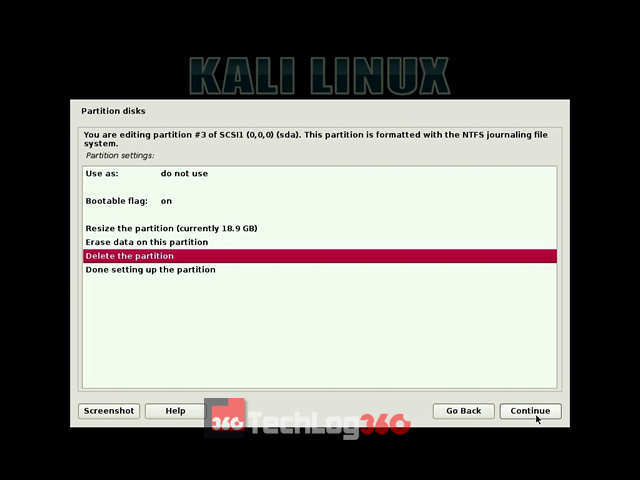
Step 17:
Then select the option “Delete the partition” and hit “Continue”.
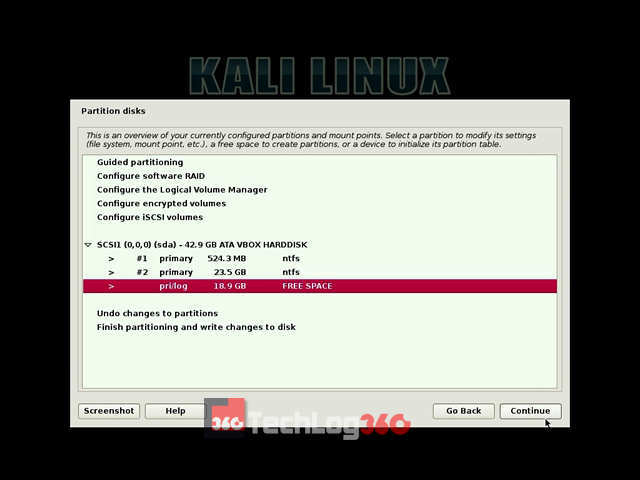
Step 18:
After the above step, now you can see that your Kali installation partition is now shown as “FREE SPACE“. Choose that free space partition and “Continue”.
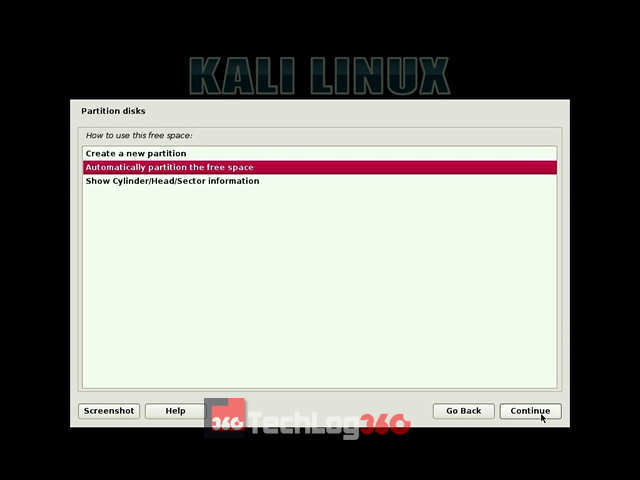
Step 19:
Now, it will ask us how to use those free space. Select the option “Automatically partition the free space” and “Continue” the process.
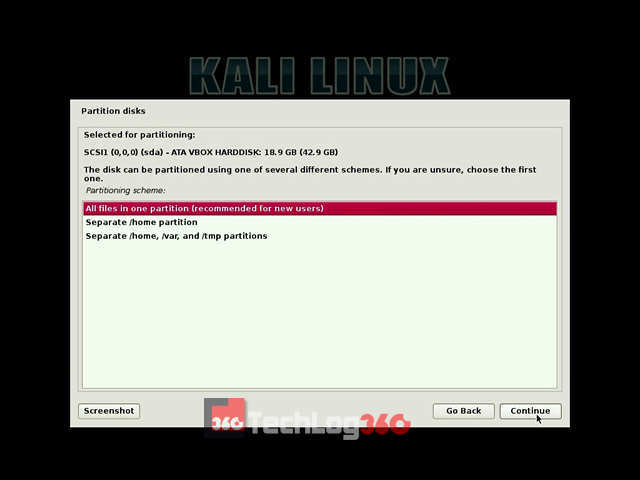
Step 20:
Next, choose the option “All files in one partition” that is recommended for new users and press “Continue”.
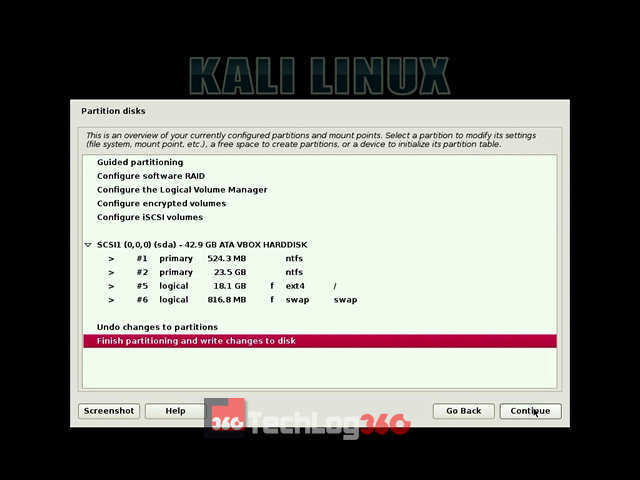
Step 21:
Finally, select the option “Finish partitioning and write changes to disk“.
Step 22:
Here, it will ask permission to write changes in the disk. Choose “Yes” and “Continue”.
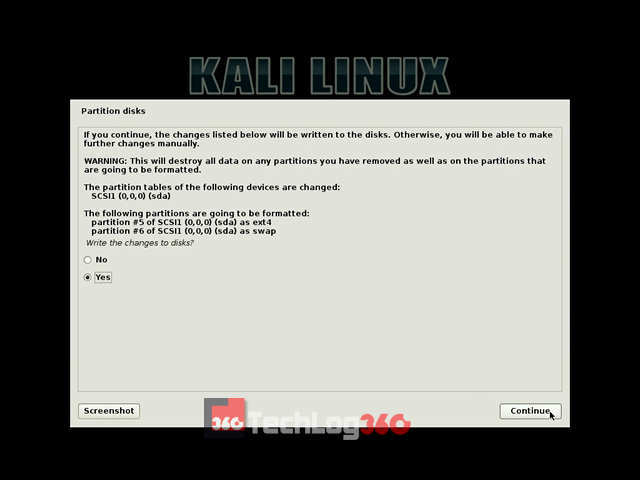
Now the Kali will start the installation process. Wait 10-15 minutes to complete the installation.
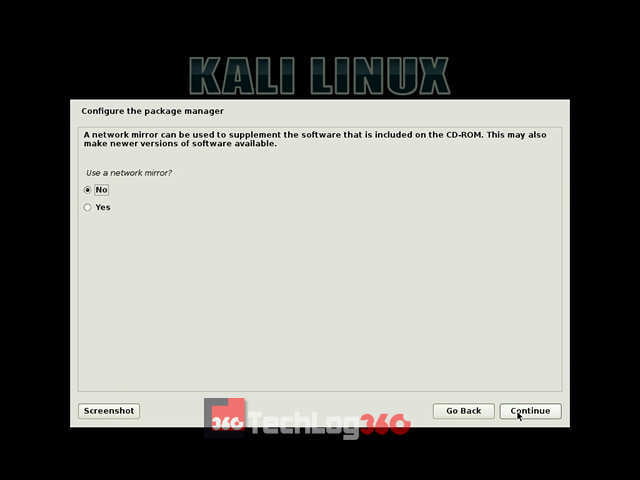
Step 23:
In the middle of the installation, it will ask for the network mirror, choose “Yes” or “No”. This setting is about an update option. So we recommended you to choose “No” now. You can later enable it.
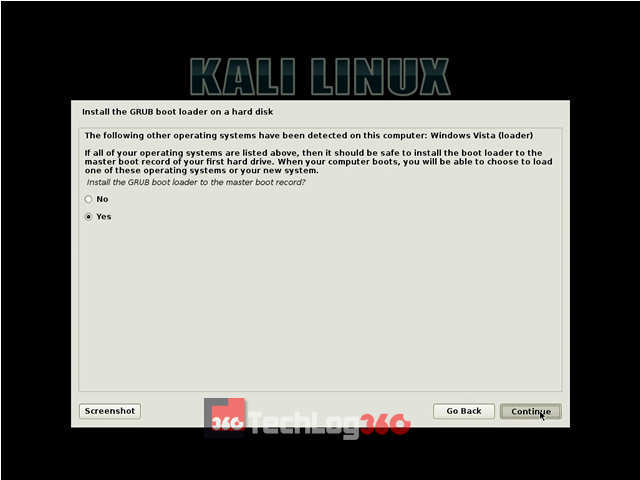
Step 24:
Next, it will ask for installing GRUB boot loader, choose “Yes” and “Continue”.
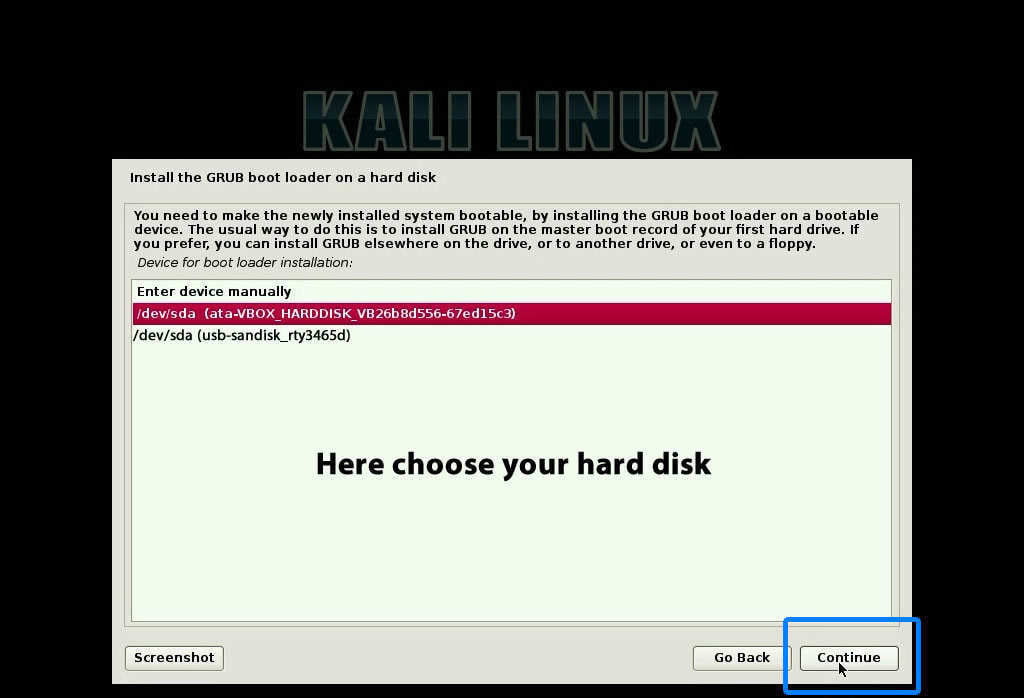
Step 25:
Next, it will ask where to install Kali GRUB boot loader. Choose your hard disk, second option. Remember only choose your hard disk to install GRUB. Otherwise, after the installation of Kali Linux, your system will not display the option to choose the operating systems on startup.

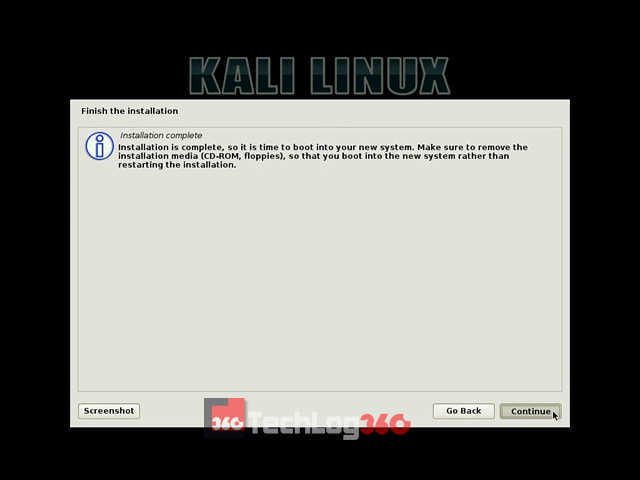
Step 26:
After the successful completion of the installation process, now you can see a screen similar to the below screenshot. Choose “Continue”.
Step 27:
Now eject USB drive and restart your system.
During startup you can see the GRUB Loader of Kali Linux. Here you can choose “Kali GNU/Linux” to boot your PC/Laptop with the new Kali Linux or else choose “Windows Recovery Environment” to boot into Windows 10.

Cool, here is your new hacking and penetration testing partner. Start to break stuff like a pro. Also, check out our full A-Z list of Kali Linux commands.

We hope you like the article regarding how to install Kali Linux v2021.1 with Windows 10. If you have any doubts or facing any problem during installation please contact us or comment below. We are here to help you.
And wait for some new Kali Linux tutorials 🙂
Also Read: How To Uninstall Linux Or Windows From Dual Boot System
Check out Video Tutorial ► Dual boot Kali Linux With Windows

[Solution] – Authentication Problem During Kali Linux Startup
Sometimes, even after the successful installation of Kali Linux, many users fail to login to Kali first time. The problem they are facing is authentication.
You may also experience the same problem, even after entering the correct Username & Password (one that provided during installation), you fail to login to Kali Linux. Don’t worry we have a solution for you.
When Kali Linux asks you to enter Username for the first time, do not enter the Username you given during installation. Instead, just type “root” in username field and then enter the password as “toor“. If that password didn’t works enter the one that you set during installation. Yes, this will solve your problem.
[Solution] – Missing GRUB in Kali Linux
Some of our readers are reporting a problem, that after installing Kali Linux they are unable to boot into Windows. This is because of missing GRUB loader. So to solve this problem you have to reinstall the GRUB menu so that it can detect Windows. To do so boot into Kali and open terminal and type following commands :
os-prober
update-grub
Solution Source: Kali Forums
[Solution] – After Installing Kali, PC Directly Boots to Windows
Many readers are reporting that even though after successfully installing Kali, every time PC boots automatically to Windows without showing GRUB. This is due to failed GRUB installation happens because of Bootable flag option is off. GRUB installs successfully only when this option is on. See step 17, you can find the bootable flag option is turned on there during installation.
So this is one of the possible solutions for that problem :
- First boot with your Kali USB
- Select the “Live” option to boot into Kali Live mode.
- Open Terminal window.
# fdisk -l          (First we have to find out the partition Kali is installed on (: /dev/sda1, /dev/sda2, etc) )
# mount /dev/sda1 /mnt           (Mount your kali partition)
# mount --bind /dev /mnt/dev          (You will need to mount the /dev directory into mnt)
# chroot /mnt           (change the root to the mounted partition to be able to run the command from the mounted partition)
# grub-install --recheck /dev/sda           (install grub in the HDD sda, not sda1, sda2, etc.., just sda.
- Now reboot the system, you will see your boot-menu showing Window and Kali Linux both simultaneously.
- Now, please issue these 2 commands, if they fail, do not worry, you will have to do it after reboot. This will make Windows show up in the grub menu. # os-prober (looks for partitions in the HDD and register them in the os-prober file. # update-grub (Takes some templates, including the os-prober file and writes them in the menu)
- That is all, once done, reboot. You should see the grub menu. If you do not see the Windows option in the menu, don’t worry, just enter Kali, open up a terminal and run the 2 commands I posted above.
- Reboot again, you should see the Kali and Windows option in GRUB menu
If this method didn’t work out for you then try the below mentioned on.
[Solution] – Adding Kali Linux to Windows Boot Manager using EasyBCD
As we told before, sometimes because of some reason Kali Linux won’t boot after installation and directly opens Windows. And most instance above mentioned method solves this Kali grub not showing on the Windows problem.
If you already tried the above solution and still not solved the problem, then probably this method will help you to add Kali Linux bootloader.
In this method, instead of installing GRUB bootloader we are adding Kali Linux boot entry to our Windows boot manager. To do this task, we are using the free edition of a simple tool called EasyBCD. So download and install EasyBCD Community Edition and do as follow :
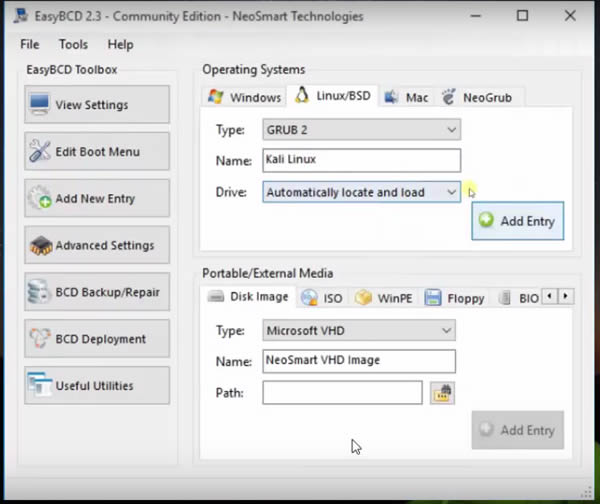
Open EasyBCD and go to the “Linux/BSD” tab and choose the option “Add New Entry“.
Next, you have to select the type of bootloader for your Linux distribution. Since we are using Kali Linux — choose GRUB2. And next, change the name of the operating system to Kali Linux. And finally set the drive option as “Automatically locate and load” and hit the “Add Entry” button.

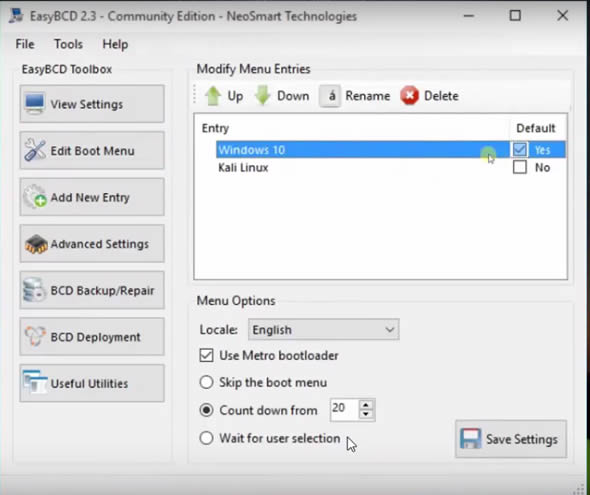
Now you have to set Windows 10 as the default OS so that your system will boot directly to Windows during startup. So go to the “Edit Boot Menu” option and tick Windows 10 or your Windows version and finally hit the “Save settings” button. And finally, restart your PC and boot into Kali.

Let us know the above-mentioned step resolved your issue. If not try this solution.
If you think Kali Linux is not that secure as you thought, then try any of these security and privacy-focused operating systems and also if you are a Linux beginner and feel Kali kinda heavy and difficult to maneuver then you should try with these selected Linux distributions for beginners.
If you have any doubts or facing any problem during installation please free to comment below!
HELP! I’m on windows 10 and it is not working for me at the boot bit. I navigate to the USB option but it fails everytime. any help?
Try to create bootable usb again….may be some error occurred in previous process
Ive done it several times but nothing is working. What if i downgrade to windows 8.1 and try again? Would i also be able to upgrade back to windows 10 without harming the linux partition?
The error message was:
Boot failure: a proper digital signature was not found.
One of the files on the selected boot device was rejected by the secure boot feature/
I think your Kali Setup is corrupted, because we successfully tested it in all version of windows.
What would you suggest for me to do? I wouldn’t mind downgrading my system
if necessary
Try to download kali linux again…
I did it SEVERAL times
Turn off secure boot option in your bios and then boot usb
Actually, changing my settings from the bios did the trick. I turned off the secure boot feature and changed the EUFI mode to something like SCLC (i can’t remember the actual name, but it was the only other option available). I GOT LINUX AND AM READY TO START MY CAREER AS A PEN TESTER
Congrats samad…..happy for you
Hi, This is the steps i took after re-imaging my computer about 10 times lol.
-Ensure you have secure boot OFF and Legacy boot ON, along with UEFI as your primary boot
– download the kali ISO to your windows 10 desktop.
– insert your USB, find it in the system folder and format it to NTFS (full format)
– Use Power ISO to convert your Kali ISO to a RAW IMAGE on your USB. Once complete set usb aside.
TRICKY PART
– Go to your system settings. Find DEVICE MANAGER.
– Click EVERY DROP DOWN MENU and go line by line to UPDATE DEVICE DRIVER (use the search online feature) Do this for every single item in your DEVICE MANAGER PAGE and do not restart until you have completed each one. (reason for this is, i had problems with my UEFI firmware reading my usb. So im not necessarily sure that this was the problem or if it was the format of my usb when it was FAT32)
– Once you have done that restart your computer and let windows load
– Now SHUT DOWN YOUR COMPUTER
– Insert your KALI USB
– Click on F12 to enter the boot menu. (you should see UEFI and LEGACY)
-Click on LEGACY USB and complete the KALI installation (NOTE: You should create a partion for Kali in WINDOWS through the Disk Management. Format it to NTFS but leave it empty so you can identify it during the kali installation. When you arrive to the partion screen in kali do a manual partion. Find the space your created then delete it. You should then see FREE SPACE and that were you will install Kali….AND BE SURE TO INSTALL THE GRUB BOOT LOADER TO YOUR HARD DRIVE NOT YOUR USB!!!!!!!!
-Once installation is complete you will be able to login into kali from the F!2 key
– Click on LEGACY HARD DRIVE and Kalii will load!!!!!
Can u give ur mail .. I still have problem
message to our facebook page
i get this error that saying grub boot loader cannot install why help.
Sometimes this happens when you try to install without internet connection.So try to manually installed grub-efi .If if you are using an EFI install then go to this step: Manual Install Of Grub-efi
Fantastic article ,had about given up till I found this site
So does this work with Win7 too?
Yes Neyo…..same method works on windows 7 too
Great articles, i follow it step by step, and there’s no problem about installing. But after finish. The group menu not show yet, and actually windows which show up.
Can tell what’s the problem???
I think you failed to install GRUB Menu..follow steps in this link to reinstall it. How To Repair Kali Linux Grub With Kali Linux Live Cd
hello!!
I have a problem, during The grub’s installation, he do not found any operating system , but i have installed in the pc Windows 8.1 . why this happens ??
if suppose i want to remove kali from my system. then how to proceed without damaging windows
Follow steps in this link
I did everything however, I don’t have the menu to choose Windows…only Kali
Not sure what I did wrong
Apparently windows 10 installed boot manager on second hard drive, so grub didn’t work as a boot manager on my first try (had to install it on second hard drive)
hi I have followed all these steps but I didn’t get grub loader my laptop is uefi based firmware how to modify and add boot option. give me some solution.
Akshay Go To This Link and follow the steps
yeah I also done even that mentioned link but it won’t works please say how to get grub loader in my uefi firmware
try again bro ..try to boot again into Kali, launch a terminal and type the following command: update-grub
Hello, I was installing Kali and it said no DHCP so i said not to configure it now, when i booted Kali up there was no wifi symbol and no connection (obviously) what can i do to fix this or do i need to install Kali again?
Try steps in this video ► https://youtu.be/Lp3snFy9Jbs
this is it.A to Z, Congrats.however on installing
grub boot loader,more information should be added
for newbies if it fails to detect current installed systems.
and the link to remove kali linux should also be ontop of the page.
I didn’t have any idea about Linux..it was the first time that i was trying to install a dual boot OS and this article helped me to install and also learn the process…tnx …
If you are new to Linux, try some other linux distro, like like Linux Mint, Ubuntu, Fedora, or openSUSE….
Hello guys.
I have 1 problem. I wanted to create bootable USB linux kali device. When i would have USB in my PC i could run linux by going in boot menu and select USB. So i downloaded linux kalix64.iso and wrote it with Win32 Disk Imager on 32GB USB. I restarted pc and i came in Bott menu. There i selected USB boot. I installed Linux from USB. After installing it i wanted to go back on Windows 10. I turned off PC and unpluged USB. Then i turned on pc and i got this message:
“error: no such device: d75a65fc-e4f5-4b25-9cb4-a82efc6bbb8f.
Entering rescue mode…
grub rescue> ”
Then i turned off my pc and turned it on with USB in it. So it took me to GNU GRUB there i could chose between Linux Kali and Windows 8 (loader) (na/dev/sda1). So now i cant go in any OS without USB in my PC.
Plz help me.
Thank you for answer and sorry for my bad English
David follow steps in this video…
https://youtu.be/i1QpN9IWSoc
Hello,
Thank you so much for the article, but after I did everything you said and finished the installation I still can’t see the grub boot installer when the pc restarts itself. Windows 10 boots up normally, I am sure I didn’t install grub to my pen drive. What do you think should be done ?
Thanks
How to create partition?? So confusing. There’s no Unallocated space in Disk 0…
First you clear up some space and create a new partition then start installation process
I followed every step but I couldn’t find my partitioned volume in the disk management (at the time of installing i.e, after network configuration) I parties 45gb space for this Kali Linux but when I am installing it shows only 3 primary volumes of about 365mb,890gb,104 GB each…..But my hard drive management is 256,45,201,245 each with dedicated extra memory for windows…. Evrythingis smooth but this allocated space not showing….Please help me to do this
How do I return to Windows 10 OS?
When I start my computer I get the error: “Operating System not found.”
Go to BIOS Setup and give First Boot priority to HDD and then restart ur laptop
I’ve done it same way but now windows 10 isn’t showing up in the boot menu
Dinko checkout our past comments…their we described or given some links…to guide you to repair grub
I don’t find my problem in the past comments
I can boot kali without problems and the boot menu is there with kalk and kali advance but no windows
Boot into Kali, launch a terminal and type the following command:
os-prober
update-grub
This will reinstall GRUB and detect Windows
I am Doing All the steps carefully But when Installation Finish. Then Grub boot loader is note Opening. It Direct me to Old Operating system . And One More Thing When I am installing Kali Linux It Saying Something ” Firmware Missing rlt8106e-2.fw” . Please Someone Help How Can I install Kali Linux with Windows 10.
Make sure that your BIOS can boot in legacy mode if your using a uefi BIOS.
–Missing Firmware Problem–
It is most likely in the firmware-realtek package.
Here is the detail
Is it listed if you do
dpkg –get-selections *firmware*
If not, you can apt-get install firmware-realtek
OK so i started BOOT MANAGER and booted with the USB but this message poped up
Invalid signature detected. Check secure boot policy in setup.
I have no clue as to what i have to so, all help is greatly appreciated 🙂
Adam go to bios setup and disable secure boot option and enable boot external hard drive
Ok so i went in security and disabled Secure Boot Control and cant find where to enable boot external hard drive
Okay…now try again to boot your usb
Do your bios have an option to change UEFI Mode to Legacy
Ok so ot all worked and now om stuck on partition disks, I didnt create a new one because there was one without a name or anything so I thought I would use that and it says its ntfs like my main hard drives and im worried so yeah
If it’s an unallocated partition you can use it…
OK sorry for the “spam”i guess but im back on windows and i went into the recovery mode and i got the password correct so i must be doing something wrong as i had repeated this many times to get the same result so i will explain what is happening, i turn my computer on and i launch kali linux then it introduces me with a login screen requesting username then password and i cant get past this stage i dont know what im meant to do
Try to login with default username and password.
Default username is: root and password is : toor
Problem solved i used root as username and the password i entered earier.
OK thank you for all your help, the problem was resolved, i used root for the username and the password i had entered earlier.
Happy to know you solved the problem
i have downloaded the kali-linux-2.0-amd 64.iso but when creating bootable usb,then selecting source image file.i get the following message.
The file format is invalid or unsupported
Which software are you using to create bootable usb…if poweriso is not working try a software named rufus
okey let me try rufus
And im fucked im so sorry, I deleted the volume for linux because I needed the space back and I was going to make a recovery drive but I was getting one from a friend and now my computer is stuck in grub rescue PLEASE HELP ;, (
Boot Windows setup disc or usb then go to repair windows option, their choose command prompt and type following command:
bootsect /nt60 SYS /mbr
And then exit cmd and restart your pc. Notify me if the above step solve your problem
I csnt boot windows cause its stuck in grub rescue
Adam checkout this thread
in that link i dont know how to
2. set boot order to disc at first priority
and i cant comment because i dont have 50 rep
Go to your BIOS and Under BOOT option you can set boot order
I dont know how to get the boot option to order them or add the usb to a boot option
I cant get the usb becsuse he formatted it and I csnt see him for a munth csuse im going to new Zealand
You have to get windows cd from somewhere
This worked great but i want to use the room, is there any way i can run Kali live on my usb? And its 32gb so is it possible to make it into 2 volumes one for Kali and one for everything else?
Hopes this tutorial may help you
Thats for making a separate volume for linux i still want to be able to use it as a USB on windows
James then use a graphical partition editor and simply make two FAT32 partitions in your usb and use the first one as your Windows-readable partition and then use the second partition to boot kali.
Graphical partition editor? Do i use one like GParted?
yes, you can use it too
So i make a USB into a bootable one, use a partition editor and make 2 FAT32 partitions, wipe the one i want for windows and boot Kali Linux installation and choose the 2nd partition (how do i tell them apart) then follow the rest of this websites tutorial?
When i use universal USB installer t chooses the partition 1 and i cant choose or dont know how to select the 2nd partition.
Okay then try to create bootable usb in recommended partition
I deleted the Kali Linux partition and when i boot it launches Grub rescue and i cant use a recovery usb because when i go to boot with it it isnt there, i dont know how to set boot order to the usb wither. And should i delete the boot options for kali linux etc?
Do you have a Window installation file… Then create a bootable usb of windows and use it instead of cd and then follow previous mentioned steps
Is the window installation file the recovery drive? And by creating a bootable usb do i use PowerISO and what previous steps?
Im so confused, so iv been directed to http://superuser.com/posts/277105/ but im still confused as i cant get to the repair screen, i cant or dont know how to use the repair thing on my usb. im so confused and annoyed as this has fucked over my pc and this is taking forever to fix, a solid and full answer would be amazing, and i am sorry for all my questions on this
my laptop is asus s200e with the specifications processor intel celeron 1,10 GHz with RAM 4GB ,, can put it dual boot windows 10 + kali linux ??
thank you,
I think you can…
I can not find wifi please help
I think your Wireless Card is not supported to Kali.
Try this command : $ iwconfig
and check your wireless interfaces
Please help me know, how i can boot both from the Windows boot loader instead of this grub boot loader
May be EasyBCD will help you to solve this problem
Please Help. Everything worked fine. In the option to choose windows and kali, my keyboard doesn’t respond. But once inside kali. Everything works fine. What to do? Without that I’m unable to boot into my windows partition.
The problem is related to some settings in your BIOS, find if their any option to set boot to “normal”. Or reset your default BIOS settings
I get the error saying cannot find win32-loader.ini when I try to install Kali Linux from Windows 7 pro 64 bit ..
I’ve the 32 bit version of Kali Linux..
Can you help me?
Try to create bootable usb again
I have dual booted my windows 10 with kali linux by these steps. It is installed perfactly. But when i try to connect wifi networks it shows “searching networks” and this process goes on for long and at last shows no network available though there are many wifi networks available.It shows wifi drivers properly in airmon-ng command.So what should I do to connect wifi networks available.
Which wireless card are you using
Checkout the last section of post, you failed to install GRUB
How can I get back to window 10???If possible,plz reply with screenshots.
You mean how to uninstall Kali?
I succesfully dual booted kali linux with win 10 but the problem is when i select windows 10 to boot,sometimes it brings a scratchy image of wat looks like kali background and doesnt load to windows.i hv to restart my pc severally until it clears.how do i solve this?
Nice article !! I am thinking to create a windows 10 – kali dual boot and to overide my ubuntu partition! I have some quenstions! First of all my bios is legancy and not UEFI should i change something? Finally i have about 200gb partition which has the ubuntu , can i just delete it and use the free space of this partition in the step of the manual installation?Should i care something else? Thanks!!
First delete your Ubuntu partition then you have to uninstall GRUB bootloader.After that you can start installing Windows 10 and Kali respectively
When i restart and select usb it said selected boot image did not authenticate press enter to continue
hello sir,
i followed your every step of installation and it goes well no issue while installing but after installing kali linux when system restarts there is nothing no GRUB just nothing it simplyrestarts on windows 10,the drive or partition i hv created for installation is empty … its like i did’t installed it
plzzz help me as soon as possible…
I think you installed it in your pendrive..
no pendrive not contains any file other than bootable media…….. plzz tell me what to do…..
and one other thing i want to know can i use my internal(host) wifi adapter in Vmware(virtually installed kali linux) i yes then how if not then what can do ?
I tried to install Kali after windows 10 yesterday and did all the steps as above, but after the guided partions step and done setting up the partition, (the swap partition failed to create) error occured and I didn’t know what to do, so I chose abort the installation and now I can’t boot into Windows as the (No operating system found) error is occuring. I didn’t format any partitions. Please help me recover my Windows without formatting it.
If you have the installation disc, boot from it.
Click ‘Repair your computer’
Then first try to fix the problem by clicking the option ” Startup Repair ”
If startup repair didn’t fix it,then try “command prompt”
At the command prompt, issue the following commands, pressing Enter after each one:
bootrec /fixmbr
bootrec /fixboot
bootrec /rebuildbcd
exit
Hello…..sir….
After installed Kali Linux in dual boot….in windows 10 the
How to open in windows 10
I didn’t get you, I think you failed to install GRUB,checkout the last section of the tutorial
Brother mouse is not working from the very start from the setup it is not working can you help i have kali 2016.1
You have to choose “Graphical Install” to enable mouse compatibilty in setup screen…if that didn’t solve the problem then create bootable usb again
I had this same issue, but don’t worry, just use the arrow keys and if you can’t see something sometimes you will have to just blindly type it like when you are confirming your passcode and I had to restart the process several times for that reason but the mouse will work once it is fully installed.
Comment:hi, in step 14 what is the root user password ??
You can enter anything as password
Hello,
Thank you so much for the article, but after I did everything you said and finished the installation I still can’t see the grub boot installer when the pc restarts itself. Windows 10 boots up normally, I am sure I didn’t install grub to my pen drive. What do you think should be done ?
Thanks
I wish I had seen this article before I started doing this dual-boot setup on my PC. My mistake was not making the space on my partition first through Windows Disk Manager. I created the partitions in Kali after I had successfully booted it from my usb drive using the gparted software. Now when ever I try to boot into windows from GRUB it says that windows needs to be recoverd. Unfortunately, my laptop doesn’t have a disc drive. Any help is greatly appreciated on this issue. I tried to install boot-repair with no avail. I also tried easybcd and it says there’s an error in the archives.
Please help!
hello sir,I have followed all the steps and succesfully installed kali linux but after restarting my computer got into wndows 10 as usual.Please suggest any method ASAP
Hey.. I am still not able too boot into windows after doing to what u said up there. Please help..
And one more thing.. if u can tell me that how to find out if windows is running along with kali linux.
Thank you
The problem is you forget to install GRUB loader…follow last step in tutorial to solve this problem
you are great bro thanx
hi I install kali linux dual boot with windows 10 at the end it asks user name and password i put the password and user name i created when the installation posses but it won’t open can any one help?
Try using username -root and password – toor
I successfully dual boot my kali and win10. but it seems my kali become more “admin like” compared to my windows 10. im experiencing 2 condition. my laptop wont turn off when i shutdown using win10 so i have to restart and boot to kali then shut down from there. another thing is my laptop volume when booting win10 seems to depend on the volume level in my kali. My kali’s default volume level for every restart is almost mute that’s why when booting win10, i always boot first to kali to adjust the volume then restart to use the win10. hoping for a solution. thanks to you.
Thats confusing…i will reply ASAP with a solution
Thank You! I spent a day looking for solution to windows not booting, then found your post, two lines of code, Face Palm!
First off I’d like to thank you for a great tutorial. Very in depth and loved the included picture. So on to my problem. Everything went smoothly so it’s nothing big aside from when I boot up my pc it just goes straight to Windows like it normally would? any help?
Checkout the last section of the post, updated with a solution
After installing it will ask password plz help
Try password as “root” or “toor”
Hello I have slightly a different problem here, I have installed kali linux but when I am boot it is not starting the grub loader. My laptop automatically starts windows 10 as if kali linux has not been installed.
Checkout the last section of the post, updated with a solution
I have followed all the steps and succesfully installed kali linux but after restarting my computer got into wndows 10 as usual and one of my hardisk is not showing in ‘device and drives’.please advise what to do.
Checkout the last section of the post, updated with a solution
Unable to boot into Kali 2.0 ….everytime windows10 comes … tried using Easybcd2.3 to edit but Linux/BSD entry is greyed out under add new entry tab … plz help
Checkout the last section of the post, updated with a solution
After installing kali-linux v-2.0 with window 10 sucessfully When select window 10 in grub loader blink screen coming and have to shut down the system
Did you install Kali in separate partition
can I use something else than a usb.
Yes use a cd/dvd
please, i followed you above instruction on how to partition your hard disk well, but when I’m installing the kali linux and i have choose the partition i want to write changes to, it keeps telling me installation failed that i should either abandon installation or skip the step, i know if i should skip the step, the linux won’t be installed in the computer. please can you help me with the solution to this error.
Go to BIOS and turn off secure boot and try again
@TechLog360 – Okay, I have Windows 10 pro. I followed directions to the “T” without fail and no problem. Rebooted machine and boots directly into Windows 10. Went into Bios and Secure Boot was already disabled. Went into the Boot Sequence and only 2 options was Windows 10 Loader and my Internal HDD . . . “Debian” or anything else was not listed.
Suggestions? When I go into the Disk Mng. within Windows, I can see my 15gigs partitioned and says Healthy Partition and that is what I chose to install too as per your instructions.
Did You Installed Kali in correct partition
I am pretty certain, but I have deleted and extended the HDD back to normal. I will re-shrink and start from fresh again.
Well – Just re-did everything again. Installed using the entire disk of the new partition. Still nothing. Went into BIOS, made sure Secure Boot was disabled/off and even looked at the Boot Sequence and still nothing. All it shows now is Windows 10 Loader or something.
Suggestions? ::round 2::
Did you enabled Legacy support option
after saving secure boot off will be able to dual boot
it is showing autentication failed
type username – root and password – toor or that you used during installation
Hi, so just a few questions.. Will the USB drive be usable again and if so how? and also will the kali linux only have 15-20 gb storage depending on what you chose? Because I have only done a couple things and it says “root” is almost out of storage. None of these are serious issues but I still want to ask. Thanks!
Yes you can use USB drive again..After installation just format it with default settings.
Okay so I installed kali and the first time everything worked, but now when I try to boot into kali it shows a full screen terminal and it has login and pass but I can’t really type (I can type the login but I have to press the same keys multiple times, and the password for some reason just won’t let me type) so I want to know how I can boot into GUI mode for kali instead of this terminal because rn I can’t even login.. Thanks -Simply
Edit: I have tried many solutions in the recovery mode terminal such as Startx, updating and upgrading gdm3, I tried the X command, the fsck command, and probably more, and now I looked at my disk management and it looks like the partition I created for kali had split into two parts one is 8.76 GB and one is 5.89 GB which almost adds up to 15 GB which is the size I made the Kali partition.. could that be the problem? Thanks!
Okay I uninstalled Kali because of the issue I was having above, but I can’t seem to be able to boot into kali (was trying to reinstall) and when I boot as USB, a black screen appears and doesn’t load kali. If you could help me it would be greatly appreciated. Thanks!
Make sure you turned off secure boot and enabled legacy support
Secure boot is off, where would legacy support be?
In Boot options you can find “Legacy Boot”,Enable it..
After this problem still exists, then create bootable USB drive again
If that option is in the UEFI firmware settings then I haven’t seen it.. in the boot section there are 2 options I haven’t used yet (don’t know what they really do) one is fast boot which is enabled, and one is Launch CSM which is disabled. I have already tried rewriting the Bootable USB several times and still a black screen.
Disable fast boot…and try…
Thanks for all the support it works now I think it may have been the fast boot but idk and somehow it un-wrote itself and once I re-wrote it again it worked.. I have no clue but now it works so thanks!
Unable to login
try username used during installation and password : toor
or try username : root
password: toor
When I boot my PC to USB for installation of Kali. It told me that it is not authenticate and reversed back …what to do??
Disable “secure boot” and enable “legacy support”
i have issue to detect and mount cd rom& also i insert and re-insert usb but
it say”there was a problem reAding data from removable media.plz make that the right media present.if you continue to have trouble,your removable media bad”
cannot read removable media,0r no drive found..
i also used refus , poweriso,uui .win32 image/
plz help
Try using different USB drive and also disable “secure boot” and enable “legacy support”
i have acer e1-431 &here secure boot option only in uefi mode.when i enable this mode ,it says”no bootable devise”even inserted usb.THANKS FOR REPLY. now i will try different usb.
again thank you..
No don’t enable secure boot, disable it
i have try 3 different pendrive,but problem is same.
what can i do ?????
&also tell me that when i select UEFI mode,why it says”no bootable device”.
Thanks this ia work on my pc 😉
Before reading this only I did all these steps but I haven’t selected the partition manually but selected 1st option I.e entire disk. And everything I did same.
Does it mean I formatted my entire PC?????
Plzzz help me. I have very important files in my PC.
Now my PC (I had windows 7 ultimate) is not loading and even Linux.
What to do if I had formatted my PC????
Can i recover it back???? Help me plzzz plzzz….-(-(-(
I think you formatted Windows partition..try to live boot Linux and check other partitions
hey i try to boot . I am using hp 8 gb pen drive but when i restart pc to boot with pendrive it said “hp pendrive blocked by security poicy” please give me an answer
I think secured boot option is enabled in your system.Disable it and enable Legacy boot
Hello, I successfully installed Kali 2.0 with Win10 but after reboot, it still boots to Windows and no GRUB. When I hit F12, only 1 entry – Windows Boot Manager, No Debian or Kali. I boot again in USB, selected the Live version (to launch a terminal and the command) but it can’t continue, it just shows the sad smiley inside the computer and the text, Something went wrong blah blah…Please contact the system admin.
Boot into Windows 10 and install EasyBCD and add new boot entry for kali with it
I have had the same issue. I tried that but BCD does’t un grey the linux part. Computer still says in EFI mode even though i changed it in the bios
which is your laptop brand?
i am dual booting kali linux with win 10 bot now i want to remove kali from boot entry how to do so
May this video will help you
https://youtu.be/e_Dvmv0ZJQU
Hello Techlogger.!Your post is awesome and i’m gonna try it on my PC.But one thing just curious to ask…Will official updates of windows 10 and kali lnux will be posssible after this Dual boot?
I’m Totally new to it and don’t know it will affect updates or not.!
Thank you!
I can not log in with the username and password I created, how can you help me ??? I have installed kali linux four times. Thanks
Use username:root
and password one that you created during installation
When i’m on the partition disk for the installation, the part I shrinked is “unusable”. What should I do?
How many primary partition do you have, four primary partitions – the maximum number possible, so free up one primary partition and install Kali Linux into it.
I have 4 primary partitions: 3 are NTFS and 1 FAT32.
Ce first NTFS is called SYSTEM 199 Mo, the second one (C:) 430,92 Go and the third RECOVERY (D:) 14,55 Go.
The FAT32 is called HP_TOOLS (F:) 103 Mo.
Which one shoul I delete?
Ps: I also have 20 Go non-allocated
Delete the HP_TOOLS partition, and also back it upto DVD/usb before deleting it.
And then shrink the Windows C drive, and use Windows partition to create free unallocated space for kali linux
Thanks a lot, it worked. I always have the problem of keyboard (I need to use a vitual keyboard to enter the password but no problem).
Sorry if I’ve done spelling mistakes, it’s not always easy to translate French to English
Happy to help you 🙂
Kali installation is successfull but….I can’t see my windows8.1 on booting…
check out last section of the article…Missing GRUB in Kali
I can’t see my windows
check out last section of the article…Missing GRUB in Kali
hey I have successfully setup Kali Linux along with windows 10. But I can’t go back to windows 10 . I can see grub loader. and there is windows and Kali linux but I can’t choose windows using arrow key showed by grub boot loader. please help me
Check repairing GRUB solves your problem
I reached last step of installation. But ‘partitions formatting ‘ taking too long nearly half an hour already. ( You said it will take 10- 15 Minutes).
What wrong with me ???
It depends on your system configuration
I can’t boot windows once I done this only Kali Linux and grub loader show but do not work, please help me asap
Repair the GRUB..see last part of the article
I did the steps above but it keeps having a problem on the installation part,i partitioned my hdd to 40gb,yet it cannot finish the install the system part
create bootable Kali USB again and try
I have succesfully setup kali linux. it’s work.
but Now when i shutdown my pc in windows 10 it dosen’t shutdown and show the windows 10 lock screen. i can’t shutdown my pc using power option.
So tell me how to solve it
I think turning off Fast Start up option will solve the problem
Thanks
but i have a new problem. When my pc start it shows error massage ‘unknown filesystem’. and open grub rescue mode.
i solve it and start the windows & linux. but it keeps having a problem on start up.
I format Linux drive partition and reinstall kali Linux and it fixed.
How to uninstall kali Linux on my pc?
Check out this article – How To Uninstall Linux Or Windows From Dual Boot System
“Your installation CD-ROM couldn’t be mounted. This probably means that the CD-ROM was not in the drive. If so you can insert it and try again. // this is the error I received after trying to boot from USB, how do I get pass this?
just unplug your USB and re-plug it, wait a few seconds, then click “Try again to mount the CD-ROM”
Well Done, We nailed it !! *HIGH FIVE*
Had a gr8 tym intalling kali using this article… Its solution to mostly any priblem that would occur… Except for one, that I didn’t configure the network during installation and postponed it… Now after I have intalled all can you help me configure it…. ??
Hey TechLog 360 great detailed article and super fast replies in your comments, superb, Ok i am going to follow your article and will install kali with windows 10,can you please tell me that what are steps that i should take in advance like in BIOS or grub that i dont face these above problems.And in the network config can we do it with wifi during the installation.I am newbie here thanks in advance.
Yes you can do network config with wifi
And in BIOS disable secure boot and enable legacy boot.And also disable fast boot.If you have any doubt you can chat with us during installation through our facebook page.
Thanks for the response, i will chat during the installation, plus when connecting with wifi we have to select the Ethernet card which one will i select there are so many mentioned in your screen shot, i have a reservation that will win 10 will work perfectly with kali on board, will grub allow us to select our OS every time on boot, and turning kali updates OFF will harm us how?
Usually Kali will automatically detect your network card and also GRUB will show every time during start up.So you can choose which OS you like to boot into through GRUB
While installing kali linux a window appears saying A installation setup failed ? what to do ??
I think because of corrupted installation files..create bootable usb again
Oky i finally installed kali-linux-2016.1-amd64 as your instructions and now a login screen appears asking for username and password and i cant access from what i entered while installing and upwards of the login command was written kali GNU/linux 2.0 kali tty1
just enter “root” as username and password that one you assigned during installation
Hi, Nice article.
My problem is that I’m stuck in the partitions formatting process .
I left my pc for several hours but it’s still in that ” creating ext 4 file system…” mode .
Do you have an idea ?
Thn try to change file system to ntfs after creating partition
In step 25, i selected the bootable USB drive instead of the hard drive. Windows boot loader does not show Debian. How do i make it detect it?
Why you choose usb drive …..GRUB has to be installed in hard drive
I realized that after the step. What’s the procedure to undo that and install it in hard drive?
Hello, im using Dell Inspiron and have Windows 10. I try these steps and stucked on point where i was about to install Kali. After restart the computer, then get to graphic installation etc. On partition disks step, it responded ” This machine’s firmware has started the installer in UEFI mode, but it look like there may be existing operating systems already installed using BIOS compatibility mode.
If you continue to install Debian in UEFI mode, it might be difficult to reboot the machine into any BIOS mode operating systems later.
If you wish to install in UEFI mode and don’t care about keeping the ability to boot one of existing systems, you have the option to force that here.
If you wish yo keep the option to boot an existing operating system, you should choose NOT to firce UEFI installation here.
Force UEFI Installation ?
No or Yes.
Help please
Tks
Go with “NO” because you have to install Kali in Legacy BIOS mode….also disable Secure Boot in your BIOS settings
ok thanks for your reply.Appreciate it.
Kali linux rans succesfully.
One more question please, how do i switch to my windows 10? i mean how to switch between them?
We choose kali or windows from GRUB2 loader (see the pic in step 27).I think your GRUB installation is failed.So checkout [Solution] – Missing GRUB in Kali Linux in the tutorial section to reinstall GRUB and resolve that problem.
Hi, infinitely thank you for all the help you gave me.
Your site is very informative!
Have a good day
Hello, my Kali Linux setup got stucked when installing GRUB loader, so I abort the installation.
But now I can’t run Windows.
When I try to install new window but it shows that they can not find disk driver.
Please help.
Thanks
Just insert your windows installation media and Choose “Repair Your Computer” go to “Troubleshoot” and then enter into Command Prompt. Enter the following command:
bootrec.exe /fixmbr
and then restart
Thanks
hey my problem is when i installed kali linux on my computer i booted it on my usb and somehow windows10 did too now i cant run my computer without my usb help me please !
Sorry i didn’t clearly understand your problem…
I think you successfully installed Kali with Windows but your pc is automatically booting to Kali without showing GRUB loader…Then please reinstall GRUB – [Check section Missing Kali GRUB in tutorial]
My problem is this step it says an installation step failed you can try to run the failing item again from the menu or skip it and choose something else the failing step is install the system
Which step failed….give a screenshot…..
And start again installation process
Missing GRUB in Kali Linux
i tryed almost everything to get back windows to my grub boot menu and nothing any efficase solution? help,me
I using USB installer but it shows detected CD rom how to fix it
Are you sure you created bootable usb correctly …. create it again and then try
I successfully installed kali linux in my laptop. lot of thanks.
Sir, I have installed kali Linux but I’m unable to boot up my computer.when I start my desktop screen is show me blank display with _ and cpu does not process
Plz help me
Insert Windows installation media and go to system repairs and select command prompt and run command “bootrec.exe /fixmbr” and then reinstall Kali
How to insert windows installation media
I mean if you have a Windows iso file then boot it and repair MBR
Hey, I already off the secure boot and “on” the legacy boot. And already make a partition, and made my usb bootable to kali using rufus several times. But when I try to boot it by US. i don’t see the installation for kali. It just turns into black screen and saying at the bottom left “press ESC to go to Start up Menu” but I didn’t press esc. It just boot to my windows 10 start up screen. Any suggestions?
hit “esc” and choose boot device
When i Write the file in iso mode, it says all data will be destroyed
there’s nothing on the drive to tart with
Don’t know what the problem is..use a different flash drive
Sir Kali Linux is installed in my pc how to I install win10 ??
Plz help me
The process is complicated….better you install Windows first
OK so i read through all the comments in this post and i don’t believe my question has been asked…I have an Asus K55n laptop with both an SSD (loaded with Windows10) and an HDD (loaded with Kali Linux). I installed kali after first removing the SSD in order to ensure there were no problems. After installing it, i put the SSD back in and did the whole update-grub thing and this is my problem……upon boot, i do have the choice to select Kali/Windows 10 but when i choose Windows 10 i get an error message……the only way around this I’ve found is that I boot into Kali, do a shutdown,then upon starting back up, mashing the delete key to get to bios upon which my boot order only shows the SSD (Windows10) so i save and restarted and that’s when I choose Windows again and THIS time it actually loads Windows. I’ve tried updating Grub but this problem keeps repeating and I’m unsure how to get Windows10 to load when I select it the first time in GRUB…..does this make sense? it’s a really odd problem that I’d love to get an answer to
I didn’t try this method….Please wait I will notify you soon
Sir, kali linux is already installed in my pc,how to I install win10
thats little complicated…..
Hi. I have a windows 10 and successfully installed kali but when i start my computer i dont see grub menu it just boots into windows 10 I think its booting in UEFI mode i tried to change boot mode on bios its already set to Legacy any advice?
Checkout [Solution] – After Installing Kali, PC Directly Boots to Windows at the end of the article
I did all the steps more times, but it won’t work with my HP laptop. I tried the solution on the end of the article, but kali say “device node not found” and the boot never shows up. Can you help me? I have tried EasyBCD but it says that my pc is in EFI mode. Legacy support is enabled and fast boot is disabled. Help me if you can. Thanks
Try this – https://www.youtube.com/watch?v=UQ-EaZcjQtA
thanks so much..worked 100% for me.
i selected the partition and then selected deleted the partition and it became free space and then i hit continue.
then i selected automatically partition the free space and hit continue. and selected the first option recommended for new users and pressed continue. then i hit finish partitioning and write changes to disk and then hit yes and continue.
it fives error it says “Failed to determine the codename for the release.
then i selected another partition did the same and again i got same error
then i restarted my and removed my pen drive. windows 10 was loaded. i went to mycomputer i did not find two partition their.
Before i had local disk F,G,H,C but now there is only F and C i am not finding local disk H and G
please kindly help me to regain both my local disk H and G and guide me through the installation of kali
please help me……………………………………….
Just go to “Disk mangement tools” ..you can find them there…
Reformat them as NTFS file system….create bootable usb again…and try….
how to reformat them .i right click on them the format option is dull that is its unavailable. please kindly provide me step by step guidelines . and one more issue one more primary partition is created its of size 7.20gb please help me in combing it with the original partition. please help me
Message to our facebook page
Running Kali would be so much easier, but mostly peoples goes with the Ubuntu distribution due to it’s GUI. Ubuntu distribution has a much better GUI (Graphical User Interface) then Kali and easy to use. Where-ever Kali is little bit difficult for users who recently migrate into Linux from window OS.
so according to my personal experience firstly window users use ubuntu then migrate to kali…..
Kali is not for general Linux users. It’s specifically for hacking and penetration testing.
I have been able to install kali 2.0 on alongside my windows 10 using the steps above.
But now i can’t access my drives on the windows when am using the Kali.
Please i need your help.
Just disable “Fast Startup” option to solve this problem….
I did everything however, I don’t have the menu to choose Windows…only Kali OS appears. Please i need help
thats because you forget to install GRUB ..check out last section of tutorial – Missing GRUB
i have a problem with my kali linux it shows error during installation imediatly after partition
Recreate bootable usb and try again
I am getting an error called
There was a problem reading datafrom cd rom what to do
I think problem is with bootable USB, try to create it again
can u plesa sent me a kali linux software
Why ….you can easily download it from official website
how to fix detect network hardware while
install kali linux2.0 ??
How do I exit the boot menu ???
Kali Loader is not decting the partition initially done on windows 10.
What could be the solution to this.
Try this ► kali doesn’t read partitions
I’m beginner in linux but after trying to follow your post I can’t complete my installation. My problem is that Grub is not showing after installation. So I tried to turn on the option of “bootable flag ” but the software doesn’t even let me do it. Later the option of choosing where to install grub doesnt appear…
Also I tried to install grub by booting live kali but after following the steps a message appears saying: error can’t find EFI file.
I don’t know what to do now…
I think you choose “No” when kali asked to install GRUB loader. So to reinstall GRUB menu so that it can detect Windows – boot into Kali and open terminal and type following commands :
os-prober
update-grub
well thank you in advance for the fast answer! I tried to do what you said and:
root@kali:~# os-prober
bash: os-prober: command not found
Thats what I got 🙁
By the way, I couldn’t even choose yes or no to install grub, this step didn’t appear to me
Then try to install again
I think I found the problem. My laptop boots in EFI mode so that I can’t install linux by dual boot
You sure you disabled secure boot and also there is an option to boot your pen drive in non-UEFI mode
Yeah, Im sure is disactivated . Could you tell me more about that option, please?
Check our article 5 things to do before dual booting Linux with Windows
Hi again, I got a question. If I change boot start options from mode UEfi to Legacy. And I install Kali linux. Will I lose my windows 10 in the UEFI mode?
I’m asking that because im thinking on :
-Having w10 in UEfi mode
-Having kali linux in legacy mode.
This way, instead of using a grub menu, I will only have to start as legacy or Uefi in order to choose between OS.
No.all your Windows file will be safe. Just use a separate partition to install Kali
sir please help me as everything went fine and at last wifi option in kali linux doesnt switch on and when i try to switch it on it gets switched off automatically
Hi
I installed Kali Linux . Now when I boot the system it shows both Kali Linux and windows but when selecting windows it says windows failed to start
And
File: \boot\BCD
Status:0×c000000e
Info: the boot configuration data for your PC is missing or contain errors.
Help me what should I do
I’m using Lenovo g5080 laptop with windows 10 pre installed so I didn’t have a disc
I think your windows got corrupted. First uninstall kali and then boot your system with Windows media via USB,
Then run command prompt and enter following commands :
bootrec /fixmbr
bootrec /fixboot
After that again try to install Kali
Hi Sabarinath, I have followed all of your steps to install dual boot Kali Linux alongside with Windows 10. But, I got a problem with my boot loader. My windows 10 does not appear in boot. I have mounted and updated the grub as you guide in here: https://www.youtube.com/watch?v=UQ-EaZcjQtA
[IMG]http://i68.tinypic.com/1441xyq.jpg[/IMG]
After success in updating grub and reboot my PC, my windows 10 still does not appear. I was wondering why my boot device located in /dev/nvme rather than /dev/sda.
Please help me, any thought greatly appreciated.
Please help me…I found different kind of error…windows os load properly but when I try to login to Kali Linux from dual boot menu
end kernel panic not syncing attempted to kill in it exit
I found this kind of problem ..
When I try to login to to recovery mode
I GOT END CALL TRACE what can I do please help me please we. …
Everything worked well but if i open “Disk Manager” in windows, kali linux will not start, plz help
I’ve do that steps on this website, but when the steps at installed GRUB it can’t detect my Windows 10, so i hit yes but my laptop separate into two : kali linux on legacy and windows at uefi bios. So how can I fix that?
Hi
Good Post
Keep IT UP GOOD WORK…
I installed Kali Linux successfully but I’m not getting Kali Linux on my boot loader
Actually very very valuable informations!
Thankyou!
Now I start kali successfully!
I installed kali linux 2016.2 64bit on my dell 5378.
I got an error “grub failed to install in /target/” and i have tried installing grub using live cd, but when i type in the command “grub-install’ it says command not found.
HELP..!!
Sir..i successfully did all the procedure….but my installatiom process is lagging in last….where the grub bootloader has to get installed..
It ia taking very much time…almost one night and then also..its not conpleted…..
Help me with thay……please….as soon as possible
I think in the middle of the process your installation media may disconnected..try to install again
do you know where i could find a guide on how to do this same thing without having windows installed already.
Its same as dual boot …. here is the official guide to install Kali Linux on hard disk.
I am installing Kali Linux on my Windows 10 PC according to your instructions.The installation has been going well and it has been installed on the system. It is now installing GRUB, and my problem is with the GRUB installation. It has been stuck in the same position for a good 30 minutes now with the command ‘running “update-grub”‘. I don’t know if I am just being impatient or not but I would appreciate your thoughts.
I think your installation media may be unmounted….restart the installation again
HI,
I have successfully installed KALI and am using my PC as a dual boot ,other one is WIN 10
and the problem is that everything was pretty normal and smooth but from last two days am not able to get the boot screen of Linux (for choosing OS) i think i have to change some of my boot setting , could you please help me out with that UEFI and legacy boot set up issues.
thank you
So now you are directly booting to Windows 10, isn’t it?
Then again run kali linux live cd/usb and follow our missing GRUB solution mentioned at the end of the article.
Can i shrink my local disk D or E for installation ??? i don’t have enough space on C disk.
yes of course
I followed your all steps..
Everything is fine…
Thank you..
But when kali is selected for startup there are many errors shown. But no harm in proceeding. Why they appear? What is the solution for them??
What type of error..kindly provide a screenshot
i will send a photo to your email admin@techlog360.com
I have disabled all the quick startup, and fast start options. I have a live version of Kali on usb which I can run no problem. To install Kali onto my new disc partition though I get a graphics error once I select Graphic install. I try and change boot from uefi to cmd and I get error failure to load com32. Please help I have been trying for two days.
create bootable USB again, I think some error has occurred during the bootable USB creation process.
Yeah that is exactly what needed to happen after not wanting to admit it. Lol thanks works great!
Hi I have already been trying this but it says Installation failed : Step: Install the system.
Any idea guys? Help
I think, there is some error happened while creating boot USB so run Rufus tool again
Where do I download Kali Linux
On my PC or USB to install
Download Kali Linux on Pc then install Rufus tool to create boot device
What if we don’t install kali linux’s grub boot loader?
And how to choose Kali linux in windows like view not in kali linux bott loader?
It’s possible by using EasyBCD
HI TechLog360, not so long ago i tried dualbooting my HP Elitebook 2560p Windows 10, but after succesfully installing kali in the second partition i made, i could no longer enter windows. Kali worked fine, experienced no problems apart from being unable to install kali applications or update. My main concern is that each time i would try entering windows, it would tell me something about the drive being corrupted. I tried several ways, until i had to remove kali, and install my windows backup.and before i could do that it would bring an error about my drive being basic disk yet windows requires dynamic,so i would have to remove all the partitions and start afresh. Kindly help me please. I would like to dual boot windows 10 alongside kali linux on HP Elitebook 2560p.
Just install by following the tutorial.If you face any problem, please contact as via our Facebook page.
I Followed your tutorial, it still brought the same error when trying to boot into windows. That the Drive is corrupted. Yet kali works just fine. Kindly help me.
I want to dual boot it with Windows 10 on HP Elitebook 2560p.
It will be really helpful if you send me a screenshot of error
I tried dual booting kali Linux 2017.2 with Windows 8.1. I did everything correct expect when I get greeted by the Kali boot menu I don’t have the “Graphical install” option. How can I proceed with the dual boot?
Do wizard provide “Install” option instead of graphical install…then you can install kali by choosing that option.
hii.. i have a problem while installing kali linux 2017.3 version. after selecting country and language the window will appear with an error i.e.,
“your installation CD-ROM couldn’t be mounted. this probably means that the CD-ROM was not in the drive. if so you can insert it and try again.”
please please give me solution of this error.
Just eject and plug-in again your usb drive continue the installation
Hello! Kali linux do not loading – this is a lot of errors “pcie bus error severity corrected type physical layer id 00e5 receiver id”. What should i do?
Please reply again with screenshot image link
how to turn ON bootable flag.
Its not changing even when i click it.
Please help me!!!
I think you can ignore that and continue with installation. Try that and notify me.
Grub menu is not showing, I’m using Kali 2017.3
I can only get into Windows. Your repair guide did nothing, the link you provided is for Ubuntu. Please help.
Checkout last part of the article, added one more solution to solve Kali missing GRUB with EasyBCD
Iam getting as
error : unknown file system.
Entering rescue mode…
grub rescue>
Hi…ah I have a little problem after i installed kali linux 2017.3 with my win10,i used your solution for directly boots to Windows but i don’t sure if i installed successfully, the terminal showed “grub-install: error: /usr/lib/grub/i386-pc/modinfo.sh doesn’t exist. Please specify –target or –directory”
I tried several times and got same result.
Please tell me how to do this.
Hey , ,In my boot menu there’s two usb
1. UEFI USB SanDisk
2. Usb SanDisk
, first i tried withthe 1st option everything is fine but except GRUB loader , then after i tried your commands but nothing works.
Now i tried to install it again but this time i choose 2nd option the difference is the 1st One that is Uefi usb having good interface .
But here everything gets successfully done even thr GRUB bootloader but after restarting laptop , sane problem occurred – Directly loaded to windows .
Then Again i tried same commands, nothing works ,
Please Help me
Try to understand my English
Please help
Thank you
Check out the last section of the article, we used tool called EasyBCD to add Kali Linux boot entry Windows MBR. Try that one.
When i open Easy BCD , It says , EFI bootloader Detected ….. eqsy bcd has detected that Your machine is currently booting in EFI mode. …….. and when i click on add new entry , It does not allow me to add Linux/BSD ( all of the section is BLURY)
As we already told in our article, that you have to disable secure boot option before installation process. That’s why you are getting similar errors. Just Enable legacy mode and disable secure boot.
when i installing it it format my harddisk and remove the windows as well as and it also didn’t get installed
I think you choose the wrong partition to install, otherwise, Windows remains intact.
Hello, at your video, exactly at 3.25 i see the boot/startup menu, how to go that? Sorry i doesn’t have a good english
That’s start up boot menu and can be activated by pressing f2/f12 or esc button during start up. Buttons varies as per manufactures.
Bro, im sorry, ithink i must use easybcd, but they give message “your conputer in EFI mode” i can’t understand can u help me? Plz reply me ASAP
Go to your BIOS and turn off Secure Boot and enable Legacy Boot
I installed Kali, but grub loader part failed. i got to part grub-install –recheck /dev/sda, but it says bash : command grub-install not found, please help..
Check last section of the tutorial and add Kali Linux to Windows MBR using EasyBCD
I am not able to use WiFi in kali whereas in Windows it is working fine. There is a logo in the corner but it is not able to find any networks to connect to. Please help.
Would I still have all my files in my hard drive withouts losing them
of course
It does not show up the partition I’ve created before like it did on 5:46s in the video.
And do I need to make it unallocated partition?
Try that
in the end of this…my files will be lost in the other disks like ( e: d: ….) ??
and thank you.
sorry i didn’t see above …i know the answer now 😀 thankx
thanks alot for your explanation, what i’m facing is that in boot menu either windows 7 or kali linux dont work i dont know why?
that’s odd, what error is it showing?
I have been installed kali linux for dual booth. But after installation, i can’t go back to my previous boot loader (windows 10).
so, now your PC is directly boots to Kali?
Is that the problem,
open up terminal and type:
sudo update-grub
Enter your root password and complete the process and reboot.
Kali installs fine but everytime i reboot it only load windows 10 i have tried everything mentioned above but nothing work neither the terminal command nor easyBCD as in easybcd the option to add entry is not highlighted plz tell me i have tried downloading image again using rufus ,win 32 nothing works
You sure you disabled secure boot option prior to install
Yup i did it all just i came across a video according to which i have to go to bios setting select UEFI file as trusted then HDDO then EFI then kali then grubx64.efi and reboot and this worked for me. Thank u for yur help
installation gets completed i get the grub screen and i select linux gnu i get psmouse symantec unable to query device 1 and system get turnoff.installation is perfect what should i do what is going on
I think the problem is with touch pad or mouse, I will soon reply with a solution
sir i am eagerly waiting for your reply
In which mode (uefi or legacy) I shoud install windows and linux in dual boot
In legacy mode and make sure you turned off secure boot
Sir what should be the configuration of computer to install dual boot operating system
-I tried to install kali linux 2018.1 alongside windows 10
-I had 33 GB unallocated space in my hard dirive
-I assined 2 GB for BOOT, 13 GB for root(/), 15 GB for home and 3 GB for swap
-I installed Kali with bootable flash drive sucsessfully.
-but the notable point during installation was the steps 24 and 25 of installation process were not shown.
-after installing and reboting, system starts with windows 10.
-I installed EasyBCD 2.3 to add my kali linux in my boot loader.
-but when I run the program I get this error:
“EFI Bootloader Detected!
EasyBCD has detected that your machine is currently booting in EFI mode. Due to limitations set by Microsoft, many of EasyBCD’s multi-booting features cannot be used in EFI mode and have been disabled.
Press ‘OK’ to continue or ‘Help’ to read more about these limitations and possible workarounds.”
-My goal is to have metro boot loader at startup instead of GRUB.
-I look forward to hearing your directions in this regard.
are you sure you turned off secure boot and fast boot option in Windows
Hey ! Please reply this fast
I installed kali linux with windows 7 it was successfully installed but one problem that windows 7 is not showing on Grub menu.Also i tried various methods but it did not got fixed.
So i decided to boot into Windows using BIOS but their also under UEFI section no hardware was shown in boot priority list.
SO, I decided to remove kali linux but how to remove it without getting into window?Also I want my laptop back into its older condition. Plase reply fast .
I have tried os-prober and etc commands like this in terminal.
Follow this tutorial to uninstall Kali Linux from a dual boot environment https://techlog360.com/uninstall-linux-windows-dual-boot-system/
why to use usb. and after installing linux in pc is that usb is require to open kali linux os..
no, after successful installation of os you can remove the USB
During kali linux installation it does not detect the partition i made (100 gb).Only my 2 TB har disk
check FileSystem of partiton
dude actually my mouse was not working during the time of installation.
actually i couldnt see what userid and password i gave
now the os is asking for user id and password
i tried everything possible
it is not accepting please help
try this:
username – root
password – toor
I am not able to use my touch pad after installing kali os any solution ???
missing touchpad drivers
If missing touch pad driver how to install it… Any solution to work back touchpad in my kali linux
HI, I just reinstall my windows 10 and download Kali Linux 2018.2 when I am going to install there is kernel panic issue, please advice, thanks
Error http //prntscr dot com/jqg0ts
That’s weird.
First, try to create bootable USB again, I think its a boot error.
If the error still exists after that, download Kali Linux 32 bit and try that.
Hello, I have download and trying to install with 32bit Kali Linux.. But when copying files (installations process) the installation failed I was partition with 40gb free space, will you advice what is wrong and is there a solution for installation failed issues. Thanks
Now what error is showing during the process
I can’t find GUI when I want to boot , I see live,installer, advanced option…etc , but there’s no Graphical user interface! !
then go with installer option
I tried to install Kali Linux , but during installation it shows fails to mount from CD-ROM. What to do next? Pls help me.
I tried exit shell too Bt it wouldn’t work. Help me.
just unplug your USB and re-plug it, wait a few seconds, then click “Try again to mount the CD-ROM”
@Arijeet bro Make your usb bootable using Latest version of Rufus, and while making it bootable use DD option to write the iso file on the usb drive . It should fix the issue
YAY! It helped. I’ve tried almost everything but nothing works. Thank you so much bro! Be force with you 🙂
Please help me out am stock in kali Linux and I have everything in windows. But kali worked fine
Try out solution (Missing GRUB in Kali Linux) on the last section of the article.
If that didn’t work put uninstall kali and try intallation again.
Uninstall Kali by referring this article – https://techlog360.com/uninstall-linux-windows-dual-boot-system/ – so that you could regain access to your Windows OS.
The article is only applicable when you are able to log in to windows
Check the solution carefully, it clearly says when you can’t find Windows boot option in Kali GRUB. Then you have to boot to kali and open terminal and enter the commands mentioned on it.
can i use bootable memory card for this installtion
SD Card has low read/write speed for booting operating system. So I recommend USB flash drive.
can i use another software for making bootable memory card or pen drive . Can you info me which software i use for making bootable memory card and message or call me on this number 9571858877 between 2 pm to 6 pm i am live in india or message me on email
Try UNetbootin or PowerISO……they also works well
I have hp CPU but,I don`t know to turn of secure boot and fast boot please reply me fast
I think you have to tap f10 key on start up to enter BIOS settings in hp. If it didn’t workout, try esc or f2 or f12.
I know that key to enter bios setting and i also change boot option but in bios where is secure boot and fast boot option locate i don`t know where is location of this can you tell me the location
I am not able to boot from usb drive ,i have disabled secure boot and fast boot but whenever i tried to boot from usb ,the pc automatically boot to windows ,and i have also checked usb is successfully bootable by using mobalivecd..
its work on legacy bios?
I have a dell laptop with gpt partition and uefi…. I followed all your steps step by step…. But at last i get an error grub-installation dummy failed…. Please help me out…. I have Windows 10 64 bit installed
Did you try to reinstall the GRUB, check out solutions at the end of the article.
It’s asking for username and password what’s that????
Please reply faster. Plzzz
User: root
Pw: toor
hey guys i really have a bigg issue trying to install kali duel boot with win 10 i do all but when i click on graphical install it shows me a message
end kernel -not syncing vfs: unable to mount root fs on unknown-block
Reformat usb flash drive and try to create bootable usb again
Man you sure Rufus will work? Because I made my usb bootable according to steps but I noticed two errors (if we call the first one an error):
1- right after choosing graphical installer starting line in black screen includes ” … Register access failure… ” after that in the installer after choosing language in Detect and mount CD-rom step it says “your installation cd rom couldn’t be mounted”. what should I do? should I try another program to create bootable usb? please respond.
When it says “installation cd rom couldn’t be mounted”, simply unplug and reconnect usb drive and hit retry
I have done everything as mentioned but when I boot into Kali there is no gui , I have tried everything such as gdm3 etc nothing works also I am not connected to a network so can’t run apt-get update , Please help
After install Kali doesn’t boot. It only showing wi ndows
After install kali.its not showing Kali Linux
I am getting error as my machine is in EFI mode….. when i try your method to solve my problem where even after successful installation my laptop boots to windows 10 directly….
can you please look after it…
What types of errors are you facing?
Nice! Best content about the topic I was searching for !
Thank you TechLog360
Hi, i follow all the step
And succes installed kali linux, but my windows 10 not list in grub. I’m tried all grub reinstall with kali live, and do update-grub but only kali linux found. Any solution?
I did exactly like this, but after the installation, the kali Linux is not booting.
it’s booting my windows 10 only.
please give me a solution.
Please check the “Solutions” section at the end of the article.
Hi.. thanks for tutorial.
I experiences 2 issues below:
1. When installing Kali, I didn’t see step 24 & 25 above.
2. After installation finished, it directly boot Windows 10 and never boot into Kali. I’ve tried all possible options:
a. using os-prober (ok) and update-grub (failed: command not found)
b. using mount (ok), chroot to sda (ok), grub-install (failed: command not found)
c. using easyBCD also failed because it said easybcd detecting windows using uefi and limits some features, so I can’t add new entry for Grub2 in Linux tab.
Can you advise?
how to install kali linux as main os ?
Hii….i have a problem with my kali linux
The installation goes fine but after the reboot the windows 10 boots and when i check in disk management the kali linux partition is empty it is shown as free space ….. plzzzzzzzzzzzzz help
Then it is not installed, please try the installation again.
After installing linux, can i switch back and forth between the OS’s
does the option to choose which os i boot appear as soon as i turn my laptop on?
Yes, you can choose either Kali or Windows on startup
After finishing partition ,it displayed “No EFI partition was found” can u please help me with this..
Successful installation after following all steps. But I have problems, wifi is missing and bluetooth won’t start. Please help. thank you.
Check your laptop has a Kali Linux supported WIFI adapter
I installed kalix Linux for Windows 10 x64…..ave used both Rufus and balenaetcher to create the bootable USB drive…but Each time I install… there’s always a error….LOAD DEBCONF PRECONFIGURATION FILE….I don’t know wat went wrong
Which type of Installer you downloaded, NetInstaller or Offline Installer?
Super smooth guide. Thanks
I just installed kali linux in windows 11,using dual boot method,but only kali appears,only kali boots