

Do you have some important data on your Mac that you want to recover? Wondering how you can do this process and if it is possible? If you have the same questions like these, then this is for you. This post will show you ways on how to recover deleted data on Mac computer.
Mac is one of the most trusted brands when it comes to computers because of its high-quality performance and amazing features. Selling Apple products also brings good value. That is why a lot of people tend to have this computer. And also, Mac comes with a large storage space that will allow every user to save as much data as they want as long as they do not reach the limit of its space.
However, just like any other computer, accidents also happen to a Mac product. And one of the most common scenarios that most users experience is losing their important data on their Mac. And with that, a lot of users are having the question if there is a way for them to recover those deleted data on their Mac.
Well, the answer to that question is yes. There are several ways on how to recover deleted data on Mac. And these methods are known to be very easy that you can do it on your own. So, to know more about the ways on how to recover deleted data on Mac, go ahead and keep on reading this post.
Contents
- 1 Part 1: How to Recover Deleted Data on Mac Using FoneDog Data Recovery
- 2 Part 2: How to Recover Deleted Data on Mac Using Recycle Bin
- 3 Part 3: How to Recover Deleted Data on Mac Using Time Machine
- 4 Part 4: How to Recover Deleted Data on Mac Using Undo Options
- 5 Part 5: How to Recover Deleted Data on Mac Using Terminal
Part 1: How to Recover Deleted Data on Mac Using FoneDog Data Recovery
In this first method that we are going to show, it does not matter if how the files from your Mac got deleted or the reason behind it. The FoneDog Data Recovery is a third-party app that you can use in order for you to know how to recover deleted data on Mac the safest, easiest, and quickest way possible.
Through the use of the FoneDog Data Recovery, you will be able to recover deleted data on your Mac such as your audios, emails, photos, documents, videos, and more. Through this tool, you will be able to recover even from the Recycle Bin of your Mac. And aside from that, you can also recover lost or deleted data from other external devices such as your flash drive, external hard drive, and memory cards.
The FoneDog Data Recovery software is as we said, very easy to use. So with that, we are going to show you here a quick sample on how the process flows.
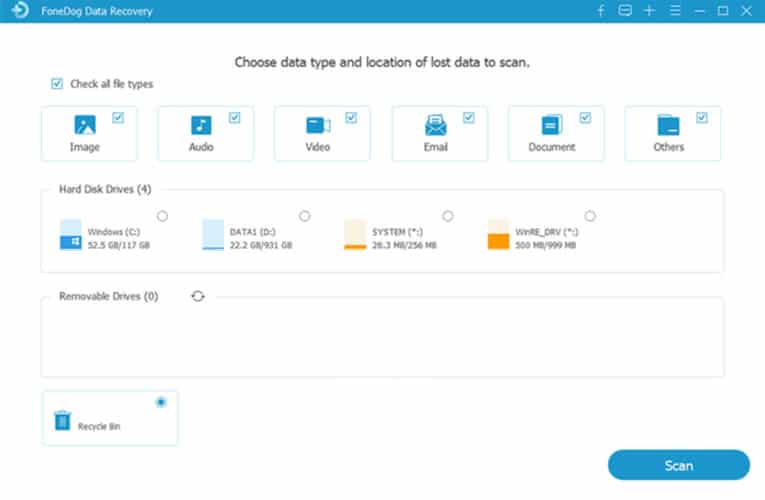
Step 1: Select Data to Recover and Storage
Download and then have the FoneDog Data Recovery installed on your Mac. Once done with that, launch the program to start using it. Then, once that you get on the main page of the tool, simply choose the type of data that you would like to recover. And also, on the same page, choose the location of the data where it has been deleted.
Step 2: Do A Complete Scan on Mac
After choosing all the needed information, the next thing that you should do is to have your Mac scanned by the FoneDog Data Recovery. For the scanning process, there are two ways on how the program can scan your Mac. One is through a Quick Scan which can take only a few minutes. The other one is through a Deep Scan which can take a longer time to complete. But it can definitely give you more items that you can recover as a result.
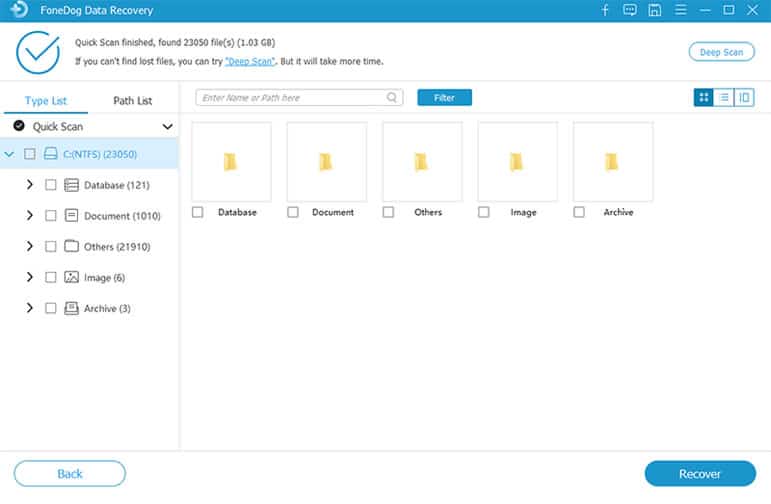
Step 3: Check Your Scanned Data and Choose to Recover
After the scanning process, you can now go ahead and choose the data that you want to recover. By doing this, the FoneDog Data Recovery will allow you to preview your scanned data. This way, you will be sure that you are going to select those data that you really want to get back.
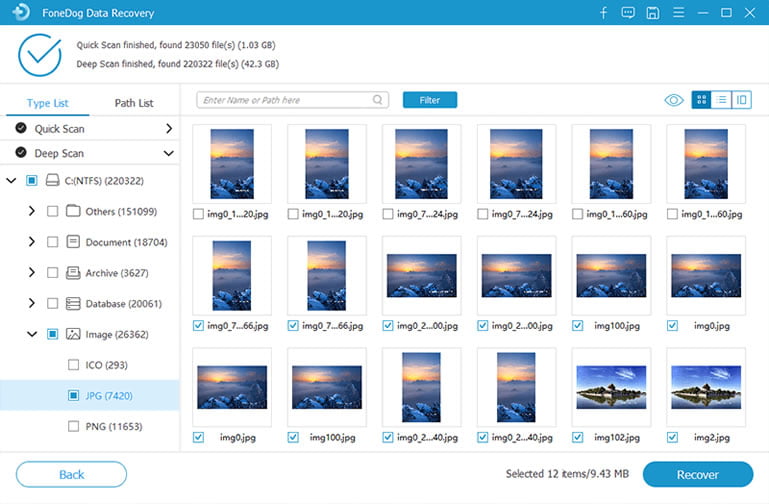
Step 4: Recovery Your Chosen Data
And once that you are done choosing the items that you wish to get back, you can now go ahead and process recovery. In order for you to do this, just click on the Recover button found at the lower right corner of your screen. Then wait for the program to complete the recovery process of your deleted data on Mac.
Part 2: How to Recover Deleted Data on Mac Using Recycle Bin
The easiest way for you on how to recover deleted data on Mac is by taking advantage of its Recycle Bin folder. This is because every file that you have deleted on your Mac, whether you have dragged it to your trash or by clicking on the delete button, they can all be found in just one folder which is the Recycle Bin.
Data that was put on your Recycle Bin can still be restored with just a few clicks.
- Step 1: Launch your Recycle Bin on Mac.
- Step 2: Locate on the file or data that you want to restore.
- Step 3: Then right-click on the data and then choose the option Put Back. This will then recover your chosen data back to the original folder where it has been deleted.
Part 3: How to Recover Deleted Data on Mac Using Time Machine
In some cases, there are those users who try to empty their trash now and then. This means that once that you have deleted all the items that you have on your Recycle Bin, then you can no longer recover them using the method above.
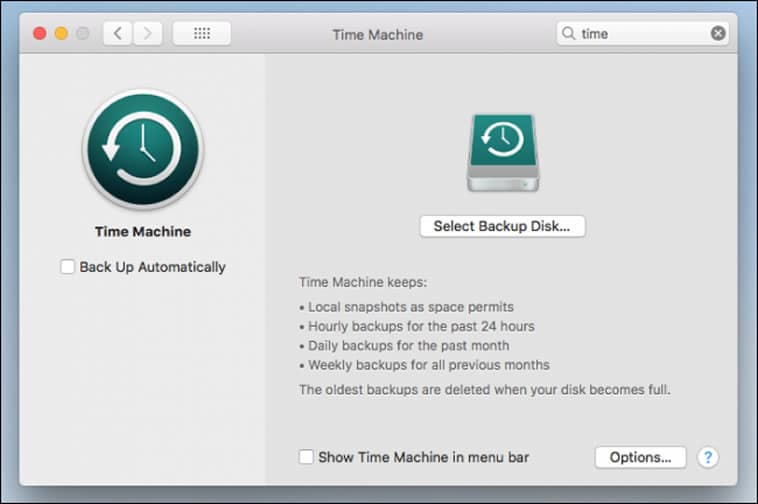
Good thing is that there is also another way for you to recover those deleted data using a built-in feature on your Mac. And this is by using the Time Machine Backup files. And to show you how you can do that with this method, here is a quick tutorial that you can follow.
- Step 1: Go ahead and click the Spotlight option which can be found at the upper right hand of your Mac. Then enter Time Machine for you to locate and launch it.
- Step 2: Then, from the page of Time Machine, go ahead and choose the folder where you have lost your data that you want to recover.
- Step 3: After that, go ahead and hit on the arrow up button which is located at the right part of the Time Machine page. Then go ahead and check out all the backup files shown on your screen and then choose the one that you would like to recover.
- Step 4: Once done, simply press and hold the Command button and then select on the file that you want. After that, click on the Restore button for you to recover deleted files on Mac using the Time Machine.
Part 4: How to Recover Deleted Data on Mac Using Undo Options
There are also some Mac users who are very tidy that they always deleted those files that they no longer need from their Mac. This way, they can keep their Mac clean while they are using it. And because of that, there are some people who lose their data because they have accidentally deleted it.
If you have this same case, then you have the option for you to recover that deleted data right after you have accidentally deleted it from your Mac. And this method is by using the Undo option. You can have that file be restored on your Mac immediately right after you have accidentally deleted it. However, this will not work if you have already emptied your Recycle Bin.
Part 5: How to Recover Deleted Data on Mac Using Terminal
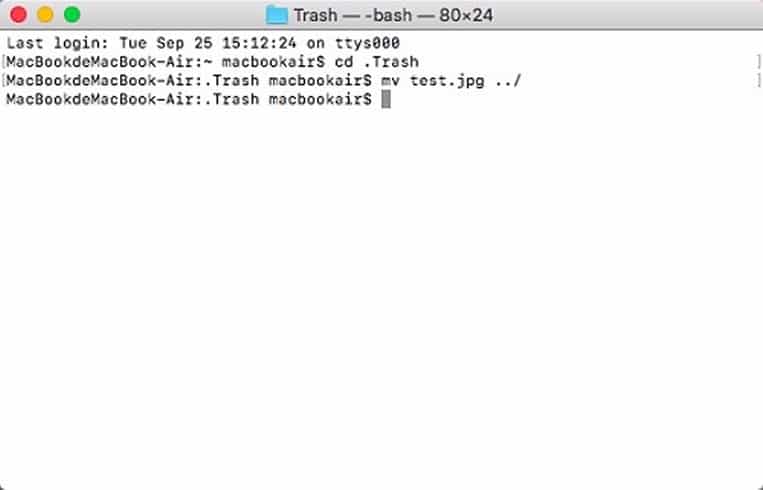
Another feature that you can use on your Mac is its Terminal app. This is an app wherein it is considered to be a direct interface to your OS X. That is why you can make use of it if you want to restore deleted data on your Mac computer. And in order for you to know on how you can use this, here is a quick process that you can follow.
- Step 1: Go ahead and navigate to your Applications and then click on Utilities for you to be able to launch your Terminal app.
- Step 2: From there, go ahead and key in the Unix code: cd .Trash and then tap on the Return button n your keyboard.
- Step 3: After that, type in mv name ../ and then press the Return button again. In this command, you can change the command “name” with the name of the file that you would like to recover.
- Step 4: After that, type in Quit after you have recovered the data that you want and to close the Terminal app on your Mac.
Conclusion
As you can see, there are definitely a lot of ways on how to recover deleted data on Mac. The only thing that you need to do here is to choose which of the following is suitable for what you really need. However, if in any case that you want to do this process the easiest and the fastest way possible, then you might as well use the FoneDog Data Recovery to get back those deleted data on your Mac.