

For a photographer, nothing is as unsettling as spoiling beautiful pictures due to color banding. It is a distracting discoloration in images where colors jump abruptly to the next color instead of gradually transitioning from one shade to another. It is distressing to encounter color banding in your images, as it compromises their overall quality and visual appeal.
The problem occurs when the bit depth is too low that there aren’t enough tones left for a smooth transition of colors. Moreover, lossy compression (such as converting your image to JPEG) or over-processing an image (adding too much dehaze, vibrancy, etc.) can also introduce color banding. Fortunately, there are options to fix color banding in an image using various photo editing software like Lightroom and Photoshop.
Read this guide to learn how to fix color banding. You will also learn how to avoid color banding in the first place during shooting or post-processing.
Contents
How to Avoid Color Banding?
Now that we know various reasons that can cause color banding, let’s look at some ways to avoid it during shooting and post-processing.
During Shooting
- Use the live histogram option in the camera to get accurate exposure during the photo shoot.
- Always shoot in the uncompressed RAW format to capture more data.
- Use a camera with a higher bit-depth, like 12-bit or 14-bit, to capture a wide range of colors and to decrease color banding.
- Always shoot in properly lit conditions, as low lightning can cause color banding.
- Use the lowest ISO settings to get the required exposure.
- Ensure your camera’s lenses and cables are clean and in good condition.
During Post-Processing
- Always use a high-quality monitor with a wide color gamut and brilliant color accuracy.
- For a smooth transition, gradually apply color and tonal adjustments using tools like Gradients mask or Adjustment layers.
- Cautiously and uniformly apply the noise reduction techniques in the image.
- Use dithering techniques while converting or saving your images.
- Save or export your images in a file format that supports high bit depth, like PNG or TIFF.
How to Fix Color Banding?
There are different techniques to fix color banding in images. However, remember the effectiveness of each technique depends on the severity of color banding in an image. Here are the most common ways to fix color banding.
Increase the Color Depth
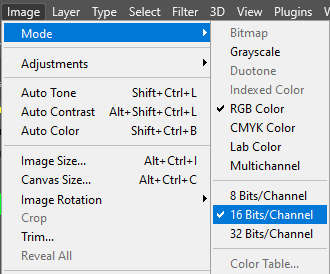
As mentioned above, the higher the color depth, the lesser will be the color banding. If your image is 8-bit, the first thing you need to do is to convert it to 16-bit. You can use Photoshop to convert images to 16-bit. Here’s how:
- Open the image in Photoshop.
- Go to Image tab > Mode and select 16-bit.
Once you have converted your images to 16-bit, make some enhancements and adjustments to fix color banding.
Add Noise
Generally, we remove noise, i.e., certain types of visual distortion, from the image as it makes your image look grainy. However, adding little noise can introduce random variation in the image by substituting the color banding edges with tiny dots. You can use Photoshop, Lightroom, or any other photo editing software to add some noise to your image. Say, for example, in Lightroom, follow these steps:
- Open your desired image in Lightroom, and click Edit.
- Open the Detail panel, go to the Noise Reduction, and adjust the sliders.

However, ensure not to move the Noise Reduction slider too much, as you want to disguise the color banding problem, not highlight it.
Add a Texture Overlay and Blur
Adding a texture in an image, such as gradients or patterns, can help cover the color banding and other background errors, giving your photo a fine finish. Textures provide additional details to the image, reducing the emphasis on the color banding area.
Similar to noise, adding blur to your images can also make color banding less noticeable. However, it’s important to strike a correct balance while adding blur as too much blur can worsen color banding.
What to Do if Your Image Gets Corrupted?
While using any popular photo editing software for fixing color banding, your images may get corrupted while importing and saving them on the system. In that situation, use advanced photo repair software like Stellar Repair for Photo software to efficiently repair corrupt photos stored on your hard drive, memory card, or other data storage device. This photo repair tool can repair images with corrupt header/data, unknown or invalid JPEG markers, invalid file structure or missing SOS markers.
Conclusion
Color banding in a photo can occur sometimes due to the absence of enough tonal range to represent different colors in a picture or when you push post-processing edits to an extreme.
However, various photo editing tools can fix color banding in your image by adding noise, texture or blur, etc. But try to avoid taking color-banding shots in the first place by using higher bit-depth or using the lowest ISO settings.