

You’re looking for a way to set up your own private cloud for your family or friends, including a mail server, calendar, and file sharing capabilities? You’re looking for an alternative to Gmail, Google Docs, and Dropbox, which is not only open-source but also guarantees that control over all your data remains with you alone? It’s not that complicated, really.
Now, you’ve probably heard that Linux is the preferred operating system in this case, but what if you’re a Windows or macOS user? In this article, we’d like to introduce Univention Corporate Server, a Linux system with a graphical configuration interface and an included App store in which you find around 90 further applications from well known open-source vendors, providing easy and fast access to mail, video conferencing, cloud services, chat programs, password management, and many other services– an ideal open-source operating system for your own home server. And don’t worry: you don’t have to stop using Windows or Mac if you don’t want to.
After describing the installation process, we’ll give a quick overview of the included system administration tools. We’re also going to show how to install and upgrade software and how to share files with other users by integrating Nextcloud in your UCS environment. In the end, you’ll find some advice on how to set up your own mail server and links to the UCS documentation.
Please note that this is an exemplary setup only. The installation wizard is very capable and should guide you through the installation process smoothly. However, if there appear to be any obstacles, you will find answers to many questions in the Univention Help Forum. You can also ask individual questions there, of course.
Contents
- 1 Univention Corporate Server: A good Choice
- 2 What you need
- 3 Downloading the Image and booting the Installer
- 4 Configuring UCS
- 5 Quick Overview: Portal and Univention Management Console
- 6 Software Installation and Upgrade
- 7 Setting up your own cloud by integrating Nextcloud in UCS
- 8 Setting up a Mail Server
- 9 Last but not least: Installation of Let’s Encrypt
- 10 Great Learning Experience
Univention Corporate Server: A good Choice
Univention Corporate Server (UCS) is a Debian-based enterprise Linux distribution with an integrated management system for central and cross-platform administration of computers, users, and services. While it is mainly used in professional environments, private users can also benefit from its features since it’s really easy to set up and administer. Here are some cool features of the Open Source operating system:
- Graphical administration in your preferred web browser
- App Center for simple installation of about 90 applications e.g. Nextcloud, Rocket.Chat, OpenProject, Open-Xchange, SuiteCRM, and many more
- An online portal for easy access
- Simple integration of additional services via Open Standards like SAML and OpenID Connect for Single Sign-On
- Identity Management for central administration of users/groups and their permissions
- Network Management including DHCP and DNS
- Client and Infrastructure Management for Windows, Mac OS X and Linux Desktops or Servers (including Active Directory compatible Domain Services)
In Univention Corporate Server, there is no need to fiddle with configuration files in a text editor, although you can do this if you want to. Most users should be happy with the web interface for installing apps, managing domains, computers, printers, user accounts, network shares, and more. UCS can operate as stand-alone distribution but can also be your main server and manage other Linux, Windows, and macOS computers.
What you need
The first question most people ask is: “Do I need a physical machine to run my own home server?” Well, no, you don’t – there is always the possibility to rent a virtual or dedicated root server from a hosting company. If renting a server from an external provider is not an option, and you don’t have a spare computer, then you can run UCS as a virtual machine on one of your other machines. For this article, we’ve decided to install Univention Corporate Server in our local network on our own hardware. A computer with 2 GB RAM and 10 GB on the hard drive should be good enough, but you probably need more space if you’re planning to store photos, videos, and other documents.
Keep in mind that running the server on your own network does give you more control over your data but is not ideal if you frequently access the machine from the outside over a slow internet connection. If you’re planning to access your own server from the Internet, you need a broadband internet connection with enough upload bandwidth and a public IP address as well as a corresponding DNS entry:
- A public IP requires the configuration of your router so that it can pass on requests to your local UCS server. The configuration depends on the router and often also on the Internet Service Provider. For most routers, you should be able to find HOWTOs online.
- A publicly resolvable DNS entry is available from providers like Free DNS or similar.
- A publicly resolvable DNS entry is available from providers like Free DNS similar.
There are plenty of tutorials on the web about public and private IPs, about port forwarding and opening ports on your router/firewall, so we won’t go into detail here. Let’s get started with UCS!
Downloading the Image and booting the Installer
Go to the UCS download page and download the ISO image, which is available for the amd64 architecture (64 bit). You can burn a DVD or create a bootable USB medium to install Univention Corporate Server on a physical machine. Alternatively, use the ISO image to install the operating system on a virtual machine. The UCS download section also offers pre-installed images for VMware and VirtualBox. The UCS installer includes support for the Unified Extensible Firmware Interface (UEFI) standard and can start systems with activated SecureBoot. Make sure to adjust your BIOS settings to boot the computer from DVD or USB.
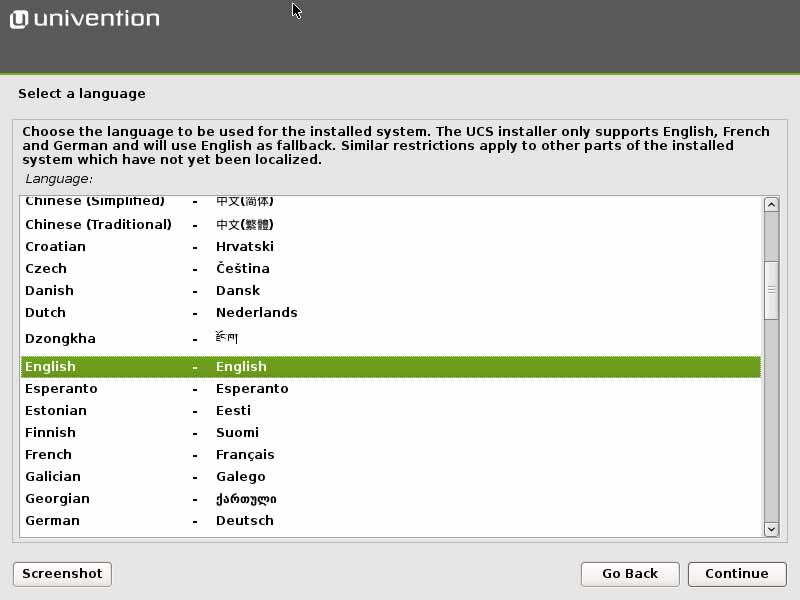
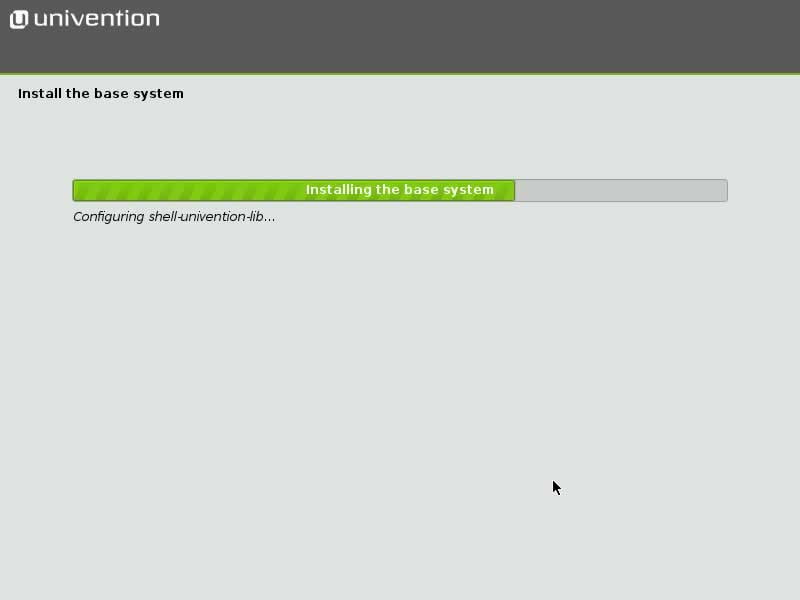
After selecting language and time zone, the installer will help you to partition your hard disk and then install the base system. In most cases, you can stick to the default settings. That includes the automatic network configuration via DHCP. Once the base system has been installed, the actual UCS configuration begins.
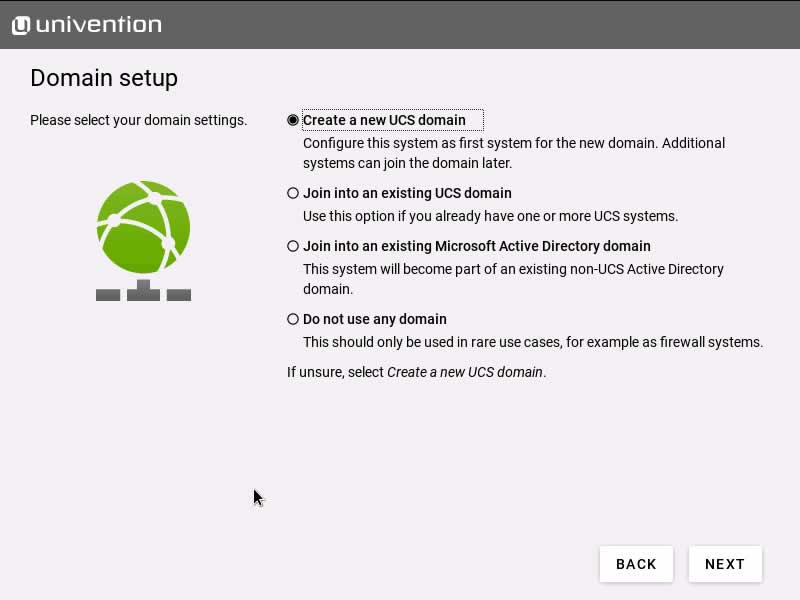
Configuring UCS
First, the installer will ask you to select your domain settings. You can create a new UCS domain (default), join an existing Active Directory domain, join an existing UCS domain or skip the domain configuration. In most cases, the default settings are fine – since you’re probably installing the first and only UCS machine in your local environment, select “Create a new UCS domain.” The following dialog asks for your name and a valid email address to where your personalized license key will be sent to.
The actual activation of the UCS license happens later, in the web-based administration interface. You don’t need to pay for the license: UCS is not just Open Source Software (GNU AGPL), but also freely available in form of the UCS Core Edition. For more information about the license models, please visit the Univention website.
Next, enter the hostname: the first field expects the fully qualified domain name (FQDN) of your UCS machine, and the second field (LDAP base) is suggested based on the FQDN’s settings. The fully qualified domain name is the name under which your computer can be accessed in the network. Since many UCS services depend on this setting and it’s not that easy to change this at a later point in time, you might want to put some thought into this. For a single Home Server, which shall be made available using the above mentioned DDNS services later, we recommend to use the FQDN registered in the external DDNS service.
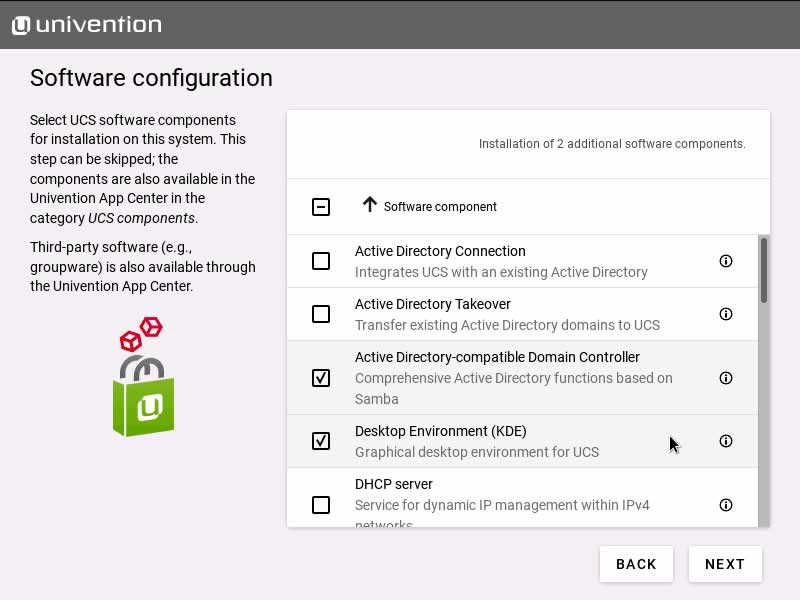
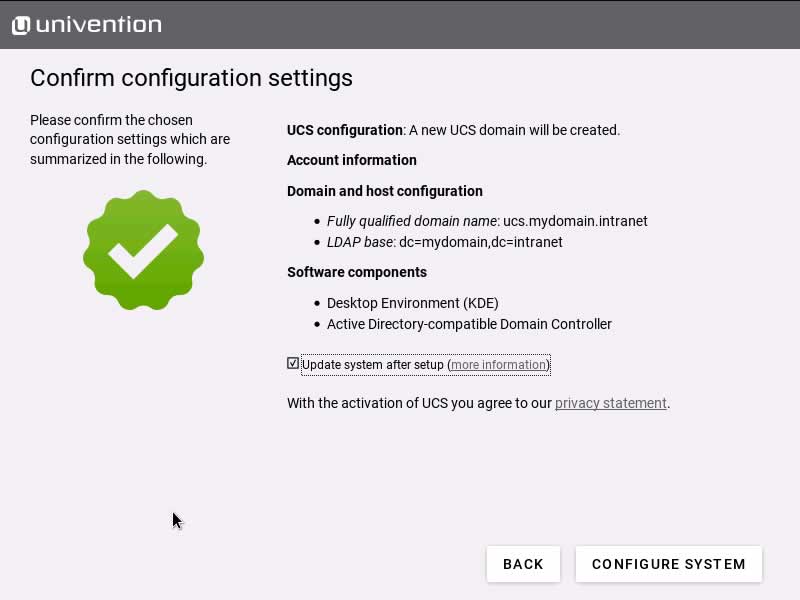
In the “Software configuration” dialog you can select the first few services to be installed on your UCS machine. We’ve decided to install the graphical desktop environment (KDE) and the “Active Directory-compatible domain controller” so that we can set up file sharing in the local network later. Don’t worry about forgetting something important – it’s quite easy to install additional apps and services later on.
After hitting “Next” the installer will present you with a summary of all settings. By default, the box “Update system after setup” is activated which means the installer will download and install all the latest patches, errata and app updates after the initial setup. If your internet connection is slow, feel free to skip this and install available updates later.
Depending on your hardware and the speed of your internet connection, this will take some time. Click “Finish” to reboot your machine after the installation.
Quick Overview: Portal and Univention Management Console
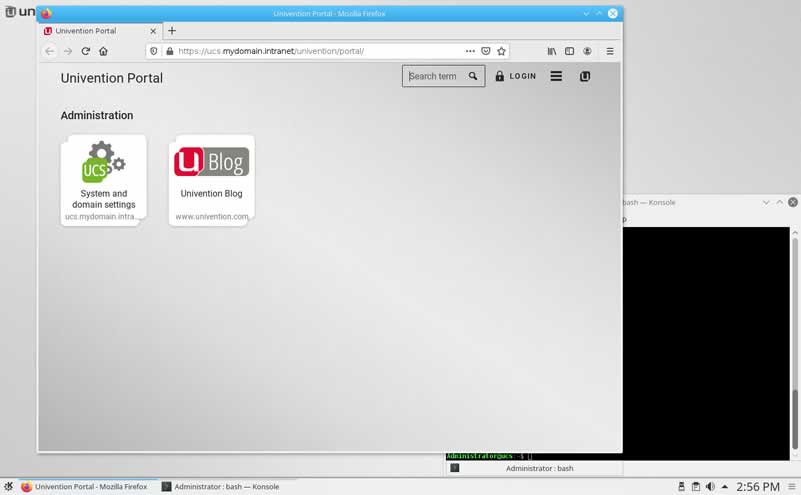
After you’ve restarted your UCS computer, log in to start the graphical desktop environment. Enter “Administrator” as your username and the root password you configured during the installation. As mentioned above, one advantage of the UCS system is the graphical configuration via its web interface. To start it, click the launcher in the lower left corner and select “Server Administration”.
The web browser Mozilla Firefox now presents the Univention Portal where all locally installed applications are listed (default: “System and domain settings” and a link to the Univention blog).
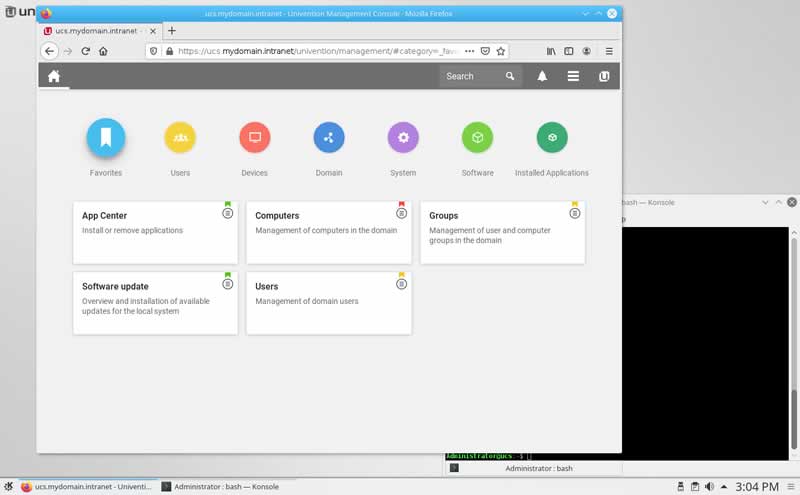
Click “System and domain settings” to log in (username: “Administrator”, password: root password) and enter the Univention Management Console. The UMC is the central place for web-based administration of your UCS computer. By default, only members of the “Domain Admins” group can access all modules. You don’t need to worry about this for the moment, since the account “Administrator” has been granted all the necessary permissions.
Now, before you make any changes to your UCS server, open the menu in the top right corner and select “License”, followed by “Import a new license”. Upload the license key from the file you received in an email or copy & paste it into the text field.
Software Installation and Upgrade
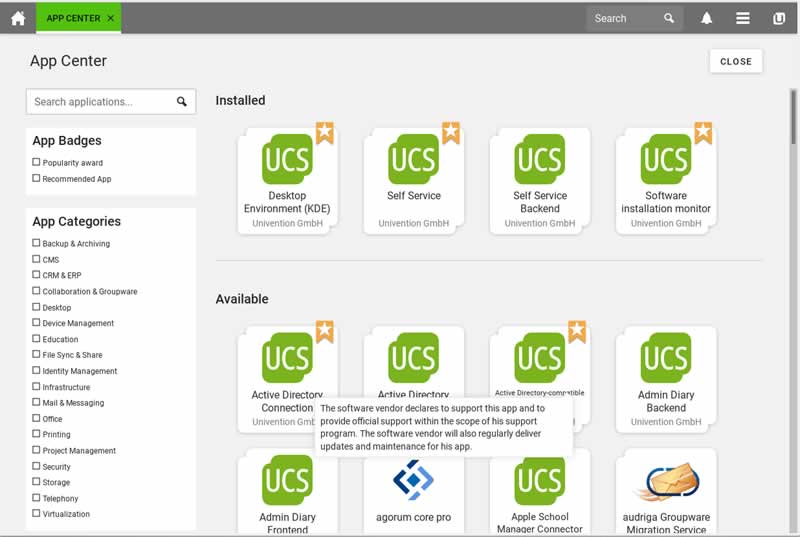
You can install additional software using the Univention App Center (module “Software” / “App Center”). After opening the App Center you can see installed and available software components. The applications are provided by third party vendors and by Univention itself. There is a “Search” field and you can filter the applications by using the “App Categories”. Click on an application to display a description, the manufacturer, screenshots and more.
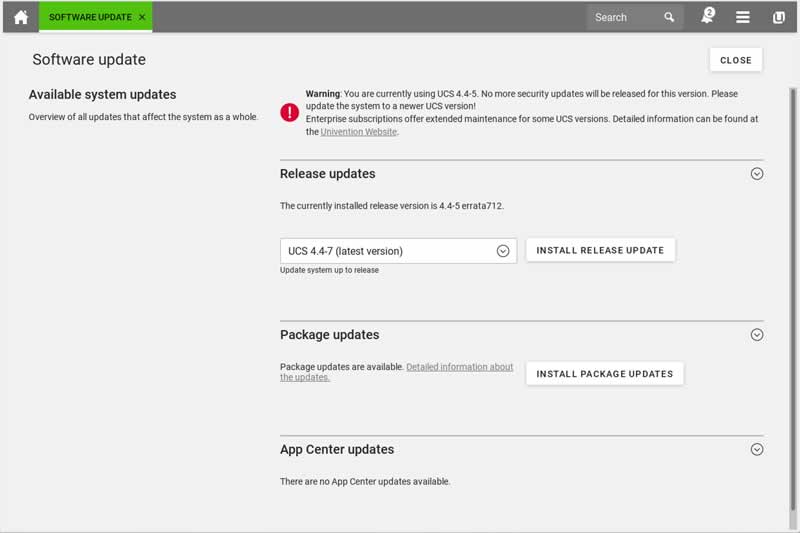
Every time the Univention developers publish software updates or a new UCS version, you will receive a notification in the menu. Follow the link to install release updates, package updates or App Center updates. The dialog also shows if it’s necessary to reboot the UCS server after an upgrade.
Setting up your own cloud by integrating Nextcloud in UCS
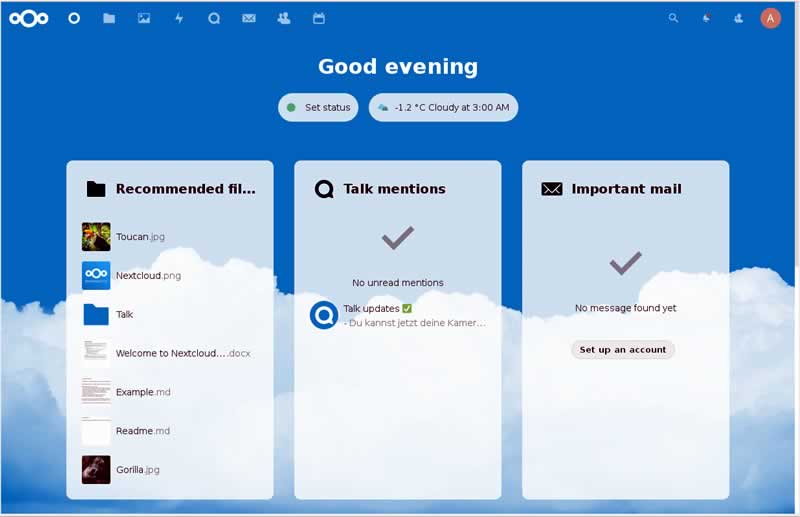
In the UCS App Center, you’ll find several apps for file sharing and synchronizing. For this article, we’ve decided to install Nextcloud Hub to set up a local content collaboration platform. After selecting and installing the app, you can access your private cloud via “https://ucs.mydomain.intranet/nextcloud” in your web browser. Use your UCS credentials (username and password) to log in.
Nextcloud Hub consists of several components, including Nextcloud Files for sharing files with other users. There is also Nextcloud Talk for private audio/video conferences and text-based chats and Nextcloud Groupware which integrates a calendar, contacts, and mail. There are apps for Android and iOS in the respective app stores.
If you want to send emails from Nextcloud, you need to set up a mail server first. In UCS this is not really complicated, as you will see.
Setting up a Mail Server
First, visit the App Center and install the app “Mail Server”. This will install a complete mail server including Postfix (Mail Transfer Agent, MTA), ClamAV (virus scanner), SpamAssassin (blocking spam), and Dovecot (Mail Delivery Agent, MDA). The MTA is used for outgoing mails and the MDA for incoming mails (IMAP and POP3).
The default configuration uses the UCS domain which you defined during the installation (“ucs.mydomain.intranet” in our example), but it’s possible to set up further mail domains via the module “Domain” / “Mail”. An article on the Univention blog describes how to assign email addresses to users and how to send emails to external servers and domains.
Last but not least: Installation of Let’s Encrypt
As mentioned in the beginning, making the UCS Home Server available to the Internet is a good idea to access your Files and Mails from everywhere in the world and get a real replacement for other Clpud Services. To secure this, SSL encryption is used for example for HTTPS.
SSL encryption is based on certificates, which are created while installing UCS as “self signed” certificates. By default these lead to warnings in the browser and other clients like the Nexcloud App. Via the installation of a trusted certificate with “Let’s Encrypt” you can solve that. The corresponding app can also be found in the App Center.
After installation, open a configuration mask by clicking on “App Settings”: enter here the domain(s) you registered for public access, separated by spaces, and checkmark the services that should use the certificate. In our example the certificate should be used in Apache, Postfix and Dovecot. With a click on “Apply changes” a certificate will be created and integrated into the services.
Great Learning Experience
As you can see, running your own server and offering a private cloud, mail services and more to other users is not complicated. With Univention Corporate Server, it’s simple to administer the system and install additional software – have a look at the App Center and give it a try. Here you can find many more Open Source programs, including groupware, project management, backup, and office applications. If you have any questions, have a look at the documentation. Apart from the quick start guide, there is also the handbook for administrators and a separate manual for users.