Home Blog Page 419

Photoshop Beginners Guide 4→Introduction To Tools Panel [Part 2]

photoshop beginner 3
In last post we discussed about some of the tools in tools panel of photoshop interface.I think now you are familiar about those tools.If you didn’t read our last post.Click the below link:


In this post we will discuss about the remaining sets of tools in photoshop.In last tutorial we ended our post with Brush Tool, Pencil Tool, Color Replacement Tool,Mixer Brush Tool.So now we are going to see 9th tool in photoshop:


►Clone Stamp Tool, Pattern Stamp Tool (S)


Clone Stamp Tool, Pattern Stamp Tool (S)

The Clone Stamp Tool has a lot of uses and if you’re doing photo manipulations then this a tool to be on good terms with. It is not complicated at all. To use it first Alt-click somewhere to set the sample point. Then start painting. You will notice that you will paint with the pixels underneath the sampled area. That’s all this tool does. It clones areas from one part of the image in other parts. It is very useful for creating new content based on an existing one and removing skin imperfections or undesired objects.

The Pattern Stamp Tool allows you to paint with desired patterns over an image. Never had a use for it!


►History Brush Tool, Art History Brush Tool (Y)


History Brush Tool, Art History Brush Tool (Y)

The History Brush Tool is an interesting little thing that holds a lot of power. It allows you to paint on a new layer from a previous state of your image. Let’s say that you heavily modified a photo but you still want some of the original look in certain areas. To do this first select a previous state. Open Window > History and click on one of the little squares next to the name of the desired state. In the image below notice that I clicked on the little box next to the most upper state of the image – the original. Now if I create a new layer and paint with the history Brush Tool I can restore certain areas of my picture to their original state.

The Art History Brush Tool is a strange tool that allows you to paint from previous states of the images but in crazy, dynamically changing shapes. A quite useless little tool, if you ask me.


►Eraser Tool, Background Eraser Tool, Magic Eraser Tool (E)


Eraser Tool, Background Eraser Tool, Magic Eraser Tool (E)

The Eraser Tool allows you to delete (erase) pixels from a pixel layer (or a layer mask). It is as simple as that. You don’t like the way your new painted layer looks, you select the Eraser Tool and send pixels into oblivion. Alternatively, if you’re smart you could use a layer mask and nondestructively remove the undesired pixels. Maybe you noticed that I generously used the term nondestructive but I do this for good reason. When working on a document in Photoshop it’s very important to be able to go back and redo or modify some of your old actions. This offers you the power to infinitely tinker with settings and adjustments without losing any permanent data. That is why I recommend staying away from the Eraser Tool as much as possible and go for layer masks instead. A bit trickier to understand at first but they are totally worth the effort.

The Background Eraser Tool is like the Color Replacement Tool , but instead of replacing the color you erase it. It is a decent tool for getting rid of certain parts of the image but not precise enough. There are much better selection tools and techniques (like Channels and Color Range) that I do not use this tool very often.

The Magic Eraser Tool looks and acts a lot like the Magic Wand Tool but instead of selecting pixels it deletes them. Useful tool only if you are in a great hurry and do not care much about the results.


►Gradient Tool, Paint Bucket Tool (G)


Gradient Tool, Paint Bucket Tool (G)

First, let us cover the Paint Bucket Tool. It is a useless tool as far as I am concerned because I never used it. And I mean never ever. What does it do? Well, if you click with it on a picture it will fill the area with the foreground color. It has a Tolerance setting in the options panel which works the same way as the Tolerance setting for the Magic Wand Tool.

Now the Gradient Tool is a very useful tool and I find myself using it on a daily basis. It allows you to create a gradient from the background and foreground colors. The shortcut key is G. While you can achieve some artistic effects by dragging the gradient tool directly on a layer and then maybe use Fade (Ctrl + Shift + F) and an Opacity option it’s more likely that you will want to use it in layer masks.


►Blur Tool, Sharpen Tool, Smudge Tool


Blur Tool, Sharpen Tool, Smudge Tool

The Blur Tool and the Sharpen tool have some obvious purposes: they blur and respectively sharpen. They have 2 big disadvantages though. Firstly, they are pretty processor intensive, so if you like working fast or you have a slow machine you will have to wait. Secondly, using them means that you are not editing your document in a non-destructive way. If you want to go back to a previous look of your image then you will have to hit Ctrl + Z (Undo) like crazy. When it comes to sharpening and blurring I prefer to create composite layer from all the visible layers (Ctrl + Shift + Alt + E), apply a sharpen/blur filter on this layer, add a layer mask and paint it with black and white to show/hide my layer (in a layer mask black conceals and white reveals).

The Smudge Tool allows you to “smudge” pixels. It’s main use (at least for me) it’s to create hair. Let’s say I cut and copy in a document a wolf (or a human head) but I don’t select the hairs very well so it looks fake. Then I use the smudge tool at the edge of the fur to emulate hair.


►Dodge Tool ,Burn Tool , Sponge Tool (O)


Dodge Tool ,Burn Tool , Sponge Tool (O)

Dodge Tool lightens and Burn Tool darkens while in the same time increasing contrast. In the Options Panel there are 2 setting you should be aware of: Exposure setting and Protect Tones checkbox. You will want to have the Protect Tones checkbox checked all the time unless you are aiming for very strong effects. The Exposure setting affects the power of the tool .I recommend using lower settings and gradually paint until you achieve the desired effect. A quick tip: If you are using the Dodge Tool hold Alt to temporarily switch to Burn Tool and vice versa.

The nondestructive alternative to these 2 tools is to create a new layer, fill it with 50% Gray color (Shift + F5), set the blend mode to Overlay and use Dodge and Burn or a black and white brush on the layer to achieve similar effects.

The Sponge Tool desaturates the image (absorbs color). For a more contrasty effect be sure to check the Vibrance checkbox in the Options Panel.


►Pen Tool, Freeform Pen Tool, Add Anchor Point Tool, Delete Anchor Point Tool, Convert Point Tool (P)


Pen Tool, Freeform Pen Tool, Add Anchor Point Tool, Delete Anchor Point Tool, Convert Point Tool (P)

The Pen Tool may be familiar to you if you have worked with Adobe Illustrator. This tool allows you to create vector shapes and the additional tools in the category allow you to modify and tweak that shape. I don’t do much vector work but instead I use this tool heavily for my selections. Basically I trace with the pen tool the object I want selected and then I simply transform path to selection (Ctrl + Enter). This allows me to do very accurate selections, it works especially well when the object I want to select has a color similar to the background, and the usual selection techniques will not work. So go ahead, give it a spin and create some paths. Make sure to check Rubber Band in the Options Panel as it allows you to preview the paths you are going to create.

Rubber Band

►Horizontal Type Tool, Vertical Type Tool, Horizontal Type Mask Tool, Vertical Type Mask Tool (T)


Horizontal Type Tool, Vertical Type Tool, Horizontal Type Mask Tool, Vertical Type Mask Tool (T)

Horizontal and Vertical Type tools allow you to add text to your images. Simply click anywhere in your document with one of these two tools and start typing. You can change the font, size and other settings in the Options Panel. When you are done typing simply press Ctrl + Enter to close the paragraph and stop typing. If you click and drag with one of these two tools you will create a box which will allow you to type only inside that box.

If you want to type on a path for a special effect simply create a path with the Pen Tool and with Vertical or Horizontal Type Tool click somewhere on the path (you will notice that the icon will change).

Horizontal and Vertical Type Mask tools allow you to create a selection from type. That is if you type something with one of these tools and press Ctrl + Enter you will have a selection of your typed text. I don’t use these tools at all because I can get a selection from a type layer much easier: I simply Ctrl-click on the layer and voila, a selection of the visible pixels of that layer.


►Path Selection Tool, Direct Selection Tool (A)


Path Selection Tool, Direct Selection Tool (A)

These tools are designed to manipulate and select paths. If you click with the Path Selection Tool on a path you will select the entire path and if you click with the Direct Selection Tool on a path you will select only a point or a handle bar.


►Rectangle Tool, Rounded Rectangle Tool, Ellipse Tool, Polygon Tool, Line Tool, Custom Shape Tool (U)


Rectangle Tool, Rounded Rectangle Tool, Ellipse Tool, Polygon Tool, Line Tool, Custom Shape Tool (U)

These tools allow us to create different shapes. There are three options in the Options Panel which are very important. If you select the first option you will create Shape Layers (that is basically a Solid Color Adjustment layer with a Vector Mask), the second option allows you to create simple Paths and the third option allows you to create pixel shapes.

Shape tool

►Hand Tool (H) and Rotate View Tool (R)


Hand Tool (H) and Rotate View Tool (R)

If you are zoomed into a document the Hand Tool allows you to drag the document. Simply click and drag and you will see what I am talking about. You can temporarily access the Hand Tool from almost any other tool by simply holding the Space button.


►Zoom Tool


Zoom Tool

The Zoom Tool allows you to zoom into a document. Drag to the left to zoom out or drag to the right to zoom in. Click to zoom in, Alt-click to zoom out. You can temporarily access the Zoom Tool from almost any tool by holing Alt + Space. Note that certain features of the Zoom Tool and the Hand Tool won’t work if you don’t have Enable OpenGL Drawing checked in the Edit > Preferences – Performance tab.

Zoom Tool

There are some additional buttons on the Toolbar Panel which are not Tools.

Default Foreground And Background Color (Shortcut D) allows you to set black as foreground color and white as background.

Default Foreground And Background Color (Shortcut D)

Switch Foreground and Background Color (Shortcut X) allows you to switch between foreground and background colors.

Switch Foreground and Background Color (Shortcut X)

Set Foreground and Set Background Color. If you click on one of these icons the Color Picker window will pop up allowing you to select a color. A nice feature of Photoshop CS5 is that when you have the Brush Tool selected you can temporarily access a simplified version of the Color Picker window (also called HUD Color Picker) by holding Shift + Alt and Right-clicking. You can change some options for the Color Picker appearance by going to Edit > Preferences > General.

Set Foreground and Set Background Color.

Quick Mask (or Edit In Quick Mask Mode) (Shortcut Q) allows you to quickly select parts of your document.

Quick Mask

And finally the last button in photoshop interface Screen Mode Button.As name implies its used to adjust screen and its shortcut is F.

Screen Mode Button

♣ Conclusion


This is where I finish my introduction to the Photoshop Toolbar. I hope you have become more familiar with the different Photoshop Tools and learned some useful stuff.

Photoshop Beginners Guide 3→Introduction To Tools Panel [Part 1]

photoshop beginner 3
In previous two posts we discussed about the photoshop interface.If you are a starter and like to know about photoshop interface read our previous two posts from below link:


 PHOTOSHOP BEGINNERS GUIDE 1→GETTING STARTED WITH PHOTOSHOP


 PHOTOSHOP BEGINNERS GUIDE 2→GETTING STARTED WITH PHOTOSHOP


Now you are little familiar with photoshop interface.Today we are going to know about Tools Panel in photoshop.I think you are little bit confused when you first took eye on Tools Panel.Don’t be confused this post will explain you the use of each and every tool in photoshop.

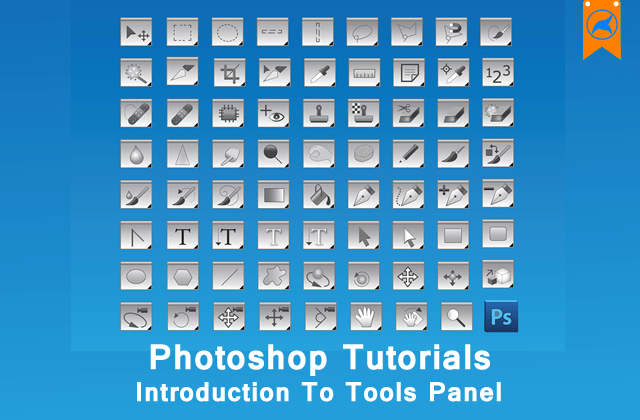
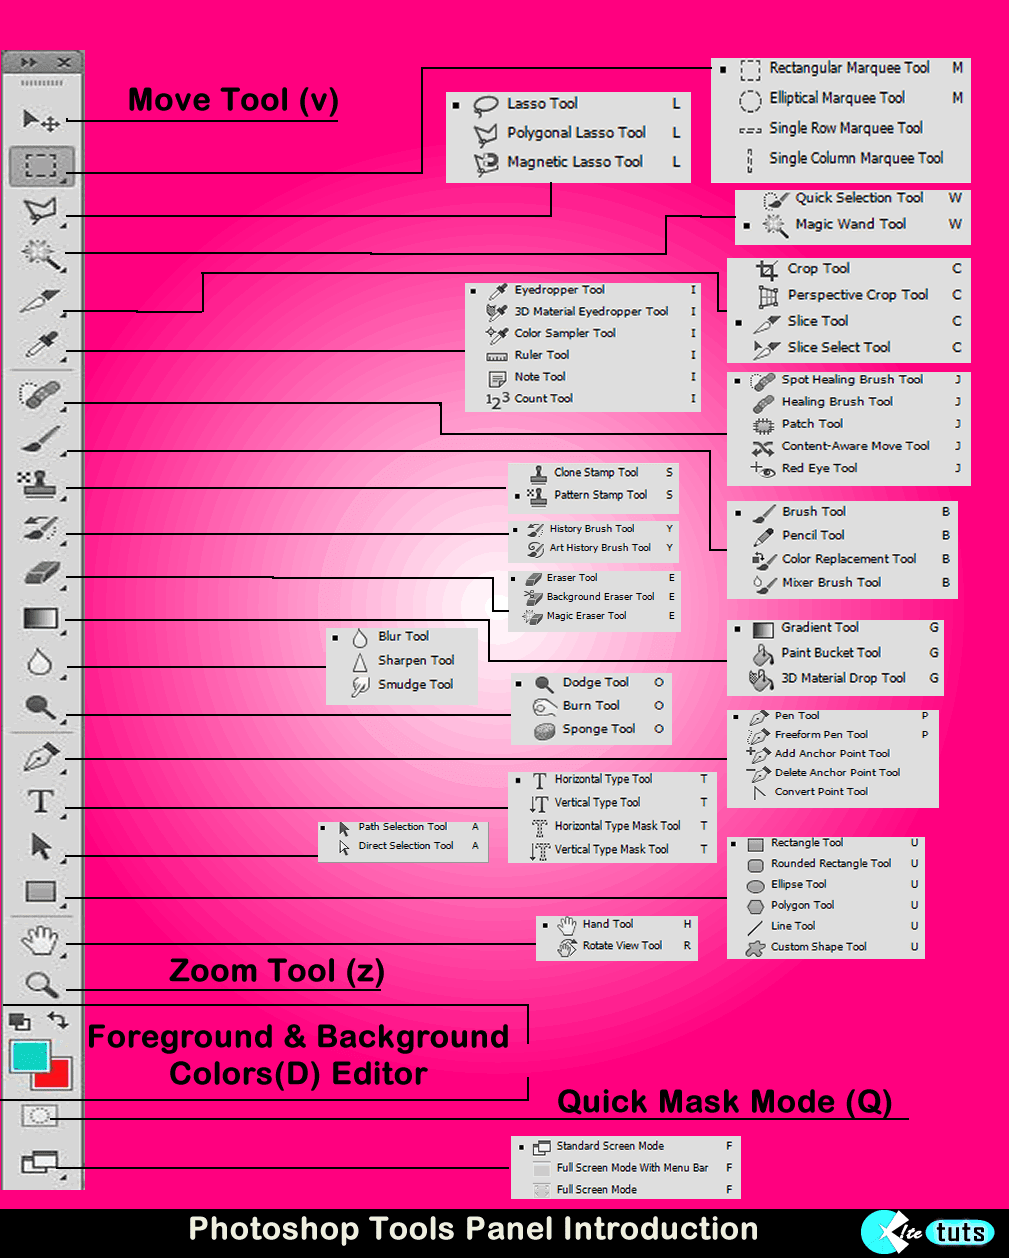
First look at below image and be familiar about each tool and their shortcuts.

Tool Panel

The above image shows the full list of tools in photoshop.So now we are going to explain use of each tool from top to bottom order.


►Move Tool (V)


Move Tool (V)
The Move Tool is used to move selections, objects, and layers.

►Marquee Tool (M)


Marquee Tool (M)

The Marquee Tools are used for selecting objects such as rectangles, squares, and ellipses.


►Lasso Tool (L)


Lasso Tool (L)

The Lasso Tool is used for making freehand selections. Not a very precise tool and I almost never use it but beginners may find it attractive.

The Polygonal Lasso tool is a bit more precise, allowing you to create a selections formed by straight lines. It has limited uses for selecting rectangular objects- like benches or fences. If you are using the Lasso Tool you can temporarily access the Polygonal Lasso Tool by holding Alt.

The Magnetic Lasso Tool has the most precision of all the tools in the group. It works by snapping to the edges of the objects. You simply click once on the edge of the object you want to select and release the mouse button. Then carefully drag around the object and notice how the Magnetic Lasso Tool “snaps” to the edges.


►Quick Selection Tool and Magic Wand Tool (W)


Quick Selection Tool and Magic Wand Tool (W)


Quick Selection Tool has the advantage of being, as the name suggests, quick. Its icon looks like a brush and if you start painting with this brush inside of an object you will quickly select it. It helps a lot if the object has strong edges but even if it has soft edges (like a face against a reddish sky) it still behaves pretty well. Highly recommended for quick work or if you don’t know how to use other tools. Not recommended for precise selections.

The Magic Wand Tool is a nice little tool that has its uses from time to time. If you click somewhere in the image it will select all pixels in that area that have a luminosity level close to the luminosity level of the level you clicked. You can set this by entering a value in the Tolerance box (the Tolerance is situated in the tool option bar along the top of the screen).


►Crop Tool, Perspective Crop Tool,Slice Tool and Slice Select Tool (C)


Crop Tool, Perspective Crop Tool,Slice Tool and Slice Select Tool (C)
The Crop Tool allows you to crop your images to the desired size. Click, drag, press Enter and you just cropped your image. The cropping is best done at the end of the editing process.
The Prespective Crop Tool (New Crop Tool From Version CS6):There are several reasons why images are captured at an angle, in this case, it is to avoid the reflection from the flash that may occur if the painting has a glass frame. To obtain the image as if it were a flat image, Photoshop CS6′s Perspective Crop Tool does an excellent job.
The Slice Tool and Slice Select Tool are mainly for Web Designers and have very few uses for regular uses. How it works? Well, you drag with the Slice Tool and create rectangles (usually web pages layouts). After you’re done you select Save for Web & Devices from the File menu and select a folder. This process will save each sliced portion as a separate image thus allowing you to quickly use these images for website creation.

►Eyedropper Tool, Color Sampler Tool, Ruler Tool,Note Tool, 123 Count Tool  (I)


Eyedropper Tool, Color Sampler Tool, Ruler Tool,Note Tool, 123 Count Tool  (I)
If you’re doing color correction in an image then the Eyedropper Tool is your best friend. To use it properly first set the Sample Size in the option bar (the option bar I keep talking about is situated just below the Menus) to 3×3 or even better 5×5.
Hover the Eyedropper tool over the image and notice how the R G B values change. If you click with this tool anywhere on the image you will set the Foreground color to the color below the Eyedropper Cursor. A quick way to access the Eyedropper tool while having the Brush Tool selected it is to press the Alt key.
Hold Shift and left click while using the Eyedropper tool to access the Color Sampler Tool and create a new color sampler (you can have a maximum of 4 color samplers).
This information is very useful when you do color correction or you want to know what are the values of a specific area. Even better, you can change the Mode to Lab, CMYK, HSB or other wacky modes. I remember that I used this tool a lot when I was first learning about Photoshop to see how various adjustments and blend modes affect the pixels values.
The Ruler Tool is for measuring the actual dimensions on the screen. Not a lot of uses for this tool (maybe if you’re a web designer) but it has one nice feature.It is used to straigten images.
I never use the Note Tool but you may find it helpful if you’re passing documents to other people and you want to indicate something. This tool is used to add certain notes that each could indicate a specific problem you want someone to address or maybe if you’re extremely forgetful write notes to yourself, like “Don’t forget to reduce the saturation here” or “Remove this ugly spot here”.
Finally, the 123 Count tool is for counting objects. It probably has its uses for certain people but I haven’t ever felt the need to count objects in an image with a tool.


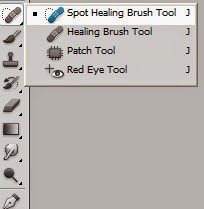
►Spot Healing Brush Tool, Healing Brush Tool,Patch Tool, Red Eye Tool (J)


Spot Healing Brush Tool, Healing Brush Tool,Patch Tool, Red Eye Tool (J)
These tools are very important if you are doing a lot of facial retouching. The Spot Healing Brush Tool is the easiest to use. You simply find the skin imperfection you want to remove and click on it. It’s not the most advanced technique for making clean skin but it is a basic and very fast tool.
The Healing Brush Tool is the same as the Spot Healing Brush Tool with the difference that it requires you to set a sample point so that Photoshop will base its healing algorithm on the area of the picture set as the sample point. To put it more simply: you will heal all your next spots based on the area you Alt-clicked on.
The Patch Tool is a different beast from the first two and it’s very useful for seamless blending of skin or other uniform surfaces.
Finally, the Red Eye Tool requires you to select an iris with a red eye problem and it attempts to remove the redness in the pupil. Although there are more advanced ways to do that (with Curves or Channels) this tool does a pretty good job.


►Brush Tool, Pencil Tool, Color Replacement Tool,Mixer Brush Tool (B)


Brush Tool, Pencil Tool, Color Replacement Tool,Mixer Brush Tool (B)
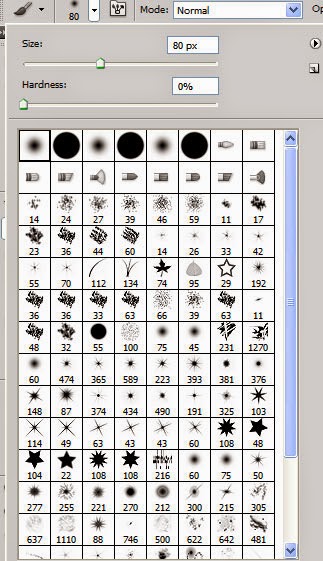
The Brush tool is probably the most used tool in the Toolbar panel. You can use it to paint with pixels over your image. The round brush tool is the one selected by default when you first open Photoshop so you probably have played with it a little. This brush has two important settings you will want to play with: size and hardness. Hardness represents how defined the edges of the brush are (or how blurry). Set the hardness setting to maximum (100%) and you will paint with ugly hard strokes.
In the brush option panel (usually you can find the option panel in the upper area, just below the menu bar) you can also change the blending mode of the brush. Combined with the layer’s blending mode this option offers you some wildly creative options. A useful keyboard shortcut for the brush tool are the bracket keys ([ / ]). Clicking the left bracket key decreases the size of the brush while the right bracket key increases the size. Holding Shift while pressing the bracket keys allows you to increase/decrease the hardness of the brush.

Brush Tool
The round brush tool is not the only tool available: Photoshop offers you a wide range of different shaped brush for your needs.

Brush Tool
The Pencil Tool is basically a downgraded version of the Brush tool. You don’t have a hardness option (in fact you do have a hardness slider but dragging it doesn’t change a thing) but you have almost all of the features of the Brush Tool. You will probably be interested in the Pencil Tool if you do pixel art.
The Color Replacement Tool allows you to replace one color with another. It has a bunch of settings in the Options panel and it offers some interesting results but to be honest I almost never use it. There are better, more accurate ways to replace some colors with other colors (at least for me) so I won’t go into detail about how to use it.
The Mixer Brush Tool is Photoshop’s attempt to mimic traditional painting behavior. Again, I don’t use this tool at all but if you’re into traditional painting and you want some digital tools to play with I recommend Corel’s Painter which is built solely for this purpose.


That’s it for Part 1 of Introduction of Tools Panel.Read use of remaining tools in next tutorial.Click the below link to read Part 2 of Introduction of Tools Panel→


Photoshop Beginners Guide 2→Getting Started With Photoshop

photoshop beginners 2
In last post we discussed about two horizontal panels -Menu Bar and Option Bar of photoshop interface.If you didn’t read the previous post click the below link:


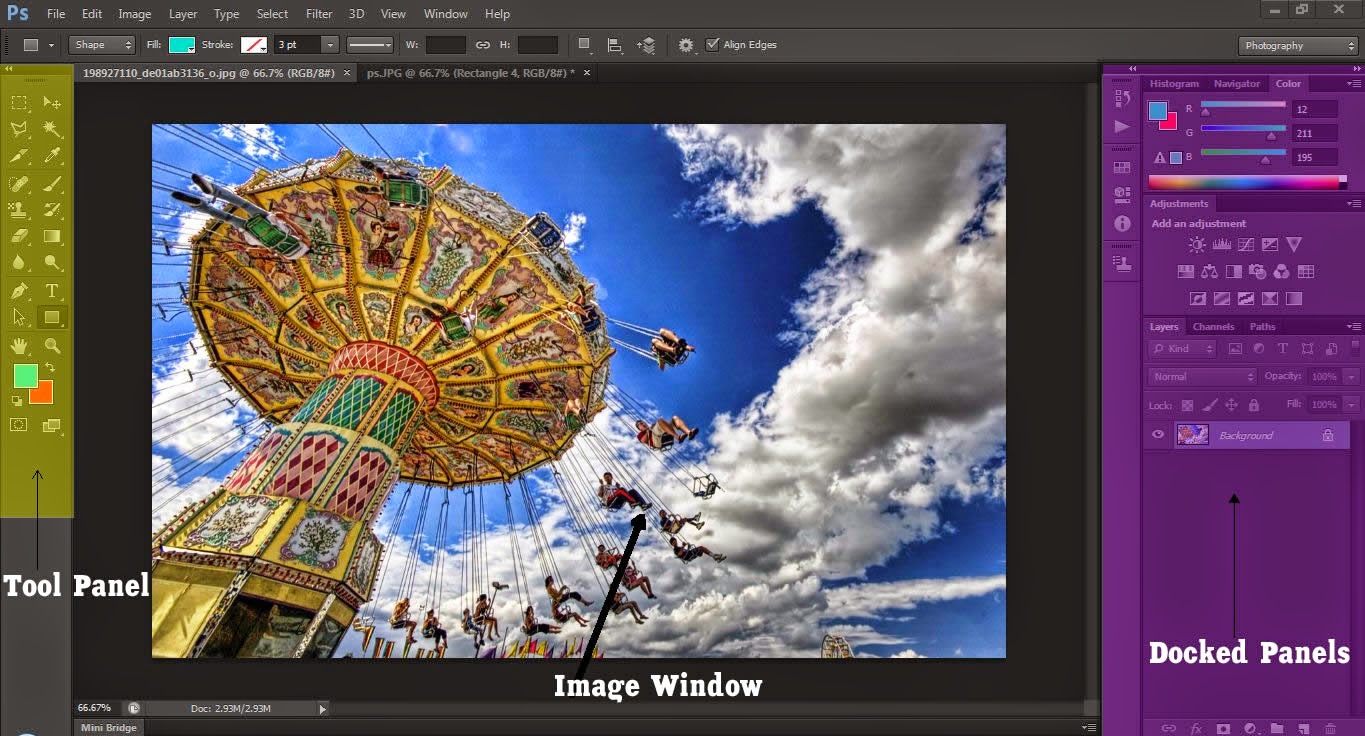
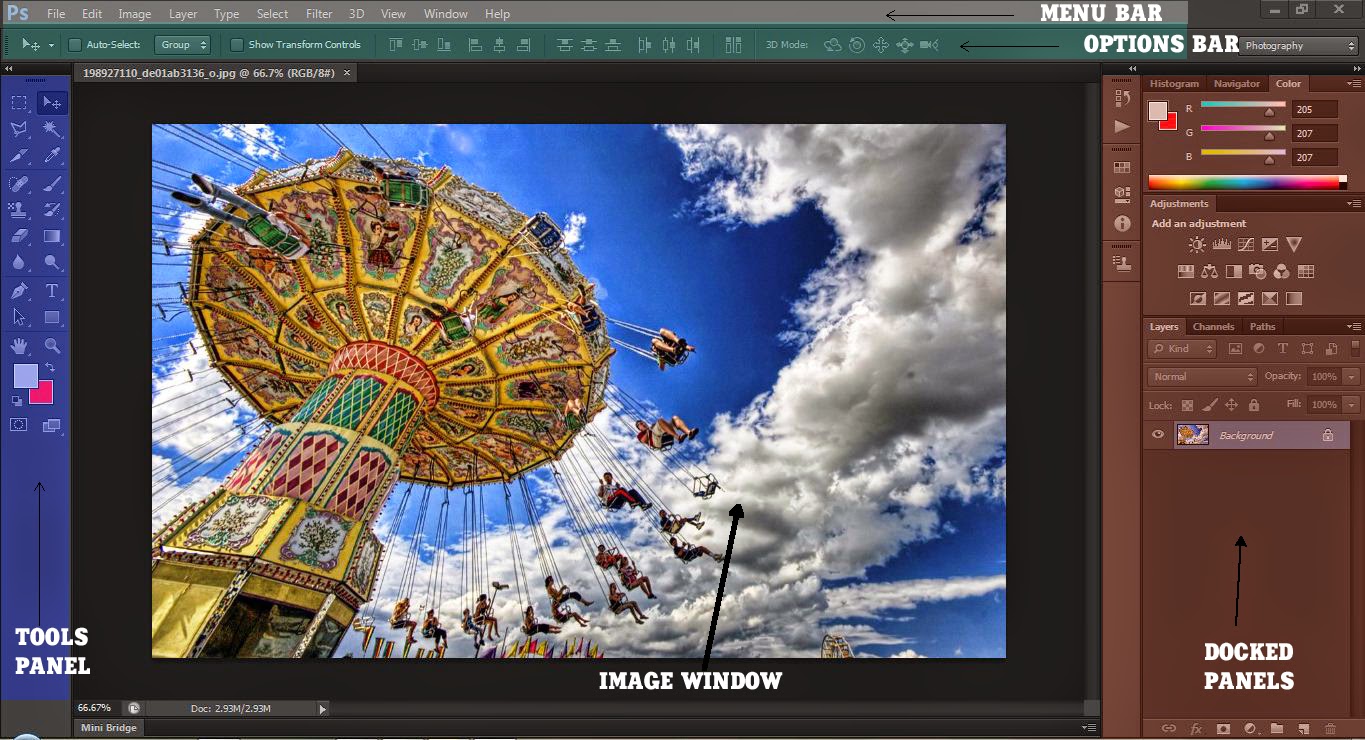
Now lets get know about remaining 3 panels.The remaining three panels are: Tool Panel,Docked Panel and Image Window.Shown in below image:

The remaining three panels are: Tool Panel,Docked Panel and Image Window.

The Tools Panel, the Image window and the Docked Panels are floating panels in photoshop meansyou can move them freely by dragging them and stick any where in the interface.


►Docked Panels


a panel group. Layers panel, Channels panel and Paths panel
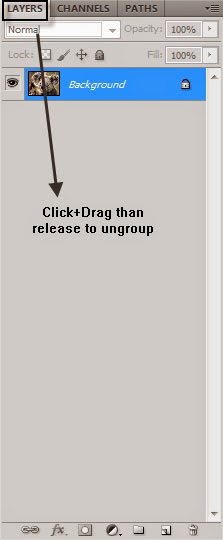
In the image above you can see a panel group. Layers panel, Channels panel and Paths panel are grouped together. If you want to ungroup let’s say Layers panel then simply click and drag the tab then release. You can see the results below.

Layers Panel in the group with the Adjustments panel and Masks panel.
Now let’s say I want to put the Layers Panel in the group with the Adjustments panel and Masks panel. Click the upper dark grey bar (but not the buttons on the far righ ) then drag until near the Adjustments panel. If you see a blue box line surrounding the group then release and the Layers panel will be now in the group with the Adjustments and Masks panel. If a horizontal blue bar appears then you have put the Layers panel in between the 2 groups. You can also change the order of the panels in a group by simply dragging their tabbed names to the left or right.
Photoshop Beginners Guide 2→Getting Started With Photoshop
The best way to get the hang of it is to experiment. Go ahead, drag and drop panels and panels groups, stick them to each other or to the right part of the sticky are. Really, go crazy with them! You can always choose Window > Workspaces > Reset “Workspace Name” to make it nice and clean again.
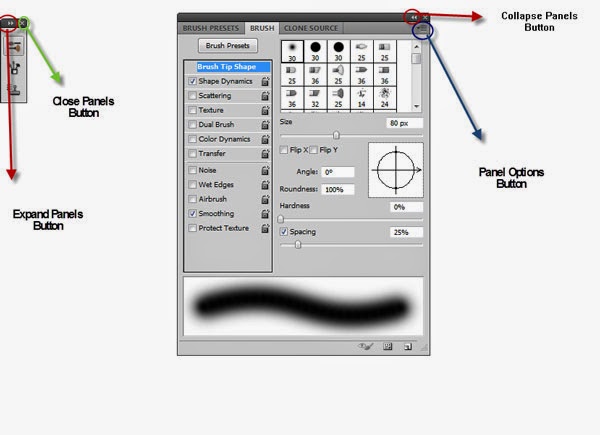
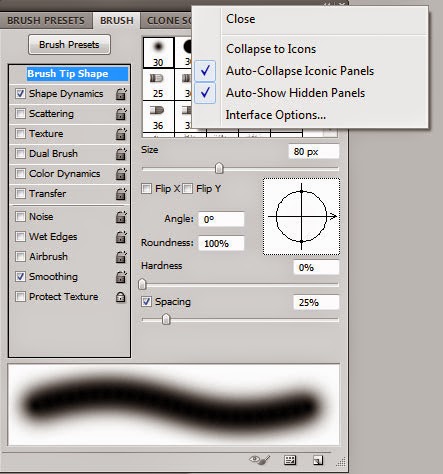
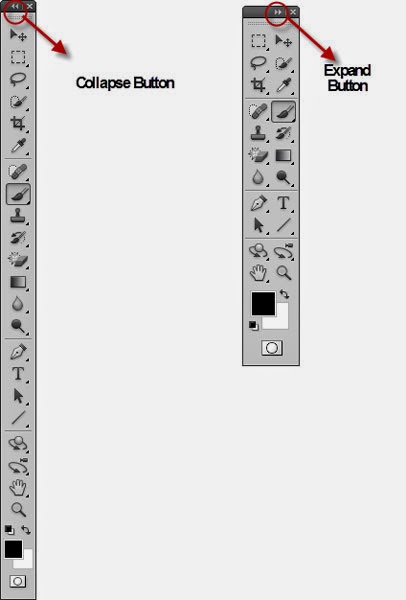
Ok, a few more things about Docked Panels. The little 2 arrows button which points to the right is the Expand Panels button and the same button but with the arrows pointing left is the Collapse Panels button. A collapsed panel is an iconic representation of the panel and it is used to save some space. If you click on one of the icons representing a panel you will open that panel in “full mode”. If you click anywhere else on the image window or another panel the panel you opened previously remains opened. But if you want the iconic panel to go back to it’s initial state after you click somewhere else then right click somewhere in the panel’s upper gray bar and choose “Auto Collapse Iconic Panels”.

Photoshop Beginners Guide 2→Getting Started With Photoshop

►Tools Panel


The collapse button behaves differently to the tools Panel. If you click on it it will arrange all the tools in a 2 column panel. If you click it again it will return to it’s default 1 column state. Take note that in older versions of Photoshop the 2 column panel is the default and the expand/collapse button is missing. We will analyze the Tools Panel in detail in a future post.
Tools Panel

►Image Window


Image Window
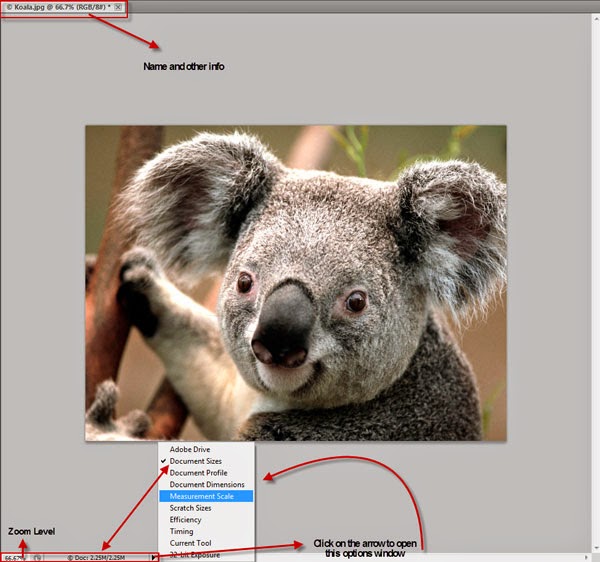
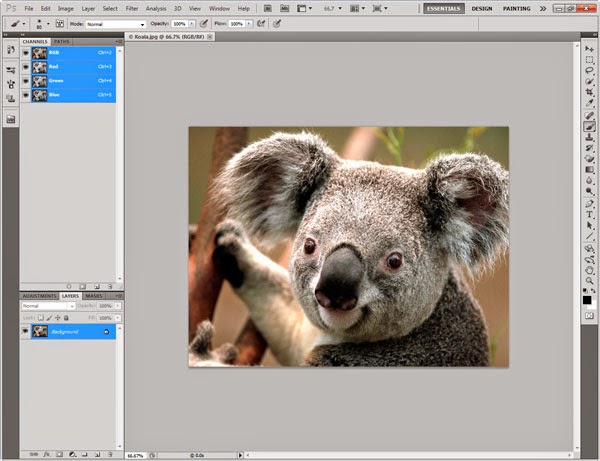
Next to image name (Koala.jpg) you can see some other info. “66.7%” is the actual zoom level. “(RGB” is the color mode and “/8#)” is the number of bits per channel or the image mode. Don’t worry too much about this info, you will get to know better what they mean in some later articles. And lastly “ * ” means that the image is not saved. If you save it that asterisk sign will disappear.
Lower, in the status bar (the red box) you can see the same zoom level as above (actually it’s 66.67% and above it is 66.7%. This is because Photoshop has rounded off the number 66.67 to 66.7).
Next to the zoom level you see some info about our image. In this case it is the image size. The number to the left of the slash sign (“/”) is the initial size” 2.25M” and the number to the right of the slash sign is the actual size “2.25M”. Because our image hasn’t been subject to any modifications the initial size and the current size are the same, but if we were to modify our image and add layers and stuff then the actual size would grow considerably. M means megabytes so 2.25 M is 2.25 Megabytes. If we click on the black arrow on the right of the info we will open an options window from where we can select what info is to be displayed. You can check out what the other options do in the manual. Because I use a lot of different images I tend to choose “Document Profiles “ as the default info but for now you can leave it in it’s default state.

♣ Conclusion


Ok, let’s make a quick summary of what we have learned so far. The Photoshop interface is composed of 3 horizontal bars (Application bar, Menu bar, Options bar) and a “sticky area” where the Image window, the Docked panels and the Tools panels live.
The only thing we can change about the upper bars is to make the Application bar smaller so it fits on the same line with the Menu bar and we can select Workspace > Options to make the Options bar disappear. We can also make these bars disappear when in “Full Screen Mode”. That’s it. We cannot drag these bars to the left, right or bottom and we can’t change their size (at least, as far as I know ).
We can float the Image window so it is above the image area and we can move it around as we want. The only place we can stick it back is the upper area.
We can float the Docked panels and the Tools panel as we want, we can move them to the left or right and stick them to the left or right ( but not the upper part ). Also we can ungroup panels from the Docked panels and create our own groups which we can stick and move to the left or to the right.
Remember, if you screw your workspace and you want to go back, simply choose Window > Workspace > Reset “Workspace Name “.
That concludes this Photoshop interface tutorial. I hope you had fun and learned useful stuff. And don’t forget to experiment and make mistakes, as this is the quickest way to learn.

Photoshop Beginners Guide 1→Getting Started With Photoshop

photoshop beginner 1
Adobe Photoshop is one of the most demanding designing software of  photographers, designers, digital artists, as well as amtures too.Now a days in many social networking sites you can see that your friends too uploading their photos with a professional.Now you can also make your photos like that..or more beautiful.For that you need Adobe Photoshop.
Adobe has launched many photoshop versions and the last edition was Adobe Photoshop CC.So through this post I like to help you to start your photoshop journey.This is our first post about photoshop,so we like to teach you the base means how to get start your photoshop.First of all we will see starting interface and keyboard-shortcuts for adobe photoshop:
Am using Adobe photoshop CS6 version in this tutorial.So if you are using any old version dont worry basics are same for all of them and am explaining only basics.So let’s start.

First Click Adobe Photoshop shortcut in your desktop:

Photoshop Beginners Guide 1→Getting Started With Photoshop
Now wait for photshop to get load and after a few seconds you can see an interface similar to below image.As for your help we just labeled each tab.Observe them carefully,because each tab has itsown speciality:
Photoshop Beginners Guide 1→Getting Started With Photoshop
Now we are going to explain you the labeled parts:

►Menu Bar                    

Photoshop Beginners Guide 1→Getting Started With Photoshop
Menu Bar is the top most tab in photoshop interface.This is where you can save any open files, set options, choose panels etc. Take a look at all the menus and try to familiarize yourself with them. Don’t be afraid to experiment and make mistakes because this is the only way you will learn. The ones you should really know about are:
  • File > Save. Save your files in any of the different formats available. If you are not sure what format to choose go with .psd or .tiff.
  • File > Save for Web and Devices. Save your files as .png, .jpeg or .gif.
  • File > Open. Open a file.
  • File > New. Create a new file.
  • Edit>Keyboard Shortcuts. Change keyboard shortcuts and menus.
  • Window > Workspace > Reset Workspace. If you screw your workspace this option will reset it to it’s default state. Also accessible from the “Show More Workspaces and Options” button from the Application Bar. Also note that when you open the “Window” menu you will see some little check marks next to some names. The check marks indicate what panels (or panels groups) are opened. Try it for yourself and check or uncheck panels. Lower down you will see a check mark next to “Options” and “Tools”. Uncheck “Options” to get rid of the Options bar or uncheck “Tools” to get rid of the tools panel. I never use this option because I know a keyboard shortcut for it. While in “Standard Screen Mode” press Tab to get rid of the Tools panel and the Docked Panels or press Shift+Tab to get rid of the Docked Panels only.
Photoshop Beginners Guide 1→Getting Started With Photoshop
  • Help > Photoshop Help. Don’t be shy to use help when you don’t know something. Use the search bar to find your topics. If you have a poor internet connection then you will do better if you download the help file in .pdf format to have it available all the time. Here’s the link to the .pdf file (CS5). Just let it load then save it to your computer. Also beware that due to the size of the file (40 mb) some old browsers might crash so use a modern (good) browser like Firefox or Opera.

►Option Bar                    


Photoshop Beginners Guide 1→Getting Started With Photoshop
Option Bar is the next horizontal tab just below menu bar.This bar will look different depending on which tool you have active. Here you will find options for the active tool. For example in the image above you can see the brush options because I have selected the brush tool. We will get into more detail in future articles when we will be describing each tool from the tools panel.
So through this post we discussed about upper two horizonatal panels-Menu Bar and Option Bar.This two panels displays basics functions in photoshops.You cannot move them or resize them and you can only make them disappear when choosing the “Full Screen Mode”. Also you can hide the Options Bar by choosing Window > Options ( choose again to make the Options Bar show ).


Read  about remaining tabs-Tool Panels,Image Window And Docked Panels in next post→       Photoshop Beginners Guide 2→Getting Started With Photoshop