Home Blog Page 417

Create A Suspended Text Effect Using Photoshop

suspended text effect

In this tutorial we are going to show you how to create a suspended text effect in photoshop.The tutorial will show you how to create a path using pen tool and how to select and edit a particular item from the document.
Reference:PhotoshopStar
So let’s start:

Tutorial Details

Difficulty : Intermediate
Estimated Time : 45 Minutes
Software : Photoshop Cs3 +


►Step 1


• Create a new document “(1000 X 700)px” with black background color.
• And create a new Text layer with following properties:
Font : Verdana
Font Style: Bold
Font Size:130pt
Font Color:#ffffff

create a text using text tool in photoshop

►Step 2


• Now create a new layer above “Background” and name it as “Gradient“.
• Select Gradient Tool and set foreground color #ffffff(white) and background color #000000(black) and gradient style “Linear Gradient
• Now drag a line from top to bottom to create a gradient effect

use of gradient tool in photoshop

►Step 3


• “Ctrl + Click” on text layer thumbnail.Now you can see a selection around your letters.
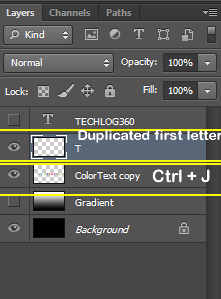
• Now focus on “Gradient” layer and press “Ctrl + J” to duplicate it.And name the new layer as “TextGrad
• And Hide Text layer and “Gradient” layer.
Now you can see gradient is applied on your text only.

duplicate layers in photoshop

►Step 4


Now we are going to select each letters of our text.
• Focus on “TextGrad” layer.
• “Ctrl + Click” on “TextGrad” layer thumbnail.
• Then select “Rectangular Marquee Tool” and enable option “Intersect With Selection“.
• And select your first letter.

use of rectangular marquee tool in photoshop

Now you can see only you first letter is selected.

select an item in photoshop

►Step 5


• Create a new layer above “TextGrad” and name it as “ColorText“.
• Now focus on “ColorText” layer and select any color and using “Paint Bucket Tool” fill our first selected text.
• Set Blend Mode to “Screen“.
• And last press “Ctrl + D” to deselect

fill color and change blend mode in photoshop

►Step 6


Repeat above two steps to edit your reaming letters and you will get an image similar to below one

fill color using photoshop

►Step 7


Set Opacity of both “TextGrad” and “ColorText” layers to “60%

set opacity in photoshop

►Step 8


Now duplicateTextGrad” and “ColorText” layers.

duplicate layers in photoshop

►Step 9


• First focus on original “TextGrad” layer and go to “Filter → Blur → Gaussian Blur” and set “Radius:5px“.
• Do the same effect to original “ColorText” layer too.

Apply gaussian blur effect in photoshop

►Step 10


Now merge all those four layers [“ColorText,ColorText Copy,TextGrad Copy,TextGrad”].
To Merge,”Ctrl + Clickeach layer and go to “Layers → Merge Layers” or press “Ctrl + E

merge layers in photoshop

►Step 11


• Now focus on your merged text layer.Ctrl + Click” its thumbnail and do the same process with “Rectangular Marquee Tool” that we done in Step 4.And select your first letter.
• After selection press “Ctrl + J” to duplicate our selected letter to new layer.

duplicate layers in photoshop

►Step 12


• Repeat the same process for each letter. Don’t forget to select the “ColorText Copy” layer after you press “Ctrl + J” each time.
• And when you done you will get duplicate copy of all letters in separate layer.
HideColorText Copy” layer to make duplicated layers visible.

hide layer in photoshop

►Step 13


• Now create a new layer just above the “ColorText Copy“.And name it as “Rope“.
• Select “Pen Tool” and enable Tool Mode to “Path” and draw a path as shown below.

use pen tool to draw path in photoshop

►Step 14


• Now set foreground color to “#cff5f5
• Then select “Brush Tool” and set “Brush Size:4px” and choose a hard round brush preset

use brush tool,adjust size of brush in photoshop

►Step 15


• After that again select “Pen Tool” and Right Click on the Path you created and choose “Stroke Path“.
• And in small box set “Tool:Brush“.
• And then hit “Enter” to Hide Path.

set stroke path tool in photoshop
set stroke path tool :brush in photoshop
path flled by brush tool in photoshop

►Step 16


• Press “Ctrl + J” to duplicate “Rope” layer.
• Focus on original “Rope” layer and apply “Gaussian Blur” filter again or Press “Ctrl + F“.

duplicate and apply gaussian blur filter in photoshop

►Step 17


Arrange each letters on the Rope so that it looks like hanging.

resize,transform text in photoshop

►Step 18


• Now first “Ctrl + Click” on “Rope Copy” layer thumbnail to select rope.
• And then select each letter layer.
• With the help of “Eraser Tool” erase the outer edges so that the letter looks like its really hang on the Rope
• And last press “Ctrl + D” to get rid of selection

use eraser tool in photoshop

►Step 19


• Again select “Eraser Tool“.This time set its size as “8px” and choose hard round brush preset.
• And then select each letters and start erase parts where the Rope and the Letter meet.

use eraser tool in photoshop

And you will get

erase tool effect in photoshop

 ►Step 20


Now “Ctrl + Select” each letter layers and change its Blend Mode to “Screen“.
And we are done with our letters

set blend mode in photoshop

 ►Step 21


Now we are going to give some background effects.
• create a new layer above “Background” layer and name it as “NewBg“.
• Select “Brush Tool” with “Soft Round” Brush Preset and brush some random spots on your canvas.
• Then erase the a little bit of color around letters and  centre part

paint and use erase tool in photoshop

 ►Step 22


Then finally apply “Gaussian Blur” filter and also adjust opacity of “NewBg” layer

apply gaussian blur filter in photoshop

We are done…


 Final Image


final image of suspended text effect in photoshop

Two Responsive Pure CSS3 Image Slider For Your Website

image slider
 Nowadays all websites are responsive or mobile friendly.And its look cool when your website become compatible to alll devices.But sometimes its hard to find some contents that are suitable for a responsive design.And image slider is one of those.Today we are giving you two responsive  pure CSS3  image slider.Yes pure CSS3 not a bit of Jquery or Javascript code for transition effect.CSS3 styling make these image slider simple,clean and fast loading.

Responsive Pure CSS3 Smooth Image Slider

Responsive Pure CSS3 Smooth Slider
 Smooth Slider DEMO

• CSS Style


Copy below css style for smooth slider and paste it before <,/head> tag

<style>
#smooth-slider {
 text-align: center;
 margin: 0 auto;
 max-width: 640px;
 height:320px;
}
#smooth-slider input {
 display: none;
}
#smooth-slider label, a {
 color: #ef023f;
 cursor: pointer;
 text-decoration: none;
}
#smooth-slider label:hover {
 color: #ff0042 !important;
}
#slide1:checked ~ #smooth-slides .inner { margin-left:0; }
#slide2:checked ~ #smooth-slides .inner { margin-left:-100%; }
#slide3:checked ~ #smooth-slides .inner { margin-left:-200%; }
#slide4:checked ~ #smooth-slides .inner { margin-left:-300%; }
#slide5:checked ~ #smooth-slides .inner { margin-left:-400%; }
#overflow {
 width: 100%;
 overflow: hidden;
}
#smooth-slides article img {
 width: 100%;
}
#smooth-slides .inner {
 width: 500%;
 line-height: 0;
}
#smooth-slides article {
 width: 20%;
 float: left;
}
#controls {
 margin: -8% 0 0 84%;
 width: 15%;
 height: 50px;
}
#controls label { 
 display: none;
 width: 50px;
 height: 50px;
}
#active {
 margin: 23% 0 0;
 text-align: center;
}
#active label {
 -webkit-border-radius: 5px;
 -moz-border-radius: 5px;
 border-radius: 5px;
 display: inline-block;
 width: 10px;
 height: 10px;
 background: #f89e67;
}
#active label:hover {
 background: #ccc;
 border-color: #777 !important;
}
#controls label:hover {
 opacity: 0.8;
}
#slide1:checked ~ #controls label:nth-child(2), 
#slide2:checked ~ #controls label:nth-child(3), 
#slide3:checked ~ #controls label:nth-child(4), 
#slide4:checked ~ #controls label:nth-child(5), 
#slide5:checked ~ #controls label:nth-child(1) {
 background: url('http://4.bp.blogspot.com/-UIZu65eikkQ/VZ34eU1MJwI/AAAAAAAAAIY/vwJyNNu8Cdg/s1600/next.png') no-repeat;
 float: right;
 margin: 0 10px 0 0;
 display: block;
 background-color:#ef023f;
}
#slide1:checked ~ #controls label:nth-child(5),
#slide2:checked ~ #controls label:nth-child(1),
#slide3:checked ~ #controls label:nth-child(2),
#slide4:checked ~ #controls label:nth-child(3),
#slide5:checked ~ #controls label:nth-child(4) {
 background: url('http://2.bp.blogspot.com/-5CImAKrafOY/VZ34euMhR9I/AAAAAAAAAIc/5gpYLrn6Ns0/s1600/prev.png') no-repeat;
 float: left;
 margin: 0 0 0 -17px;
 display: block;
 background-color:#ef023f;
}
/* Description Box */
.details {
 width:10%;
    color: #FFFFFF;
    font-style: italic;
    line-height: 20px;
    margin-top: 260px;
    opacity: 0;
    position: absolute;
    text-align: left;
 overflow-wrap: break-word;
 -webkit-transform: translateZ(0);
 -webkit-transition: all 0.3s ease-out;
 -moz-transition: all 0.3s ease-out;
 -o-transition: all 0.3s ease-out;
 transition: all 0.3s ease-out;
}
.details h3 {
 color: #FFFFFF;
 margin: 0 0 5px;
 font-weight: normal;
 font-size: 16px;
 font-style: normal;
 background: none repeat scroll 0 0 #222222;
 padding: 5px;
}
/* slider Styling */
#smooth-slides {
 margin: 45px 0 0;
 padding: 1%;
 background: #222222;
 border:3px #222222 solid;
 max-width:640px;
 max-height:320px;
}
#smooth-slides article img {
width:100%;
height:320px;
}
/* Animation */
#smooth-slides .inner {
 -webkit-transform: translateZ(0);
 -webkit-transition: all 800ms cubic-bezier(0.770, 0.000, 0.175, 1.000); 
 -moz-transition: all 800ms cubic-bezier(0.770, 0.000, 0.175, 1.000); 
     -ms-transition: all 800ms cubic-bezier(0.770, 0.000, 0.175, 1.000); 
     -o-transition: all 800ms cubic-bezier(0.770, 0.000, 0.175, 1.000); 
     transition: all 800ms cubic-bezier(0.770, 0.000, 0.175, 1.000); /* easeInOutQuart */
     -webkit-transition-timing-function: cubic-bezier(0.770, 0.000, 0.175, 1.000); 
  -moz-transition-timing-function: cubic-bezier(0.770, 0.000, 0.175, 1.000); 
     -ms-transition-timing-function: cubic-bezier(0.770, 0.000, 0.175, 1.000); 
     -o-transition-timing-function: cubic-bezier(0.770, 0.000, 0.175, 1.000); 
        transition-timing-function: cubic-bezier(0.770, 0.000, 0.175, 1.000); /* easeInOutQuart */
}
#smooth-slider {
 -webkit-transform: translateZ(0);
 -webkit-transition: all 0.5s ease-out;
 -moz-transition: all 0.5s ease-out;
 -o-transition: all 0.5s ease-out;
 transition: all 0.5s ease-out;
}
#controls label{
 -webkit-transform: translateZ(0);
 -webkit-transition: opacity 0.2s ease-out;
 -moz-transition: opacity 0.2s ease-out;
 -o-transition: opacity 0.2s ease-out;
 transition: opacity 0.2s ease-out;
}
#slide1:checked ~ #smooth-slides article:nth-child(1) .details,
#slide2:checked ~ #smooth-slides article:nth-child(2) .details,
#slide3:checked ~ #smooth-slides article:nth-child(3) .details,
#slide4:checked ~ #smooth-slides article:nth-child(4) .details,
#slide5:checked ~ #smooth-slides article:nth-child(5) .details {
 opacity: 1;
 -webkit-transition: all 1s ease-out 0.6s;
 -moz-transition: all 1s ease-out 0.6s;
 -o-transition: all 1s ease-out 0.6s;
 transition: all 1s ease-out 0.6s;
}
/*Responsive Style */
@media screen and (max-width: 960px) {
#slide1:checked ~ #controls label:nth-child(5), #slide2:checked ~ #controls label:nth-child(1), #slide3:checked ~ #controls label:nth-child(2), #slide4:checked ~ #controls label:nth-child(3), #slide5:checked ~ #controls label:nth-child(4){
margin: 0 0 0 -50px;
float:left;
}
.details,.details h3{
color:transparent;
background-color:transparent;
}
}
@media screen and (max-width: 768px){
#slide1:checked ~ #controls label:nth-child(5), #slide2:checked ~ #controls label:nth-child(1), #slide3:checked ~ #controls label:nth-child(2), #slide4:checked ~ #controls label:nth-child(3), #slide5:checked ~ #controls label:nth-child(4){
margin: 0 0 0 -50px;
float:left;;
}
.details,.details h3{
color:transparent;
background-color:transparent;
}
}
@media screen and (max-width: 620px){
#slide1:checked ~ #controls label:nth-child(5), #slide2:checked ~ #controls label:nth-child(1), #slide3:checked ~ #controls label:nth-child(2), #slide4:checked ~ #controls label:nth-child(3), #slide5:checked ~ #controls label:nth-child(4){
margin: 0 0 0 -70px;
float:left;
}
.details,.details h3{
color:transparent;
background-color:transparent;
}
}
@media screen and (max-width: 420px){
#slide1:checked ~ #controls label:nth-child(5), #slide2:checked ~ #controls label:nth-child(1), #slide3:checked ~ #controls label:nth-child(2), #slide4:checked ~ #controls label:nth-child(3), #slide5:checked ~ #controls label:nth-child(4){
margin: 0 0 0 -80px;
float:left;
}
#smooth-slides article img {
height:280px;
}
.details,.details h3{
color:transparent;
background-color:transparent;
}
}
@media screen and (max-width: 320px){
#slide1:checked ~ #controls label:nth-child(5), #slide2:checked ~ #controls label:nth-child(1), #slide3:checked ~ #controls label:nth-child(2), #slide4:checked ~ #controls label:nth-child(3), #slide5:checked ~ #controls label:nth-child(4){
margin: 0 0 0 -80px;
float:left;
}
#smooth-slides article img {
height:220px;
}
.details,.details h3{
color:transparent;
background-color:transparent;
}
}
</style>


• HTML 


Here is the html code for smooth slider.Paste it where you want to display slider.

<div class="container">
<article id="smooth-slider">
<input checked="checked" name="smooth-slider" id="slide1" type="radio">
<input name="smooth-slider" id="slide2" type="radio">
<input name="smooth-slider" id="slide3" type="radio">
<input name="smooth-slider" id="slide4" type="radio">
<input name="smooth-slider" id="slide5" type="radio">
<div id="smooth-slides">
<div id="overflow">
<div class="inner">
 
<article>
<div class="details"><h3>DESCRIPTION 1</h3></div>
<a href="LINK 1"><img src="IMAGE 1"> </a></article>
 
 
<article>
<div class="details"><h3>DESCRIPTION 2</h3></div>
<a href="LINK 2"><img src="IMAGE 2"> </a></article>
            
<article>
<div class="details"><h3>DESCRIPTION 3</h3></div>
<a href="LINK 3"><img src="IMAGE 3"> </a></article>
                
 <article>
<div class="details"><h3>DESCRIPTION 4</h3></div>
<a href="LINK 4"><img src="IMAGE 4"> </a></article>
 
<article>
<div class="details"><h3>DESCRIPTION 5</h3></div>
<a href="LINK 5"><img src="IMAGE 5"> </a></article>
   
</div>
</div>
</div>
<div id="controls">
<label for="slide1"></label>
<label for="slide2"></label>
<label for="slide3"></label>
<label for="slide4"></label>
<label for="slide5"></label>
</div>
</article>
</div>


In above html code replace DESCRIPTION 1,LINK 1 and IMAGE 1 with description of first image,link that you want your image to redirect and image link respectively and do so with remaining 4.

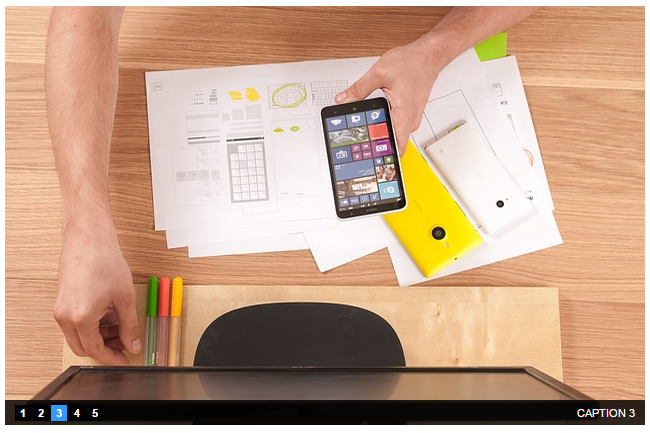
Responsive Pure CSS3 Tab Jump Image Slider

Responsive Pure CSS3 Tab Jump Slider
 Responsive Tab Jump Slider DEMO

•  CSS Style


Copy below css style for tab jump slider and paste it before <,/head> tag

<style>
/* Slider Container */
.slidertab {
margin:20px auto;
padding:0px 0px;
width:640px;
height:420px;
position:relative;
border: 5px #fff solid;
}
.slidertab li {
list-style:none;
margin:0px 0px;
padding:0px 0px;
}
/* Tab NAvigation */
.slidertab li input + label {
position:absolute;
bottom:5px;
left:10px;
z-index:999;
font:bold 11px/16px Arial,Sans-Serif;
background-color:black;
color:white;
padding:0px 0px;
width:16px;
text-align:center;
cursor:pointer;
}
.slidertab li:nth-child(2) label {left:28px;}
.slidertab li:nth-child(3) label {left:46px;}
.slidertab li:nth-child(4) label {left:64px;}
.slidertab li:nth-child(5) label {left:82px;}
/* Images */
.slidertab li img {
border:none;
outline:none;
position:absolute;
top:50%;
left:50%;
width:0px;
height:0px;
visibility:hidden;
opacity:0;
-webkit-transition:all 2s ease-in-out;
-moz-transition:all 2s ease-in-out;
-ms-transition:all 2s ease-in-out;
-o-transition:all 2s ease-in-out;
transition:all 2s ease-in-out;
-webkit-transform:rotate(0deg) scale(0);
-moz-transform:rotate(0deg) scale(0);
-ms-transform:rotate(0deg) scale(0);
-o-transform:rotate(0deg) scale(0);
transform:rotate(0deg) scale(0);
}
/* Captions */
.slidertab a {
text-decoration:none !important;
}
.slidertab li a span {
cursor:default;
display:block;
position:absolute;
right:0px;
bottom:0px;
left:0px;
background-color:rgba(0,0,0,0.8);
font:normal 11px/26px Arial,Sans-Serif;
color:white;
padding:0px 10px;
text-align:right;
opacity:0;
viibility:hidden;
-webkit-transition:all 2s ease-in-out;
-moz-transition:all 2s ease-in-out;
-ms-transition:all 2s ease-in-out;
-o-transition:all 2s ease-in-out;
transition:all 2s ease-in-out;
}
/* Active Tab Navigation */
.slidertab li input:checked + label {
background-color:#39f;
color:white;
}
/* Show the image with transition */
.slidertab li input:checked ~ img,
.slidertab li input:checked ~ a img {
top:0%;
left:0%;
width:640px;
height:420px;
visibility:visible;
-webkit-transform:rotate(720deg) scale(1);
-moz-transform:rotate(720deg) scale(1);
-ms-transform:rotate(720deg) scale(1);
-o-transform:rotate(720deg) scale(1);
transform:rotate(720deg) scale(1);
opacity:1;
z-index:99;
}
/* Show the caption with fade effect */
.slidertab li input:checked ~ a span {
opacity:1;
z-index:100;
}
/* Hide the radio */
.slidertab input{
display:none;
}
 /*Responsive Style */
@media screen and (max-width: 960px) {
.slidertab,.slidertab li input:checked ~ img,
.slidertab li input:checked ~ a img{
width: 100%;
height: 420px;
}
.slidertab li input + label {
position:absolute;
bottom:1px;
left:10px;
font: bold 16px/18px Arial,Sans-Serif;
}
.slidertab a {
visibility:hidden;
}
}
@media screen and (max-width: 768px){
.slidertab,.slidertab li input:checked ~ img,
.slidertab li input:checked ~ a img{
width: 100%;
height: 420px;
}
.slidertab li input + label {
position:absolute;
bottom:1px;
left:10px;
font: bold 16px/18px Arial,Sans-Serif;
}
.slidertab a {
visibility:hidden;
}
}
@media screen and (max-width: 620px){
.slidertab,.slidertab li input:checked ~ img,
.slidertab li input:checked ~ a img{
width: 100%;
height: 420px;
}
.slidertab li input + label {
position:absolute;
bottom:1px;
left:10px;
font: bold 16px/18px Arial,Sans-Serif;
}
.slidertab a {
visibility:hidden;
}
}
@media screen and (max-width: 420px){
.slidertab,.slidertab li input:checked ~ img,
.slidertab li input:checked ~ a img{
width: 100%;
height: 320px;
}
.slidertab li input + label {
position:absolute;
bottom:1px;
left:10px;
font: bold 16px/18px Arial,Sans-Serif;
}
.slidertab a {
visibility:hidden;
}
}
@media screen and (max-width: 320px){
.slidertab,.slidertab li input:checked ~ img,
.slidertab li input:checked ~ a img{
width: 100%;
height: 220px;
}
.slidertab li input + label {
position:absolute;
bottom:1px;
left:10px;
  font: bold 16px/18px Arial,Sans-Serif;
}
.slidertab a {
visibility:hidden;
}
}
</style>

• HTML


Here is the html code for tab jump slider.Paste it where you want to display slider.

<div align="center">
<ul class="slidertab">
<li>
<input type="radio" id="s1" name="num" checked="true" />
<label for="s1">1</label>
<a href="LINK 1"><img src="IMAGE 1" /><span>CAPTION 1</span></a>
</li>

<li>
<input type="radio" id="s2" name="num" />
<label for="s2">2</label>
<a href="LINK 2"><img src="IMAGE 2" /><span>CAPTION 2</span></a>
</li>

<li>
<input type="radio" id="s3" name="num" />
<label for="s3">3</label>
<a href="LINK 3"><img src="IMAGE 3" /><span>CAPTION 3</span></a>
</li>
 
<li>
<input type="radio" id="s4" name="num" />
<label for="s4">4</label>
<a href="LINK 4"><img src="IMAGE 4" /><span>CAPTION 4</span></a>
</li>

<li>
<input type="radio" id="s5" name="num" />
<label for="s5">5</label>
<a href="LINK 5"><img src="IMAGE 5" /><span>CAPTION 5</span></a>
</li>
</ul>
</div>

In above html code replace  LINK 1 , IMAGE 1 and CAPTION 1 with link that you want your image to redirect,image link  and description of first image, respectively and do so with remaining 4.

We hope you all like these pure CSS3 sliders.If you face any problem while insatlling this sliders to your website please comment below.
We will update this post with more CSS3 slides…..wait…….

Create A Typographic Portrait Using Photoshop

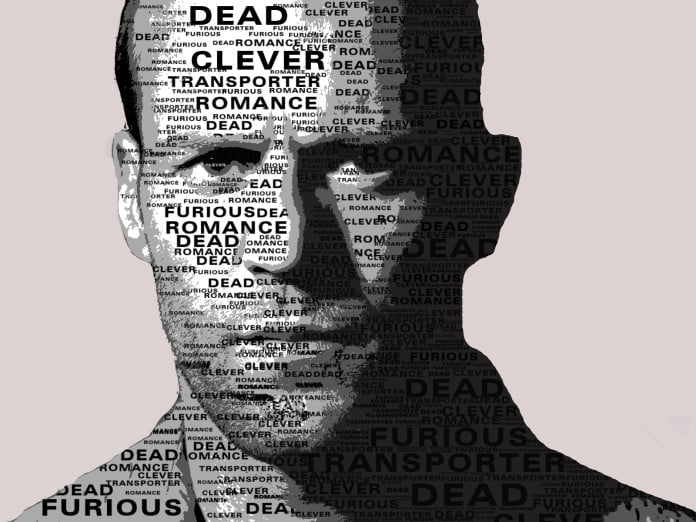
Typographic portrait

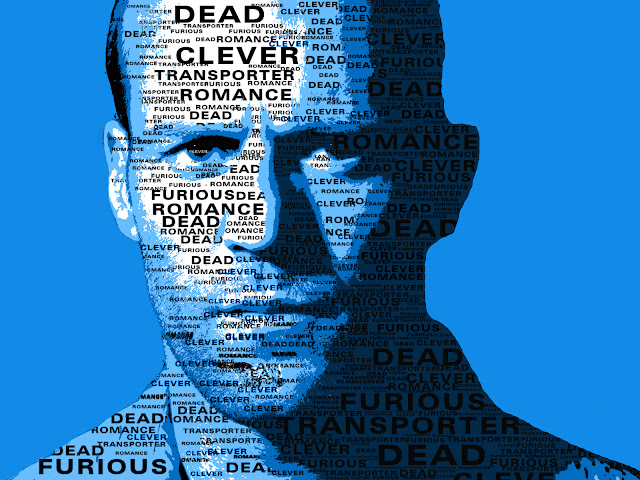
Typography means playing with text.Today we are going to show you the simplest tutorial in typography.In this tutorial we are going to overlay some  of your favourite words over your image.This is the basic typography tutorial for beginners,In this tutorial we will also teach you how to create your own brushes.So lets start:


►Step 1


Open the image you like to give typographic effect.
I prefer  close up images will be better for this tutorial.Name the layer as “Model

1

►Step 2


Now only cut out the face part of the image or delete the part you didn’t want to give typographic effect.Then you will get an image something like below one.

3

►Step 3


Now create a new layer below the “Model” layer.And name it as “Wall“.Fill the “Wall” layer with “#ffffff” color.

4

►Step 4


We are going to Desaturate the image file so select “Model” layer and press “Ctrl+Shift+U” or you can Desaturate it by going to “Image→Adjustments→Desaturate

5

►Step 5


Again go to “Image→Adjustments→Posterize” and set the value as “4“.

6

►Step 6


Hide
Model” layer for a while.
And using Type Tool with any font and color “#000000“,type some words that you want to appear on your image.

7

►Step 7


Now we are going to make some brushes.
Focus on your Text layer and with the help of “Rectangular Marquee Tool” select the first word.

8

After selecting the first word go to “Edit→Define Brush Preset” and then name your new brush.

9

Similarly select other words and create brushes for them too.So here i created 5 different brushes for my 5 words.

9.1

►Step 8


Now delete Text layer and UnhideModel” and “Wall” layers.

12

►Step 9


Now we are going to select each type of shades in “Model” layer.
So with the help of “Rectangular Marquee Tool” we are going to select all the black color area in “Model” layer.
So first select a small portion of black color like below image.

13

Then go to “Select→Similar” and you can see that all black colour region on “Model” layer are selected

14

►Step 10


HideModel” layer leaving the selection loaded.
And create a new layer above “Model” layer and name it as “Typo“.And you will get something similar to below image.

15

►Step 11


And here we are going to use those brushes that we created in Step 7.
Focus on newly created layer-“Typo” and brush those words with different size on those selected area.
You can select the brush model and change its size by Right-click on any part of document.
And you will get something similar to below image.

16

►Step 12


Like that select a small part of another shade and and brush it.And brush the entire image with words.
And now unhideModel” layer and adjust its colors and make blend mode as “Luminosity” and you will get an image similar to below one.

17

►Step 13


Just fill the “Wall” layer with different color.And you will get your typographic portrait like below one.

typographic

And we are done here.I hope you all like this tutorial.This is the most easiest method of overlaying text over your images.If you have any doubts comment below.
And also don’t forget to comment which type of tutorials you like to see from us.

Create A Water Drop Text Effect Using Photoshop

water drop text effect
Let’s learn how to Create A Water Drop Text Effect Using photoshop.In this tutorial we’ll use advanced layer style techniques to create the drops. Later you will learn how to create a depth map from any image, as well as how to distort any surface effectively with it. Along the way, we’ll also create a layer style based grid and custom background and much more.So let’s start.
Tutorial Details

Difficulty : Intermediate
Estimated Time : 60 Minutes
Software : Photoshop CS6


Step 1:


Create a new document “File → New” with following properties and save it as “Water Drop Effect.psd”
Don’t forget to save your work frquently during each step by pressing
.Because it is long tutorial and never miss you work because for any reason.

1

Step 2:


Now Double Click on the Background Layer and rename it as “MainBg”.
Because it is impossible to apply layer style directly on Background Layer.

2

Step 3:


Now set Foreground Colour to #247dbd and Background Colour to 123f6e

3

Step 4:


Again Double Click on “MainBg” layer to open Layer Style Window.Here you have to select “Gradient Overlay” and  set properties like below

4

Step 5:


Create a new layer above “MainBg” layer and name it as “Clouds”.Now go to “Filter → Render → Clouds”.then you will get an image similar to below screenshot.
Note that Colud filter will not give exact image like below because each time it gives random images.So don’t worry about your image.You can apply Clouds filter untill you satisfied the look.

5

Step 6:


Now reduce the Opacity of “Clouds” layer by 50%.After that press “CTRL+SHIFT+ALT+E” to get a copy of Merged layers of “MainBg” & “Clouds” layers.Now name the merged layer as “MergedBg”.
Always remember to turn off “MergedBg” layer visibility while you are making any changes to layer “MainBg” and “Clouds”.Because you will not see the changes that you make.

6

Step 7:


Go to “Filter → Pixelate → Mosaic” and Make Cell =35 squares.

7

Step 8:


Now create a new layer just above “MergedBg” layer.And type your text.Here i typed “TECH”.I choose font : Impact and Set Properties according to below screenshot.

8

Step 9:


In this step we are going to create water drop shapes.So create a new blank layer below text layer and name it as “Water Drop”
After that take “Brush Tool”,Set foreground colour to black (choose hard round brush) and draw water drops shape.Create you own shapes.

9

Step 10:


Now choose text layer,then “Right Click → Rasterize Type”.

10

Step 11:


Now we are going to make some changes to our text using “Brush Tool” and “Eraser Tool”.Like previous step of creating water drops ,select hard round brush to change the outer part of text and hard round eraser for inner modification.See below screenshot.

11

Step 12:


Okay now we make some irrergular look to our text.And we are going to style our “TECH” layer.So Double Click on “TECH”  layer window and you will get a window just like below.This window is called “Layer Style” Window.
So in Layer Style Window you can see a heading “Advance Blending”.Below that heading Tick the first option – “Blend Interior Effects As Group” and then set “Fill Opacity” to Zero.This will make “TECH” layer transparent.See the below screenshot if you have doubt.

12

Step 13:


Now click “Bevel & Emboss” tab and set properties like below.

13

Step 14:


Next go to tab “Inner Shadow” and set properties like this

14

Step 15:


Next go to the tab “Outer Glow” and set values

15

Step 16:


And final one “Stroke” settings after that press ok

16

Step 17:


Now you get an image similar to this

17

Step 18:


We complete “TECH” layer styling.Now we are going to copy and paste this style to “Water Drop” layer.So Right Click on “TECH” layer and choose “Copy Layer Style”
Then paste it on “Water Drop” layer.See screenshot.

18

Step 19:


Choose “Water Drop” layer’s styling option and make a small change to “Bevel & Emboss”

19


Then your result will look somethimg like this

19.1

Step 20:


Just above the“MergedBg” create a new layer ,name it as “Grid” and draw a white rectangle, like below

20

Step 21:


Now Double Click on “Grid” layer and edit Layer Style “Pattern Overlay” and  set properties like below screenshot. and press ok.

21

You get something like this:

21.1

Step 22:


Again choose “Grid” layer,Right Click and choose “Rasterize Layer Style” and apply “Image → Adjustment → Invert”.Now we have “Grid” layer in black colour.Now select blend mode to “Screen” and you will get only white grid lines.Like below screenshot.

22

Step 23:


Right Click on “Grid” layer and choose “Duplicate Layer” and rename the duplicate layer as “Grid Drop”

23

And your result will be this

23.1

Step 24:


Now hide “Grid” ,Grid Drop” and “MergedBg” layers and choose “TECH” layer then press “CTRL+SHIFT+ALT+E” to make a copy of merged layers and rename the new layer as “Drop Map”

24


And you will get like this

24.1

Step 25:


Select “Drop Map” and go to “Image → Adjustments → Desaturate” and your image will be in balck and white.

25

Step 26:


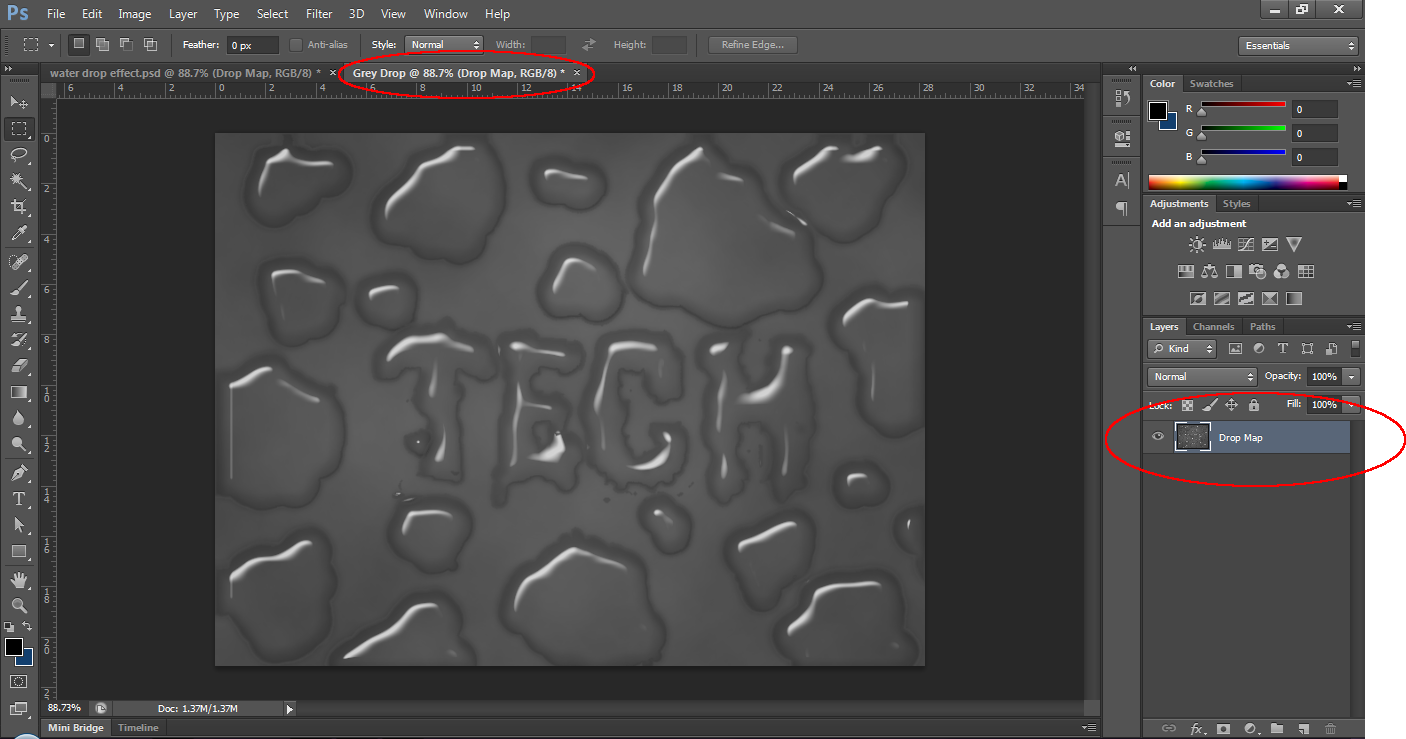
Now we are going to create separate Greyscale file.So Right Click  on “Drop Map” and select “Duplicate Layer”.And choose “New” from document drop down menu.Then name your file as “Grey Drop” and press OK.This will create a new file wth “Drop Map” layer  only in it.

26
26.1

Step 27:


Right Click on the “Drop Map” layer of newly created file “Grey Drop” and choose “Flatten Image”.After that apply “Image → Mode → Grayscale”.
This will remove colour information of the layer.Now save the file as psd and close it.

27

Step 28:


Again back to our “Water Drop Effect.psd”.Turn off the visibility of “Drop Map” layer and turn on visibility of “Grid Drop” layer.

28

Step 29:


Now choose “Grid Drop” layer and select “Filter → Filter Gallery → Disort → Glass”.See the below screenshot to set the values.And now grid pattern is disorted.

29
29.1

Step 30:


To see disorted grid patterns only in water drop we are going to create Mask for this layer.
So first choose “Grid Drop” layer and then “CTRL+CLICK” “TECH” layer thumbnail and “CTRL+SHIFT+CLICK”      “Water Drop” layer thumbnail.See the below screenshots.

30

Step 31:


Still target “Grid Drop” layer and click “Add Layer Mask” button (Third from left below the layer panel).And after that change the Opacity to 30%

31

Step 32:


Turn on the visibility of “Grid” layer and choose Mask thumbnail of “Grid Drop” layer and press “ALT+Drag” it to “Grid” layer.
In  this way we can copy Mask from one layer to another.
And then selecting Mask thumbnail of “Grid” layer, Apply “Image → Adjustments → Invert” and set Opacity to 10%.See screenshot.

32

Step 33:


Now we are going to give some glow effect to out text and drop.
So turn on visibility of “Drop Map” layer and go to “Image → Adjustments → Levels” and set value like below screenshot.

33

Step 34:


Then “Filter → Blur → Guassian Blur” with a value of 3 px and set blend mode “Linear Dodge(ADD)”

34

Step 35:


Now we are going for the final touch up.
Create a new blank layer above the “Drop Map” layer and name it as “Reflect” and choose soft brush with colour #247dbd and paint some reflection in the opposite direction of highlited area.
See screenshot.

35
And we are done,,,and your final result will look something similar to below image
 
water%2Bdrop%2Beffect
RESULT
 
I hope you all like the tutorial.If you do share it with your friends and if you have any doubt don’t forget to comment below
And also comment which type of tutorial you want next.

Create A 3D Text Rising Effect Using Photoshop

3d text effect using photoshop
This tutorial will explain how to create an amazing 3D text effect using some gradient fills, lasso tools, and Blur Effect. It is really simple but the final result is great. Lets get started.
Tutorial Details

Difficulty : Beginner
Estimated Time : 30 Minutes
Software : Photoshop CS5+
Resources : Font→Familian (Download)

Step 1:
Create a new document, 800×500 pixels, or any other dimensions depending on the text you’re going to create. Then, set the Foreground color  and the Background color  and pick the Gradient Tool. Choose the Foreground to Background fill, and click the Radial Gradient icon in the Options bar, then click and drag from the center of the document to one of the corners to create the gradient fill.
 
2
Step 2:
Create the text in Bold All Caps using the color White and the font Familian with a Size value of 175 pt, 
 
3.1
STEP 3:
 Go to Layer ->  Type Rasterize or Type to rasterize the text layer, then duplicate the text layer and make the original layer invisible by clicking the eye icon next to it.
 
4.2
Step 4:
Double click the copy text layer to apply a Gradient Overlay effect, and click the Gradient box to create the gradient used.
 
5
There are only two colors used: one to the left, and one to the right.
5.1
 This is how the text should look like.
6
Step 5:
Go to Edit -> Transform -> Skew, and move the upper corners to get a result similar to the one below. Then press Enter to get out of the Skew Mode

7

Step 6:

Pick the Rectangular  Tool, and draw a 0.3 x 9 cm  WHITE COLOURED rectangle on top of the first letter. You can check the dimensions in the Info panel (Window -> Info)

8

Step 7:

Now go to Go to Filter -> Blur -> Gaussian Blur and enter 2.5 for the Raduis value.And rename the layer as “blur 1”

9


Step 8:

Create another new layer ,create a new 1 x 9 cm rectangle over the previous one and fill the selection with white,

Then  Go to Filter -> Blur -> Gaussian Blur and enter 9 for the Raduis value.And rename the layer as “blur 2”

10Step 9:

Select both blur layers then go to Layer -> Merge Layers, and rename the merged layer to “Blur”.

After that Go to Edit -> Transform -> Rotate, and rotate the blurred part as below, then press Enter.

11

Step 10:

Duplicate the “blur” layer and move it so that you have blur placed over each letter. Then, select all the Blur layers and merge them (Layer -> Merge Layers).

13.2Step 11:

Ctrl + Click the copy text layer’s thumbnail (icon) to create a selection, then go to Select > Inverse to invert the selection.
14

Step 12:

Press Delete to get rid of the outer parts of the blur, then press Ctrl + D to get rid of the selection.

15

Step 13:

Make the original text layer visible again.

16


Step 14:

Go to Edit -> Transform -> Skew, and skew this text a bit more to the right. Press Enter when done.

17

Step 15:

Go to Edit -> Transform -> Scale, and scale the text down vertically. Don’t forget to press Enter after you do so.

17.1Step 16:

Make sure that the original text layer is selected (active), and click the “Lock transparent pixels” icon in the Layers panel. Set the Foreground color to BLACK and pick the Paint Bucket Tool. Un-check the Contiguous box in the Options bar then fill the white part with the Foreground color.

18

Step 17:

Create a new layer on top of the original text layer. Pick the Polygonal Lasso Tool and draw a selection around the empty areas between the two text layers.

19

AND WE ARE DONE.

We get final image that look like the below one.

finalHope you enjoyed the tutorial and found it useful..If you have any doubts free feel to comment below or contact us.

Create A Waving Flag Effect Using Photoshop

waving flag effect
Today you are going to learn how to create a waving flag effect or curled flag effect using photoshop.In this tutorial we are using Displace filter which make it more realstic and easy.So lets start.

Tutorial Details

Difficulty : Beginner
Estimated Time : 15 Minutes
Software : Photoshop CS6


►Step 1:


Open your flag image with photoshop And rename the layer as “Flag“.And save your file as “Flag Effect.psd“.

1

►Step 2:


Now create new layer and Place [File → Place ]  fabric image you have.You can get one from by googling.Or use mine.[Fabric 1 ,  Fabric 2] And rename the layer as “Wave“.

2

►Step 3:


Now select “Wave” layer and first “Right Click → Rasterize Layer“.
Then go to “Filter → Stylize → Emboss” set the values as you feel appropriate.

3

►Step 4:


After that go to “Filter → Blur → Gaussian Blur “and set the value as below.

4

►Step 5:


Now again choose “Wave” layer and then “Right Click → Duplicate Layer” .
Then a new window will appear.Set the values of new window like below screenshot.Then you you will get “Wave” layer in a new tab.

5

►Step 6:


In the new tab First Right Click the layer → Flatten Image
After that apply “Image → Mode → Grayscale“.Save the file as “Flag Map.psd” and close the tab.

6

►Step 7:


Now back to our “Falg Effect.psd“.First hide the visibility of “Wave” layer and then select “Falg” layer.

7

►Step 8:


Then apply “Filter → Disort → Displace“.And set the values like below and finally it will ask for displacement image,then browse to “Flag Map.psd” file that we saved in Step 6

Repeat the above Displace Step 2-3 times by changing horizontal and vertical scale values to get more waving effect to your flag

8


Now you will get a disorted  image of your flag.

8.1

►Step 9


Now turn on the visibility of “Wave” layer and then make its Blend Mode to “Hard Light“.

9

Then you will get a waving flag like below image

9.1

►Step 10:


Now you can make it more attractive by adjusting its lightning levels.So adjust levels as you like by going to “Image → Adjustments → Levels“.
10

Then your final image wil look like this:

Flag%2BEffect

I hope you all like this tutorial.This is the most easiest way to create a waving flag in photoshop.So if you have any doubts comment below.We will be back with another tutorial soon. 🙂

Create A Cool Crack Effect On Face Using Photoshop

create a crack effect on face using photoshop

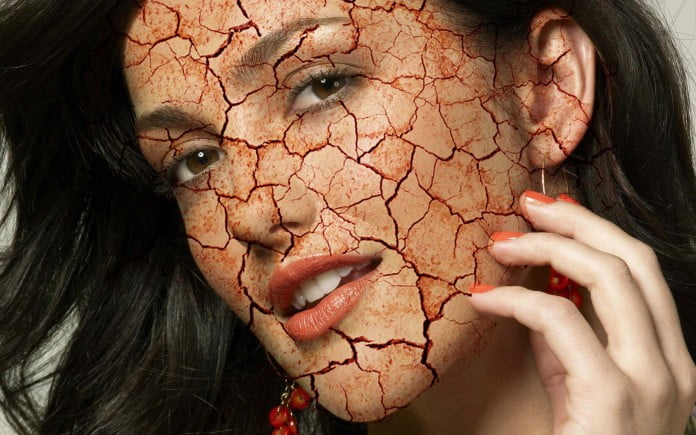
Hi guys after our Four tutorials of Photoshop for beginners today here we are before you to teach How To Make A Cool crack Effect On Face Using Photoshop. This is the one of the most easiest method to make crack effect on face without using brush tool.So lets start.

In this tutorial we are using “Multiply” blend mode to attain this particular effect.

Tutorial Details:
Difficulty : Beginner
Estimated Time : 10 Minutes
Software : Any Version Of Photoshop

Crack Face Effect On Face Using Photoshop

Step 1

Open your image with Photoshop and rename the layer as “Main”.

Tutorial - Make A Cool Crack Effect On Face Using Photoshop
Step 2

Now create a new layer and name it as “Crack”.

Tutorial - Make A Cool Crack Effect On Face Using Photoshop

Step 3:

Go to “File → Place” and select crack image (you can get one by simply searching on Google) and place it above “Main” Layer.Tutorial - Make A Cool Crack Effect On Face Using PhotoshopTutorial - Make A Cool Crack Effect On Face Using Photoshop

Step 4:

Now Click “Normal” above Layer Tab and select “Multiply”.

Tutorial - Make A Cool Crack Effect On Face Using Photoshop

Step 5

Then you get an image something similar to this:

Tutorial - Make A Cool Crack Effect On Face Using Photoshop

Step 6

Erase the unwanted parts of Crack layer. Then you will get below image.

Tutorial - Make A Cool Crack Effect On Face Using Photoshop

Step 7

We done 98% of our work, next step is up to you. Adjust image brightness, color and anything you like by going to “Image→ Adjustments”.

Tutorial - Make A Cool Crack Effect On Face Using Photoshop

Step 8

After final touch up you will get an image something like this. Make your effects as you like.

Tutorial - Make A Cool Crack Effect On Face Using Photoshop

So I hope you all enjoy this easy tutorial.If you like the tutorial share it with your friends and have any doubts simply comment below.We are here to help you.

Tell us which Photoshop tutorial do you like to learn next.

How To Unlock/Bypass Android Pattern Lock

android pattern lock

Many of you are using android pattern lock system to lock your android smartphone.But unfortunately if you forget your pattern lock and do a number of fail attempts your phone will lock permanently.So here are two simple methods that will help you to unlock or bypass your android smartphone pattern lock.


Method 1 : Using Your Google Account


This is the most easiest method to unlock your android pattern lock system without losing your data in phone.But this method only works if you already connected to internet and you have a google account unless you can skip this method.
So make sure you have an internet connection and do steps as follows :

  • When you try different patterns and unable to unlock your phone in five attempts. Then a message pop-up and shows two buttons “next” and “try again”.
  • Now click on “next” button.
  • Now you see two options for unlocking phone. One is answer the security question and the second option is to provide Google account details.
  • Mostly people don’t set a security question. But if you set it then simply answer the question and unlock your device quickly.
  • Otherwise check the Google account option and click “next”
  • Now provide your Google account username and password attached with your device and click on “sign in”.
  • After that you are directed to choose new pattern and now you can unlock with this pattern.

Method 2 : Hard Reset /Factory Reset


Do this method only if you have no internet connection or google account.Be aware this method will reset your phone.This method will delete all your datas stored in phone memory.And this is the only method that can unlock your phone without flashing it.
So let’s go for it :
  • Swithoff phone first.
  • Now hold “Volume up + Power Button” (in some devices hold “Volume up + Home Key + Power Button”)
  • Now a black screen will come with different options.
  • Use the volume key to move up and down then scroll down to “Restore Factory Defaults” or “Delete all User Data” depending on which is on your device.
  • Select this factory reset option and then press power button to let the action begin.
  • Now it asks you for confirmation, select “yes”.
  • fter clicking on the settings above, now scroll down to “Reboot System Now” and wait for your phone to reboot
  • Now your phone will reboot and android lock pattern have been removed and your device will now in its default settings.
If you have any doubts comment below.