


Difficulty : Intermediate
Estimated Time : 60 Minutes
Software : Photoshop CS6
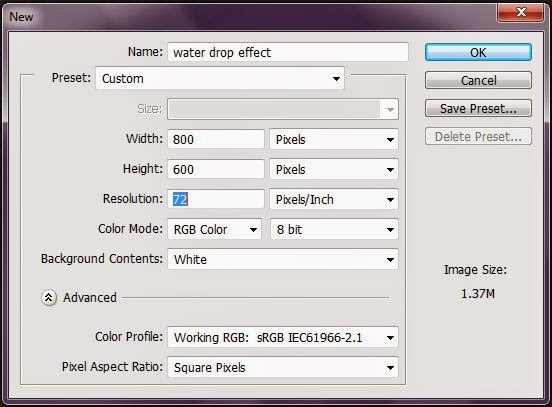
Step 1:
Create a new document “File → New” with following properties and save it as “Water Drop Effect.psd”
Don’t forget to save your work frquently during each step by pressing
.Because it is long tutorial and never miss you work because for any reason.
Step 2:
Now Double Click on the Background Layer and rename it as “MainBg”.
Because it is impossible to apply layer style directly on Background Layer.

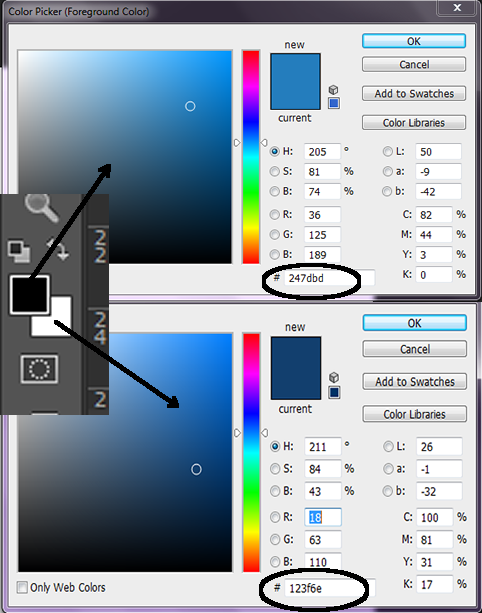
Step 3:
Now set Foreground Colour to #247dbd and Background Colour to 123f6e
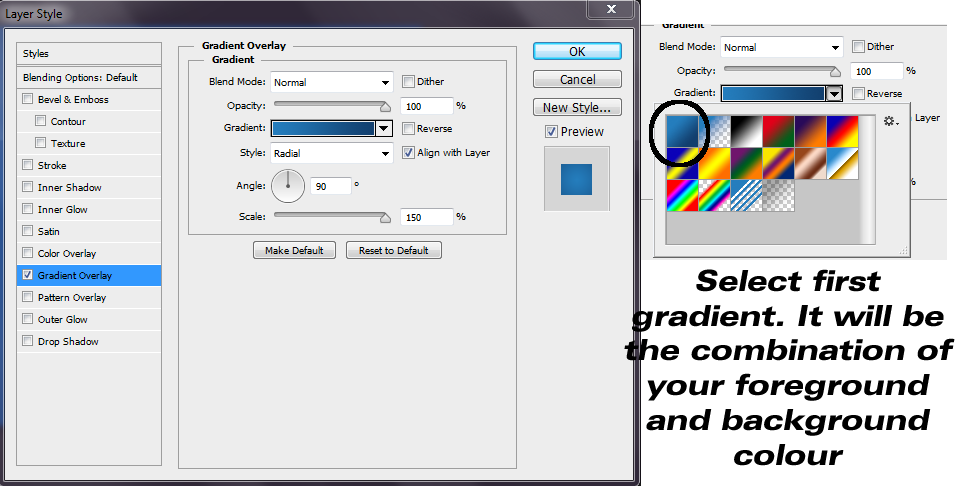
Step 4:
Again Double Click on “MainBg” layer to open Layer Style Window.Here you have to select “Gradient Overlay” and set properties like below
Step 5:
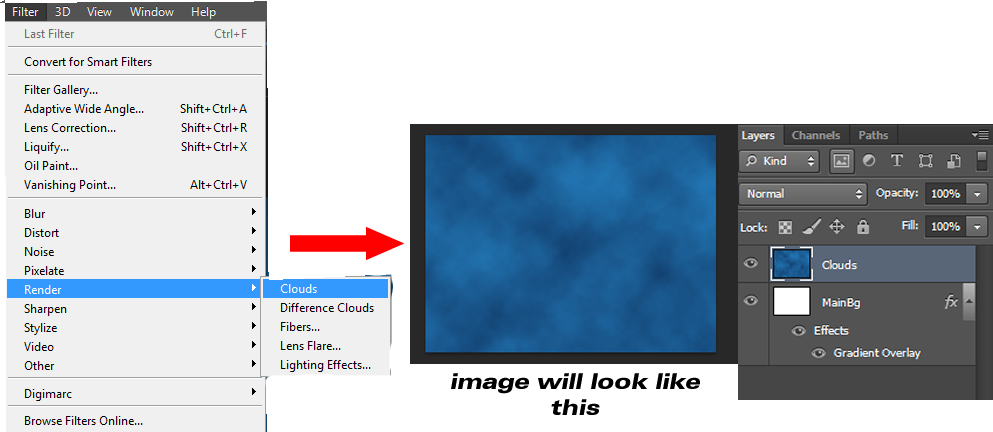
Create a new layer above “MainBg” layer and name it as “Clouds”.Now go to “Filter → Render → Clouds”.then you will get an image similar to below screenshot.
Note that Colud filter will not give exact image like below because each time it gives random images.So don’t worry about your image.You can apply Clouds filter untill you satisfied the look.
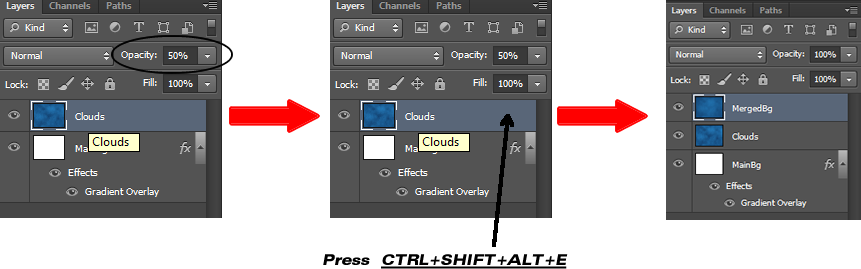
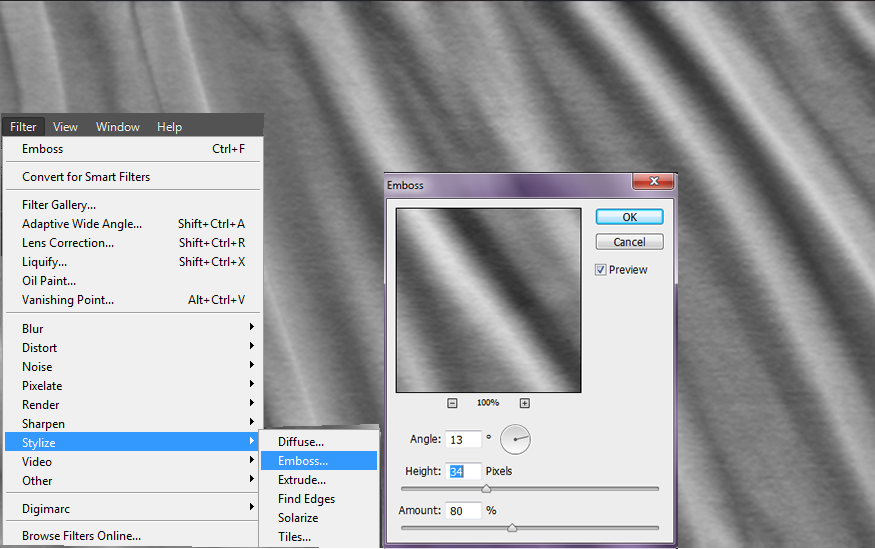
Step 6:
Now reduce the Opacity of “Clouds” layer by 50%.After that press “CTRL+SHIFT+ALT+E” to get a copy of Merged layers of “MainBg” & “Clouds” layers.Now name the merged layer as “MergedBg”.
Always remember to turn off “MergedBg” layer visibility while you are making any changes to layer “MainBg” and “Clouds”.Because you will not see the changes that you make.
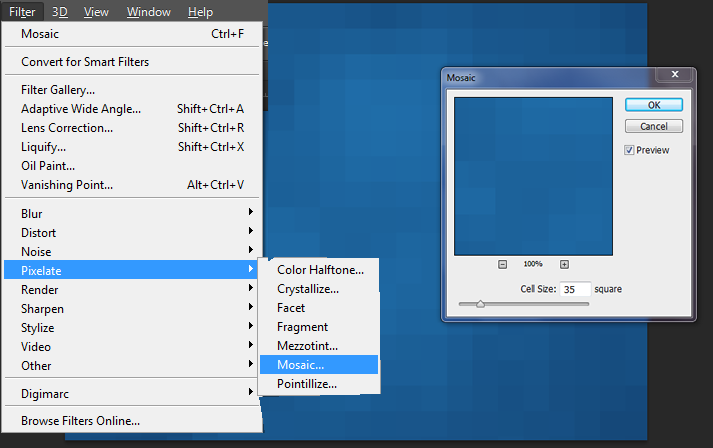
Step 7:
Go to “Filter → Pixelate → Mosaic” and Make Cell =35 squares.
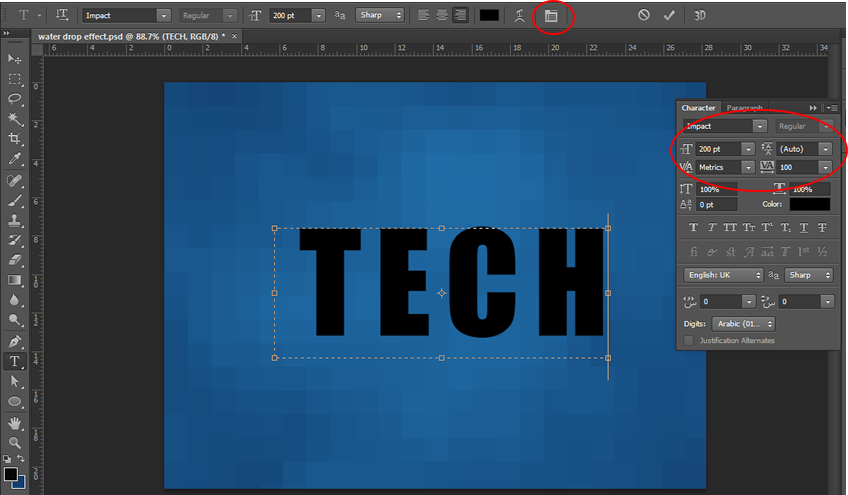
Step 8:
Now create a new layer just above “MergedBg” layer.And type your text.Here i typed “TECH”.I choose font : Impact and Set Properties according to below screenshot.
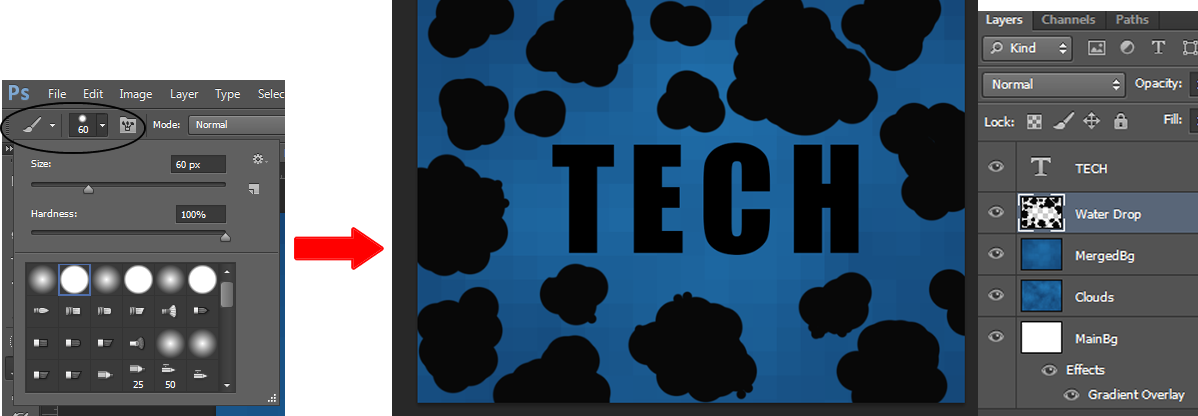
Step 9:
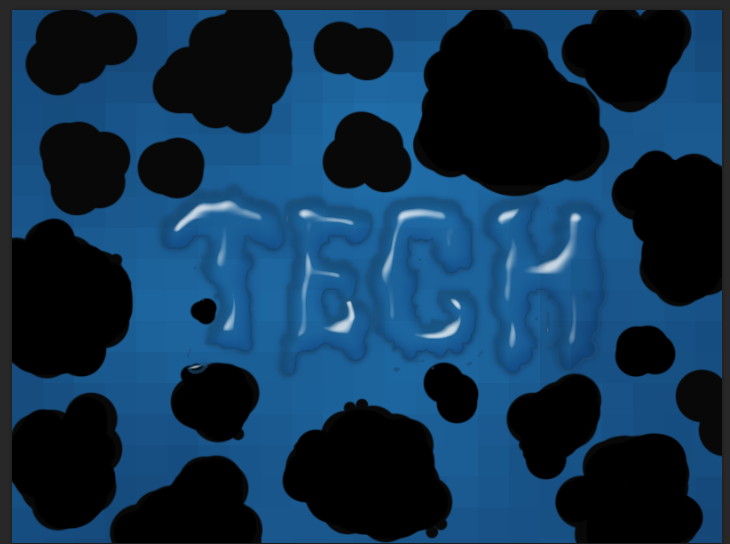
In this step we are going to create water drop shapes.So create a new blank layer below text layer and name it as “Water Drop”
After that take “Brush Tool”,Set foreground colour to black (choose hard round brush) and draw water drops shape.Create you own shapes.
Step 10:
Now choose text layer,then “Right Click → Rasterize Type”.
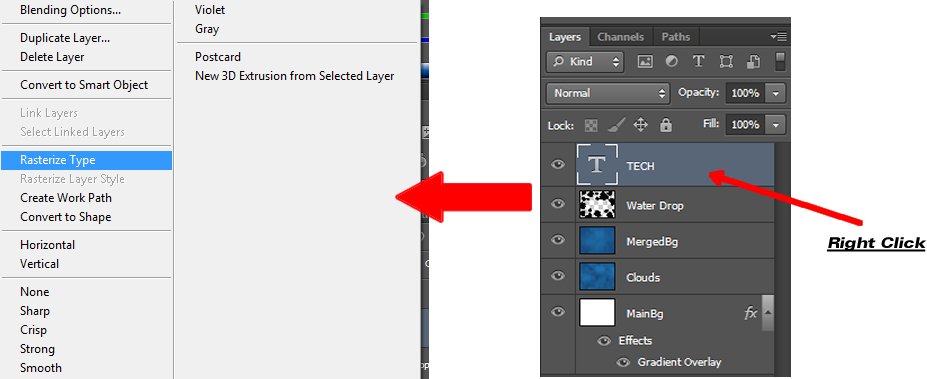
Step 11:
Now we are going to make some changes to our text using “Brush Tool” and “Eraser Tool”.Like previous step of creating water drops ,select hard round brush to change the outer part of text and hard round eraser for inner modification.See below screenshot.

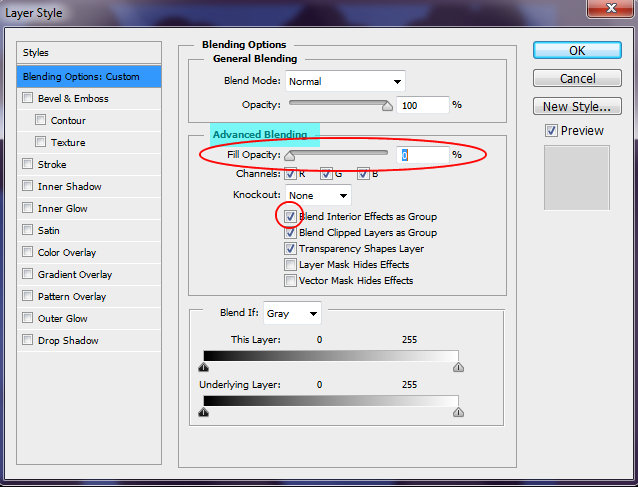
Step 12:
Okay now we make some irrergular look to our text.And we are going to style our “TECH” layer.So Double Click on “TECH” layer window and you will get a window just like below.This window is called “Layer Style” Window.
So in Layer Style Window you can see a heading “Advance Blending”.Below that heading Tick the first option – “Blend Interior Effects As Group” and then set “Fill Opacity” to Zero.This will make “TECH” layer transparent.See the below screenshot if you have doubt.
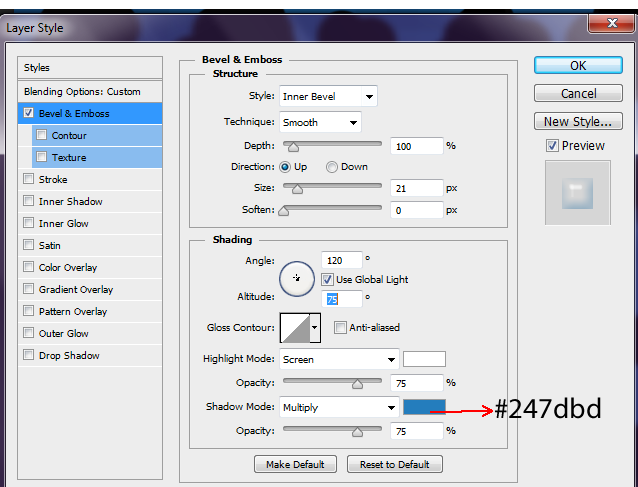
Step 13:
Now click “Bevel & Emboss” tab and set properties like below.
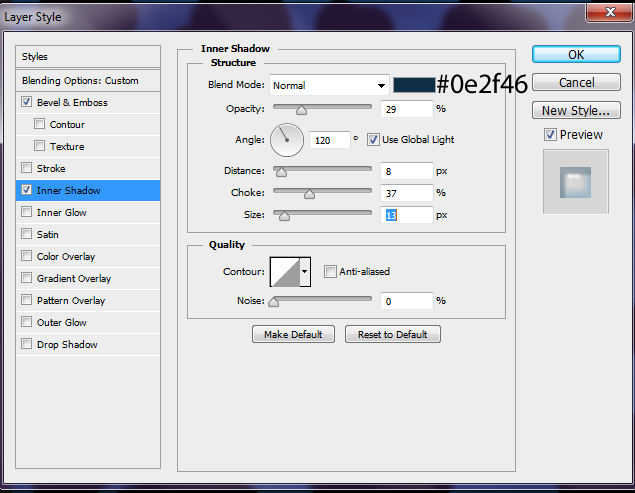
Step 14:
Next go to tab “Inner Shadow” and set properties like this
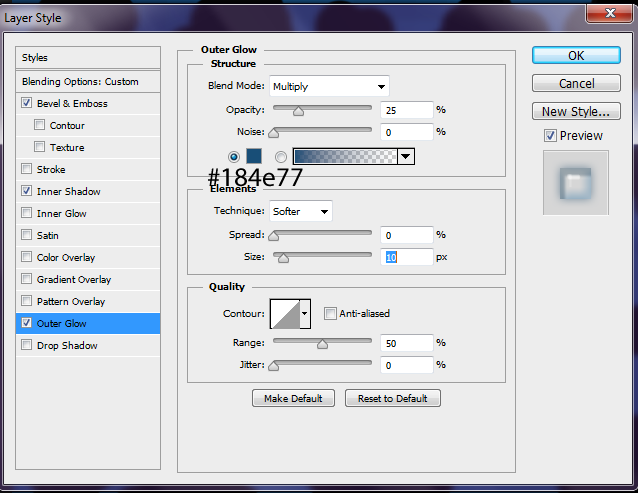
Step 15:
Next go to the tab “Outer Glow” and set values
Step 16:
And final one “Stroke” settings after that press ok

Step 17:
Now you get an image similar to this
Step 18:
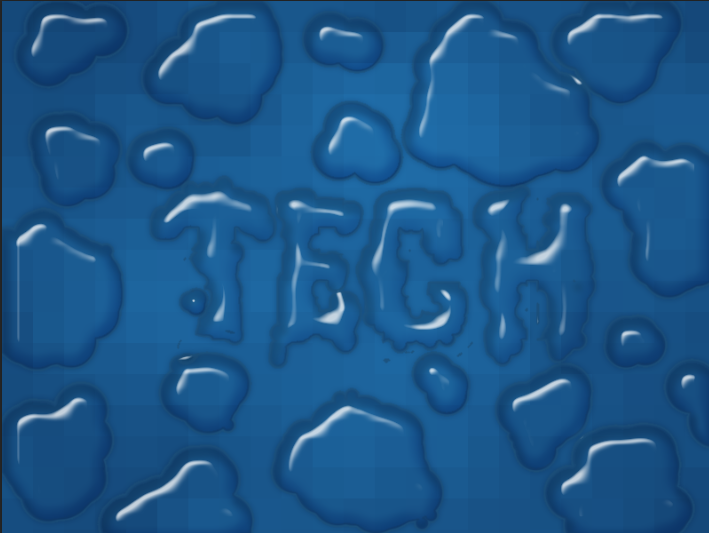
We complete “TECH” layer styling.Now we are going to copy and paste this style to “Water Drop” layer.So Right Click on “TECH” layer and choose “Copy Layer Style”
Then paste it on “Water Drop” layer.See screenshot.

Step 19:
Choose “Water Drop” layer’s styling option and make a small change to “Bevel & Emboss”

Then your result will look somethimg like this
Step 20:
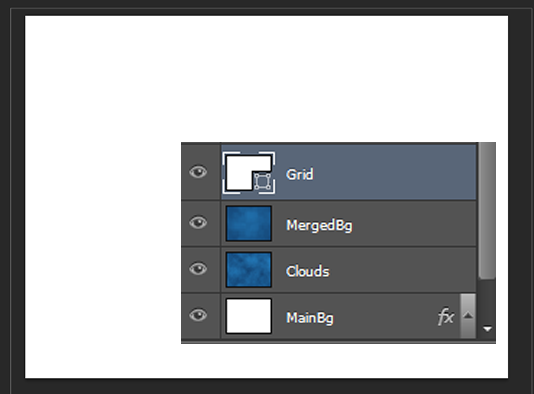
Just above the“MergedBg” create a new layer ,name it as “Grid” and draw a white rectangle, like below
Step 21:
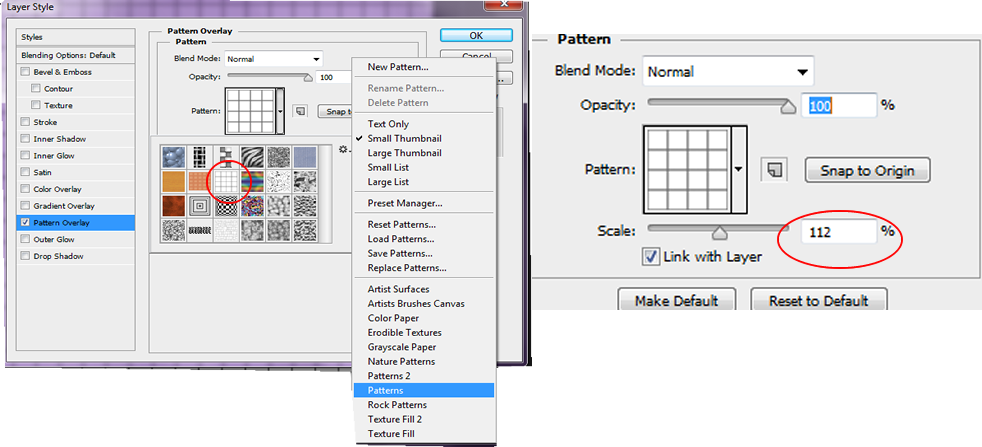
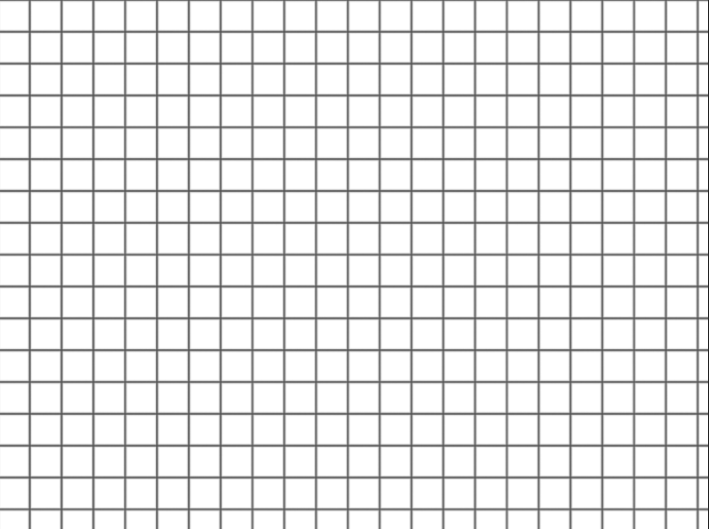
Now Double Click on “Grid” layer and edit Layer Style “Pattern Overlay” and set properties like below screenshot. and press ok.
You get something like this:
Step 22:
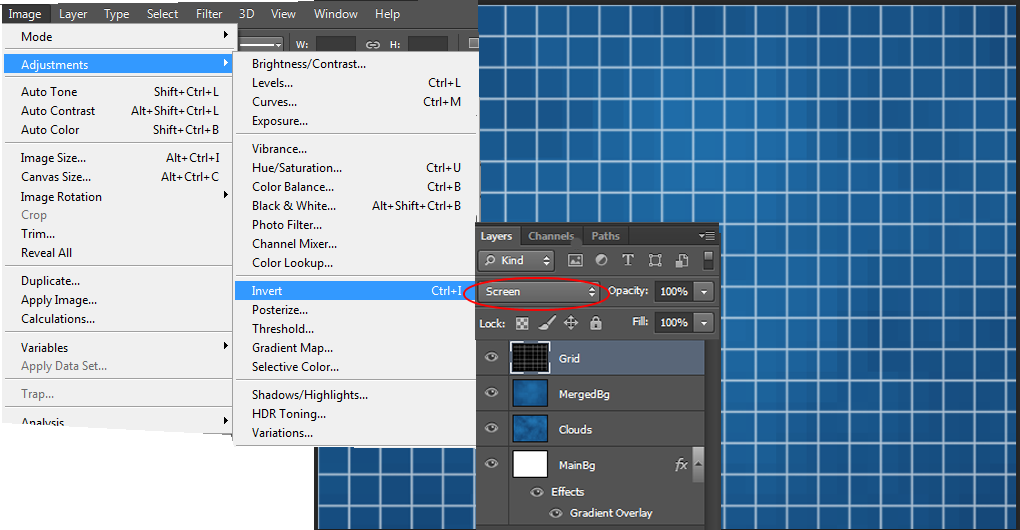
Again choose “Grid” layer,Right Click and choose “Rasterize Layer Style” and apply “Image → Adjustment → Invert”.Now we have “Grid” layer in black colour.Now select blend mode to “Screen” and you will get only white grid lines.Like below screenshot.
Step 23:
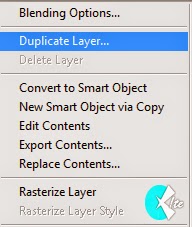
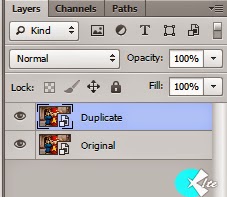
Right Click on “Grid” layer and choose “Duplicate Layer” and rename the duplicate layer as “Grid Drop”
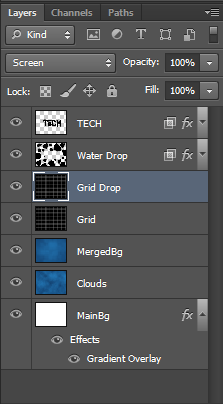
And your result will be this
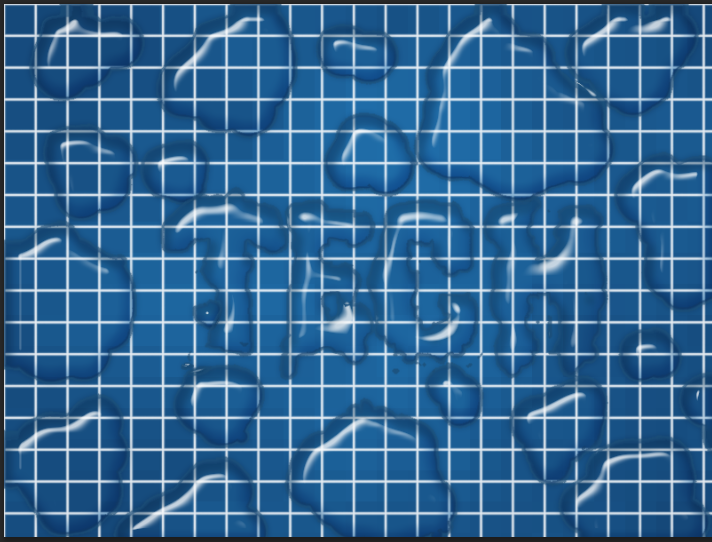
Step 24:
Now hide “Grid” ,Grid Drop” and “MergedBg” layers and choose “TECH” layer then press “CTRL+SHIFT+ALT+E” to make a copy of merged layers and rename the new layer as “Drop Map”
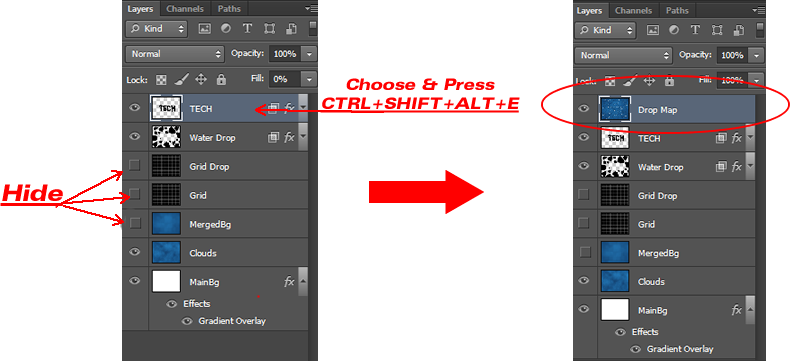
And you will get like this

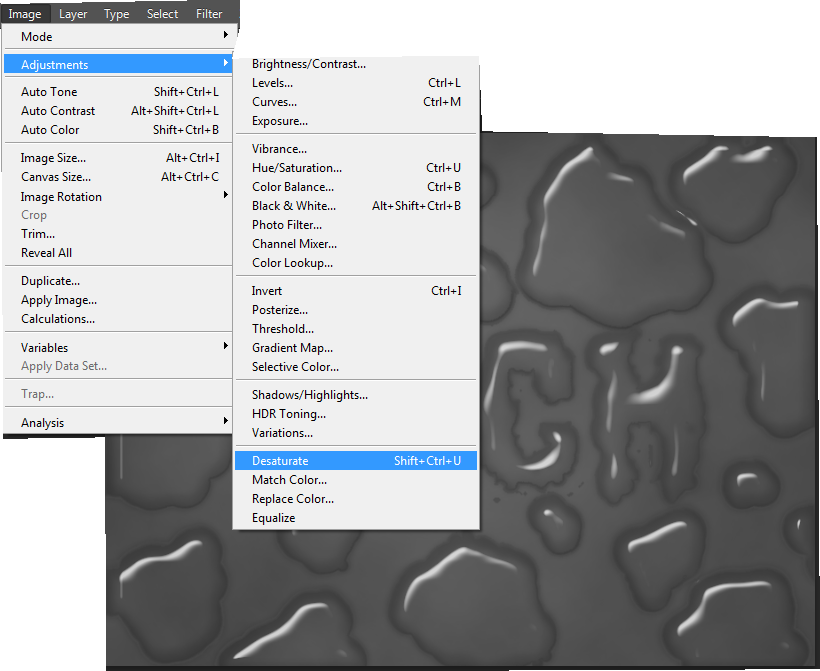
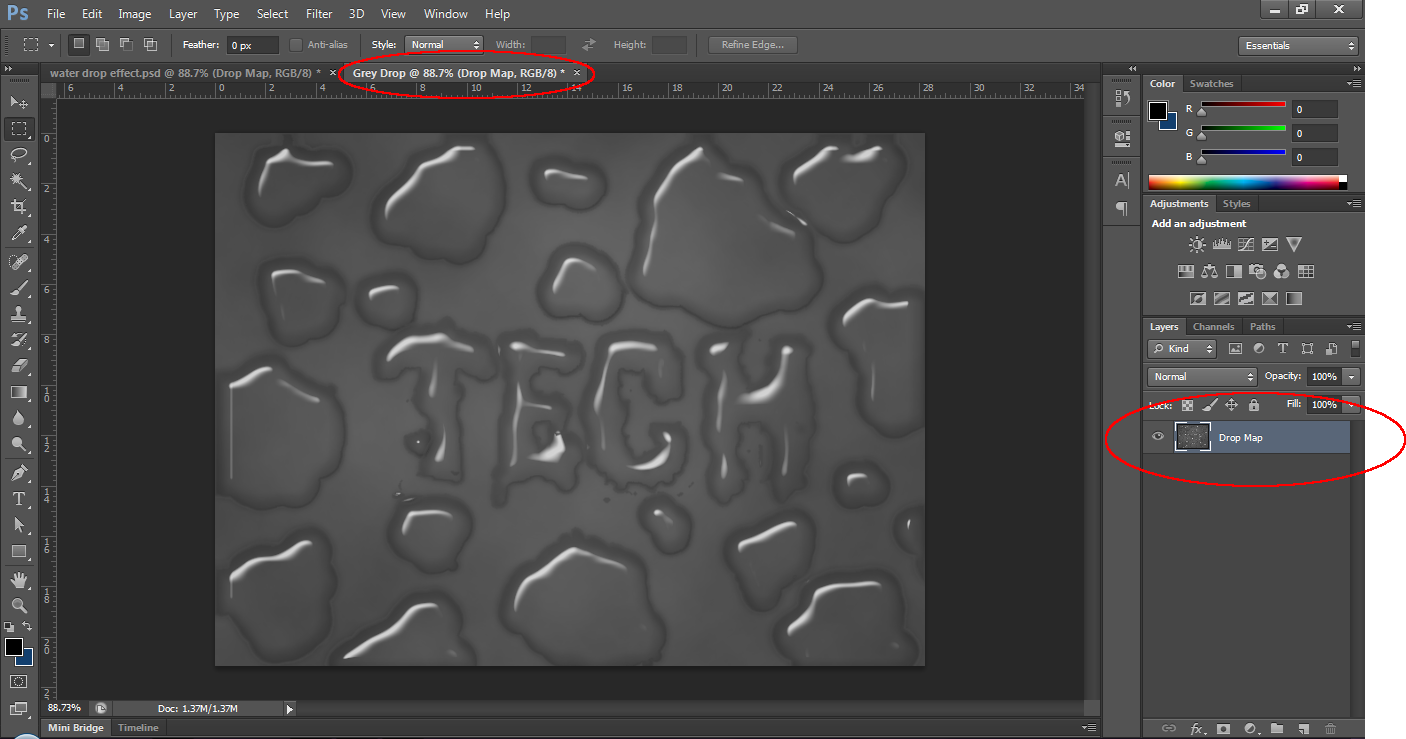
Step 25:
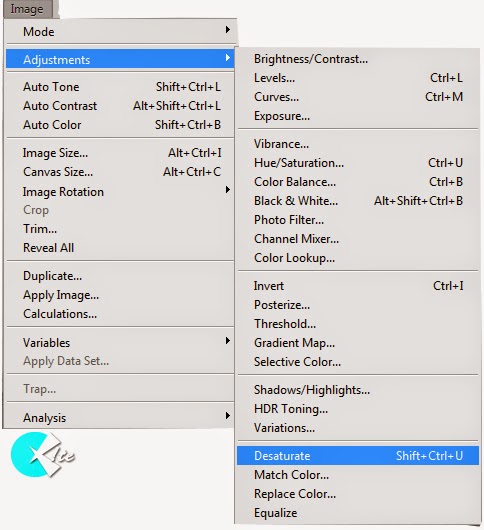
Select “Drop Map” and go to “Image → Adjustments → Desaturate” and your image will be in balck and white.
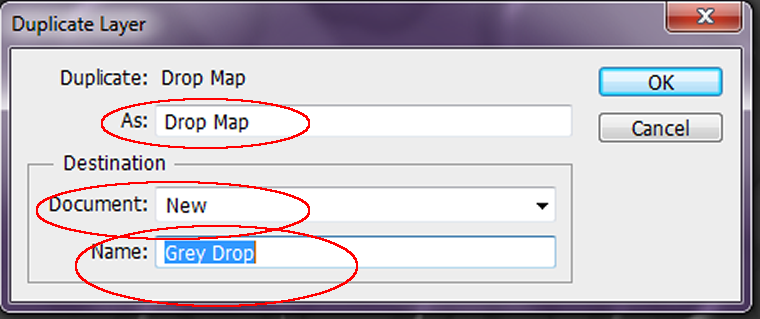
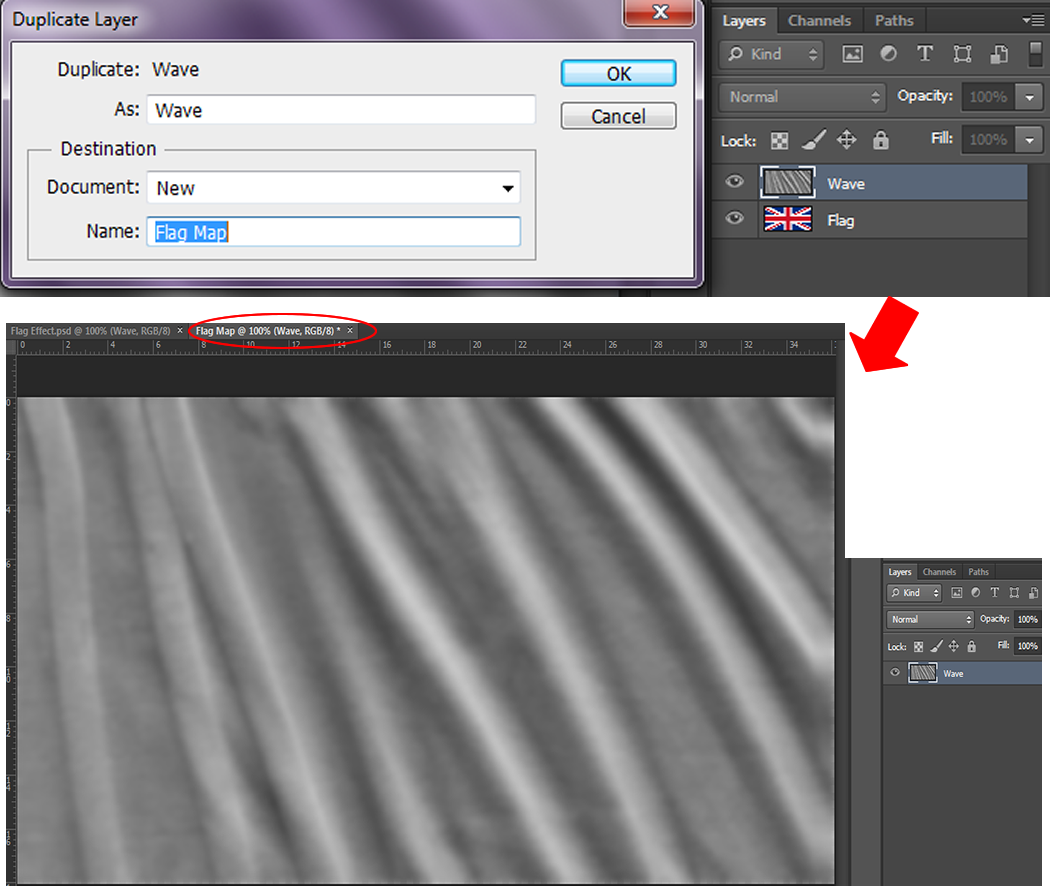
Step 26:
Now we are going to create separate Greyscale file.So Right Click on “Drop Map” and select “Duplicate Layer”.And choose “New” from document drop down menu.Then name your file as “Grey Drop” and press OK.This will create a new file wth “Drop Map” layer only in it.
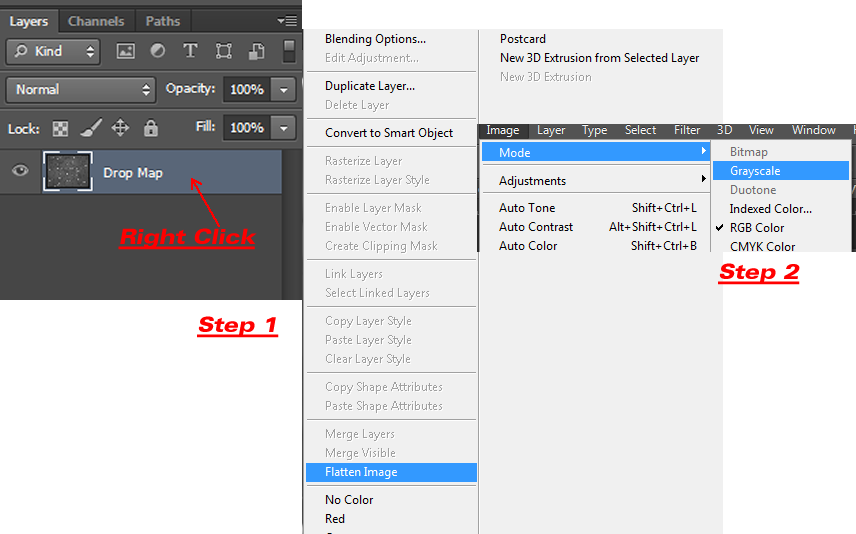
Step 27:
Right Click on the “Drop Map” layer of newly created file “Grey Drop” and choose “Flatten Image”.After that apply “Image → Mode → Grayscale”.
This will remove colour information of the layer.Now save the file as psd and close it.
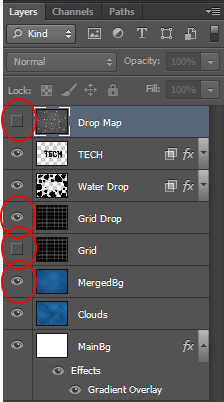
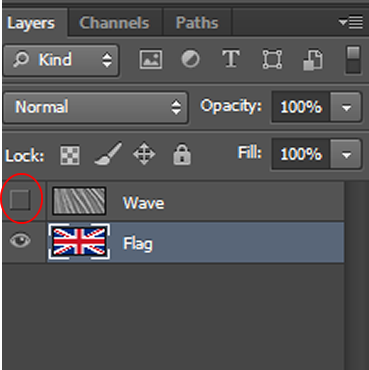
Step 28:
Again back to our “Water Drop Effect.psd”.Turn off the visibility of “Drop Map” layer and turn on visibility of “Grid Drop” layer.
Step 29:
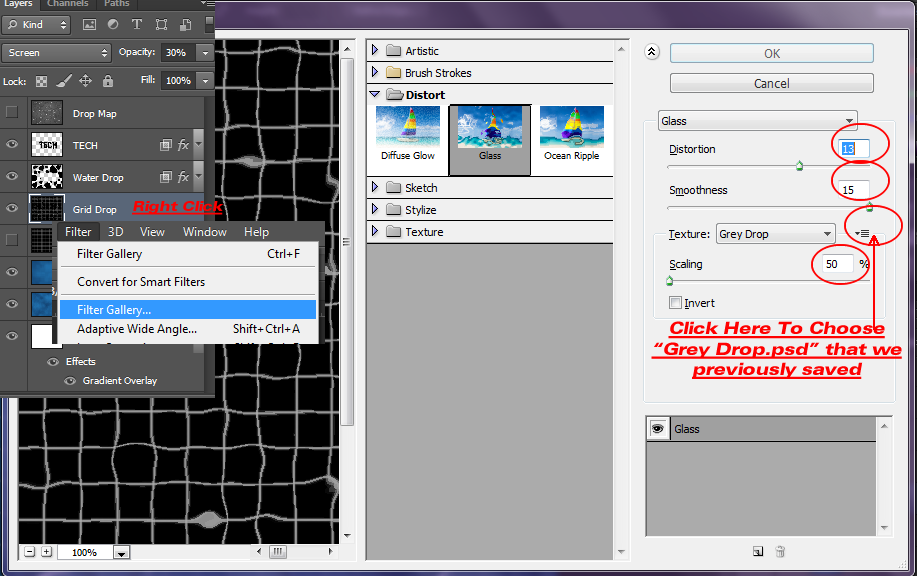
Now choose “Grid Drop” layer and select “Filter → Filter Gallery → Disort → Glass”.See the below screenshot to set the values.And now grid pattern is disorted.
Step 30:
To see disorted grid patterns only in water drop we are going to create Mask for this layer.
So first choose “Grid Drop” layer and then “CTRL+CLICK” “TECH” layer thumbnail and “CTRL+SHIFT+CLICK” “Water Drop” layer thumbnail.See the below screenshots.
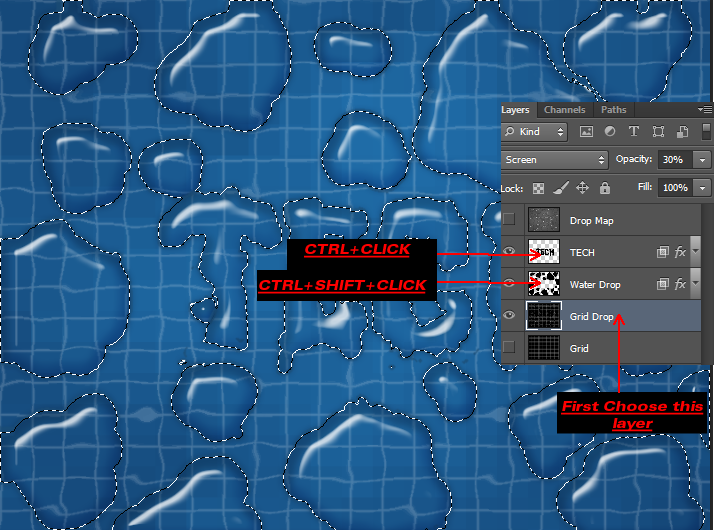
Step 31:
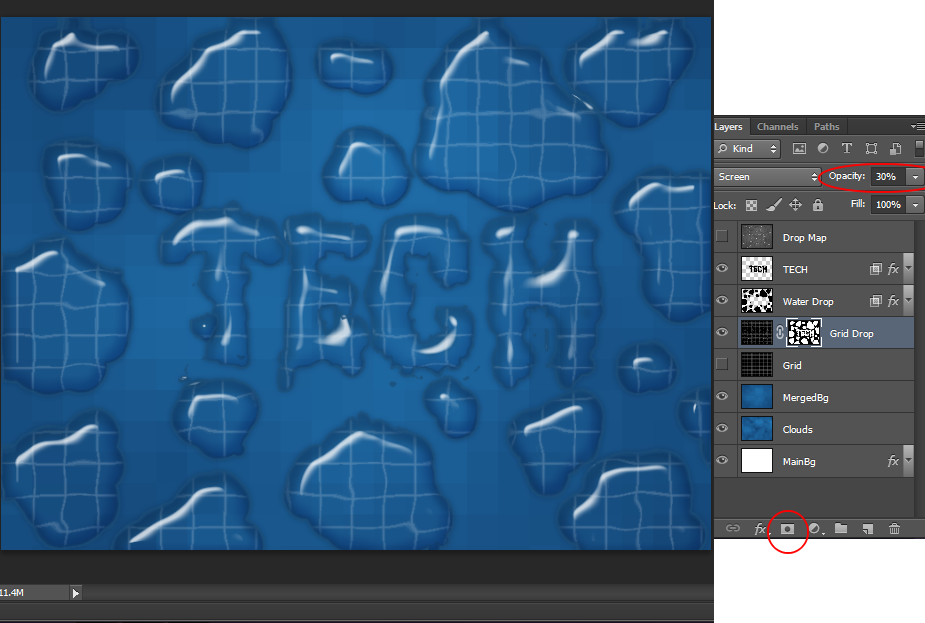
Still target “Grid Drop” layer and click “Add Layer Mask” button (Third from left below the layer panel).And after that change the Opacity to 30%
Step 32:
Turn on the visibility of “Grid” layer and choose Mask thumbnail of “Grid Drop” layer and press “ALT+Drag” it to “Grid” layer.
In this way we can copy Mask from one layer to another.
And then selecting Mask thumbnail of “Grid” layer, Apply “Image → Adjustments → Invert” and set Opacity to 10%.See screenshot.

Step 33:
Now we are going to give some glow effect to out text and drop.
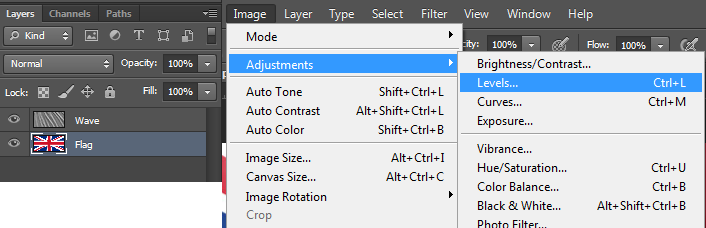
So turn on visibility of “Drop Map” layer and go to “Image → Adjustments → Levels” and set value like below screenshot.

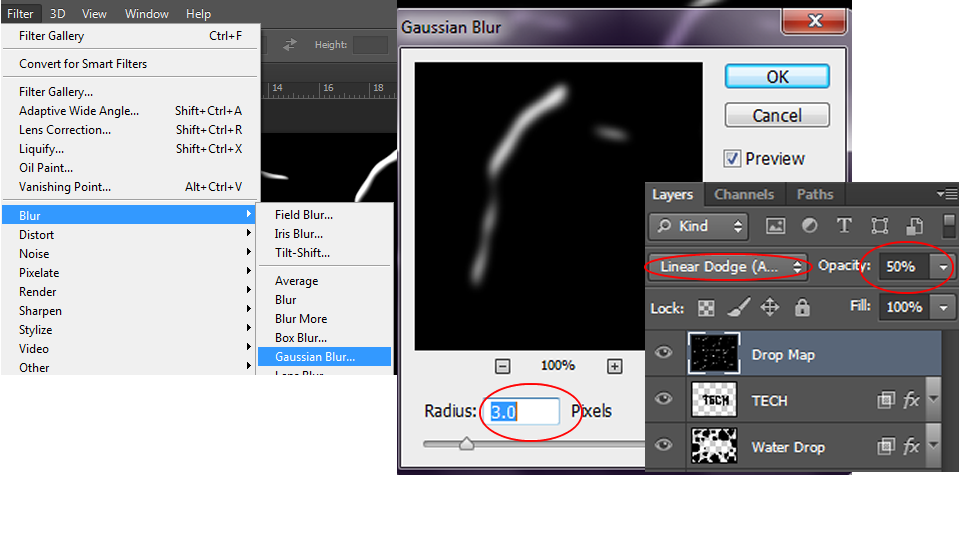
Step 34:
Then “Filter → Blur → Guassian Blur” with a value of 3 px and set blend mode “Linear Dodge(ADD)”
Step 35:
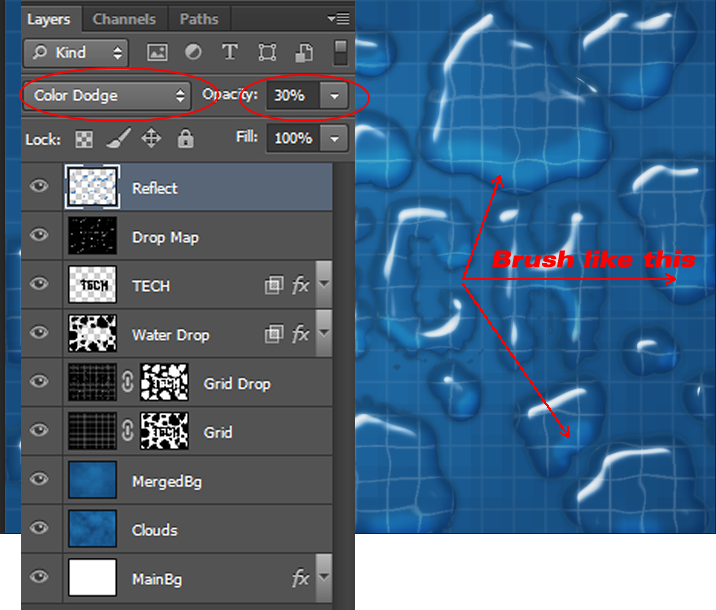
Now we are going for the final touch up.
Create a new blank layer above the “Drop Map” layer and name it as “Reflect” and choose soft brush with colour #247dbd and paint some reflection in the opposite direction of highlited area.
See screenshot.
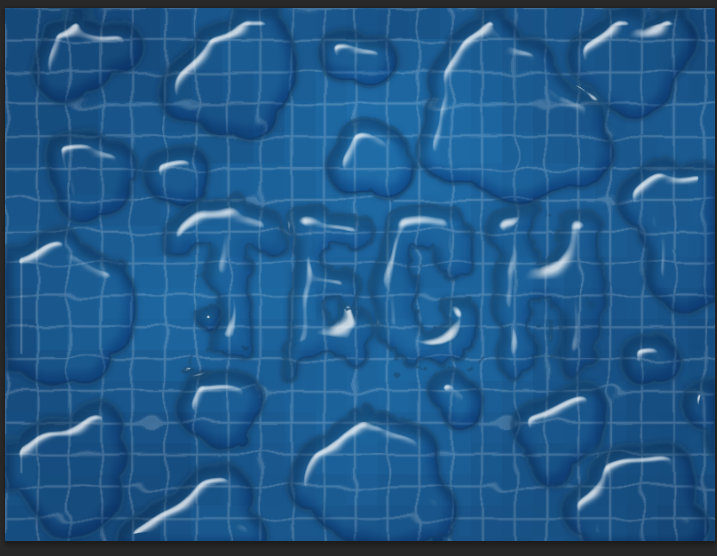
 |
| RESULT |


")
")
")
")

")
")

")
")
")

 and Rotate View Tool (R)")


")
")


