Home Blog Page 271

3 Critical Guidelines for Data Warehouse Automation

Data warehouse

Big data has become more integral to our daily lives. Its importance has become especially clear over the last couple of years.

Over 90% of the data in the world has been generated in just the last two years. Another 2.5 quintillion bytes of data are being generated every single day.

The growing volume of data provides wondrous opportunities for organizations all over the world. Unfortunately, it also creates certain challenges. One of the biggest hurdles that organizations face is coming up with adequate data storage capabilities. Without the right data infrastructure in place, they risk dealing with an unsustainable bottleneck after they are no longer able to accumulate more data. They either have to cease their data generation efforts or start prioritizing existing data for deletion. Even Google has to delete data after 18 months, so it is unlikely that you can store it forever.

Your organization will have an easier time handling data if you develop a well-functioning data warehouse. Data warehouses will be more likely to serve your long-term needs if certain processes can be sufficiently automated.

There are a number of steps that you can take to streamline the automation of your data warehouses. Some of the important guidelines are listed below.

Make sure that your data warehouse is compatible with your organization goals

The most important aspect of your data warehouse is that it must carefully support the needs of your business. You need to carefully review your organizational objectives and make sure that your data warehouse carefully aligns with them.

Here are some questions that you will need to ask:

  • How much data will your organization need to store at any given time?
  • How feasible is it to delete or overwrite older data?
  • How vulnerable is your data (you might be surprised that countries like China steal data frequently)?
  • How quickly does data need to be accessed or mined?
  • Is there any reason that your data must be stored on a server in a given geographical region (such as national privacy laws or compliance with regulations like HIPAA)?

You might find that your data warehouse isn’t suitable for your organization’s needs. In these situations, you have two options. You can upgrade to a more versatile data warehouse that satisfies your company’s goals. Your other option is to realign your company goals around the constraints of your data warehouse.

You may be tempted to dismiss the possibility of altering your company goals. However, this might be the best option. You may find that some of your goals were arbitrarily defined and that you put unnecessary constraints in place. Changing your framework might be perfectly reasonable and spare you the cost and frustration of overhauling your entire data infrastructure.

You will need to consider all of your options if the current data storage center doesn’t live up to your needs. You may find that investing in a retail colocation center could be your best approach. Make sure that you weigh your options carefully first.

Invest in the best ETL tools

One of the biggest challenges that organizations face when they try to automate their data warehouse is standardization across departments. Unfortunately, technological competencies vary tremendously between leaders of different departments.

The best way to deal with this challenge is by standardizing be flow of data at every level of the organization. You will need the best ETL tools to accomplish this. Some ETEL tools that you should consider investing in include:

  • Hevo
  • Xplenty
  • DBConvert Studio
  • IRI Voracity

You should familiarize yourself with each of these tools to get a sense of the contributions that they can make. You will find that they can pay tremendous dividends in your quest to automate data warehouse management.

Make efficiency a top priority

There are a variety of approaches that you can take to automate data warehouse processes. Some approaches might be perfect for some organizations but are inappropriate for others. You need to develop a data warehouse automation strategy that is right for your specific needs.

Before you get started, it is prudent to determine where automation can be most advantageous. Data warehouse management tends to be most effective for streamlining systematic processes. You should identify the facets of your organizational model that can benefit the most from the automation of workflows and build your strategy around them.

How to Create Attractive Product Demo Videos with Wondershare DemoCreator?

Demo Video with Wondershare DemoCreator

There was a time when creating YouTube videos were considered as a hobby. But with the advancement of time, now many people know how to do it. Every day millions of videos are being uploaded, watched and shared across hundreds of video platforms. With the increase in growth, many companies prefer promoting their brand through product demonstration videos. Well, only creating videos is not sufficient, as it needs to be up to the mark to have an impact on audiences.

Product Demonstration videos help companies attract audiences who end up becoming their potential customers. To shoot a product demonstration video, a platform with PowerPoint screen recording feature can be a good choice. 

A Small Description of How Product Demo Videos Help Companies?

Well, videos are known to be the first content type to be used by marketers to sell services and products. Clients have also become exceptionally skeptical, and if they do not find a company’s service or product efficient enough, they will never opt for it. In this aspect, product demonstration videos can convince customers. The live demonstration of the product will help companies to get more leads for their business. With that, customers not only view the product but also purchase it. To ensure that your product demonstration videos attract more leads, ensure to use a versatile tool, like Wondershare DemoCreator screen recorder

About DemoCreator screen recorder

DemoCreator screen recorder is offering companies and aspirants to record the screen and share across various platforms accordingly. It is an excellent application with different editing tools and easy to use features. Most importantly, the software is available for free and is user-friendly. There is no need for expert guidance to use the application. It has exclusive features that enhance the quality of the video, helping companies to get more conversion rate. 

Well, reading after this, if you are interested to know more about the software, here are some features and the process to use DemoCreator screen recorder. 

Recording 

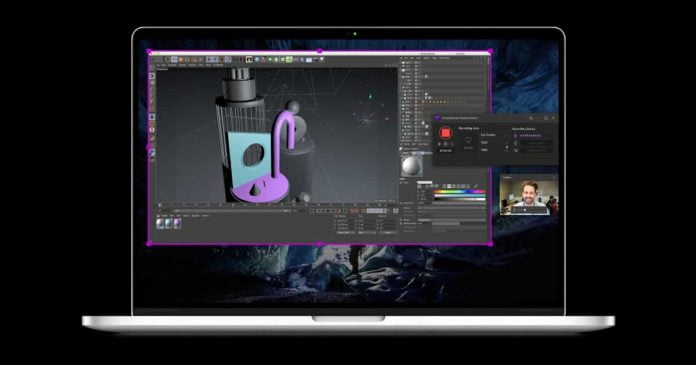
This application lets you record the screen of your system by specifying the parameters like region of your screen, frame rate, short cut, etc. Most crucially, the process of recording videos is extremely easy. Not only that, it also allows you to shoot through a webcam. Along with that, you can record audio with a microphone. Here is a brief explanation of the process to use such a brilliant tool. 

Wondershare DemoCreator

Importing and Editing

Wondershare DemoCreator

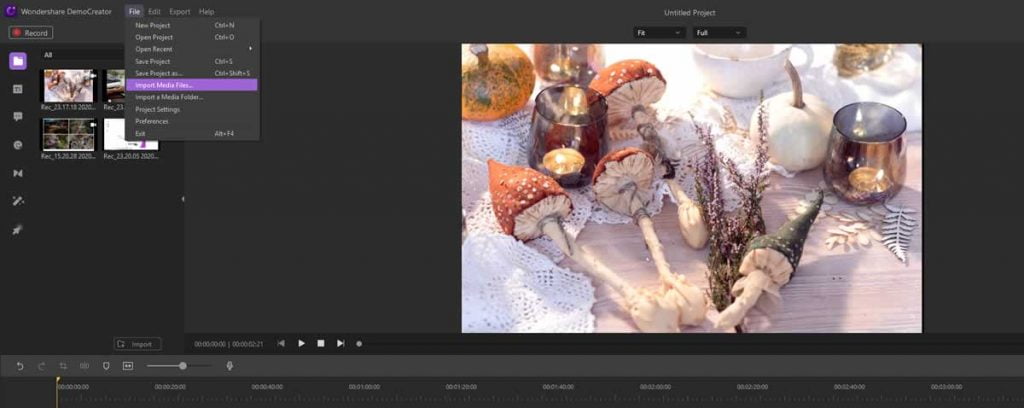
This multifunctional software allows importing a file from 50 kinds of most common video, audio and photo formats like AVI, DV, FLV, MKV, MP4, AIF, AIFF, FLAC, APE, AU, JPG, BMP, PNG, JPE etc. As a result, you have the freedom to edit a video or an audio file according to your wish. 

Voiceover effect

Wondershare DemoCreator

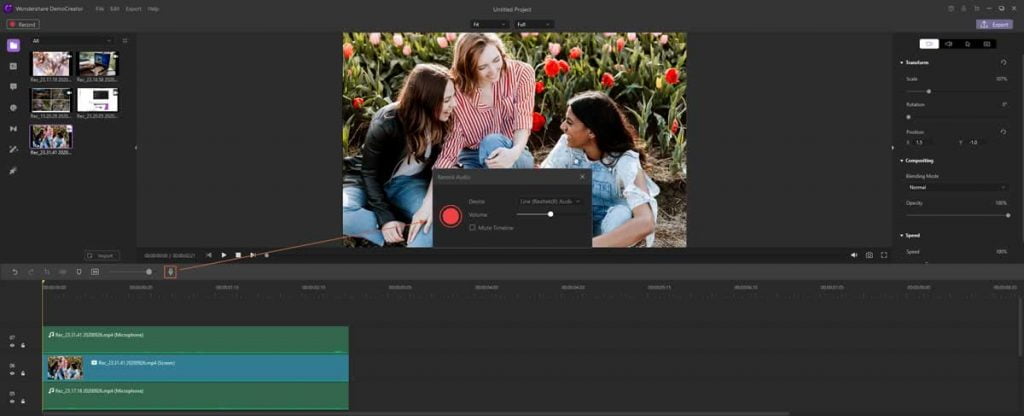
It is also possible for users to add a voiceover effect. That helps in adding additional content to the videos. You can also combine multiple recording videos with the help of this software.

How to Start Recording with DemoCreator screen recorder?

With DemoCreator screen Recorder, recording along with playing a presentation can be done simultaneously. Well, the steps to be followed to record a video are: 

1. Downloading and Installation Process

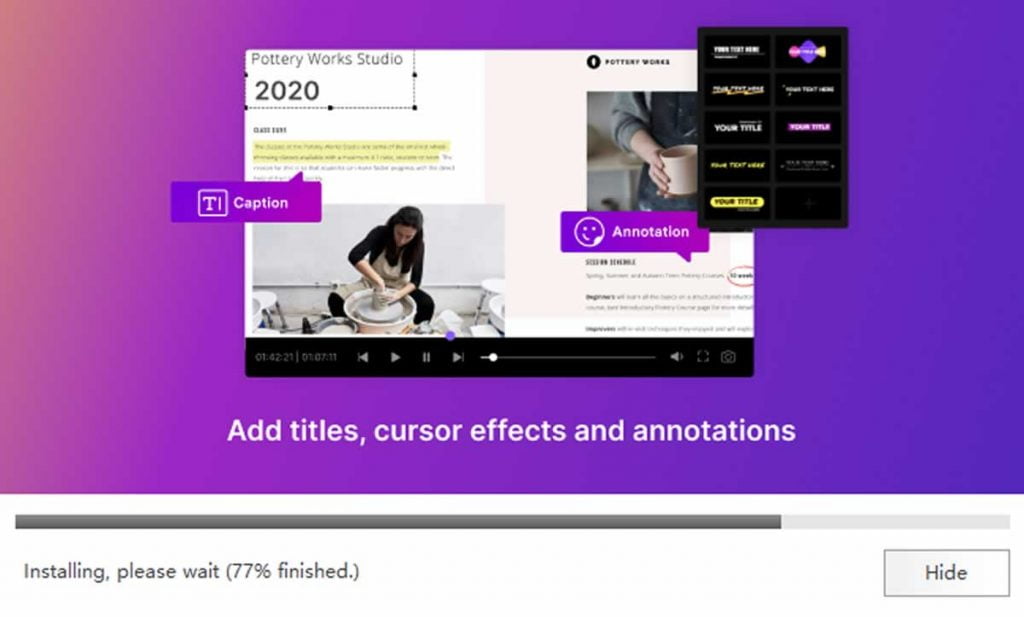
First of all, you need to go to the website of Wondershare DemoCreator and start the downloading process. By clicking on the “Free Download” button, you can effortlessly download the software. After that, double click on the “.exe file” and start the installation process. You will come across an instruction list, following which will guide you complete the process.

Wondershare DemoCreator

2. Set the Recording and Audio Parameters

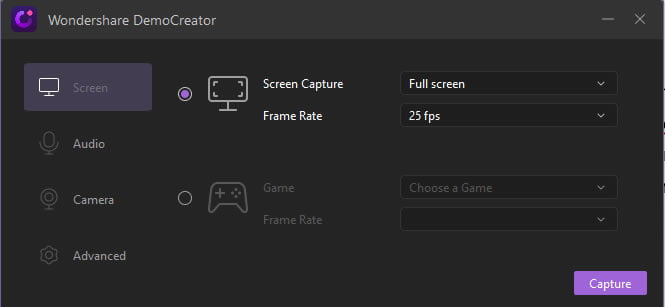
After finishing the installation process, we need to launch the software. Now double click on the application, by selecting the icon, and DemoCreator will open. With that, you will come across two options, Video Editor and Capture. Here you can set your webcam, screen, and microphone properly. Only then you can start capturing the video. 

Wondershare DemoCreator

3. Start Recording a Video 

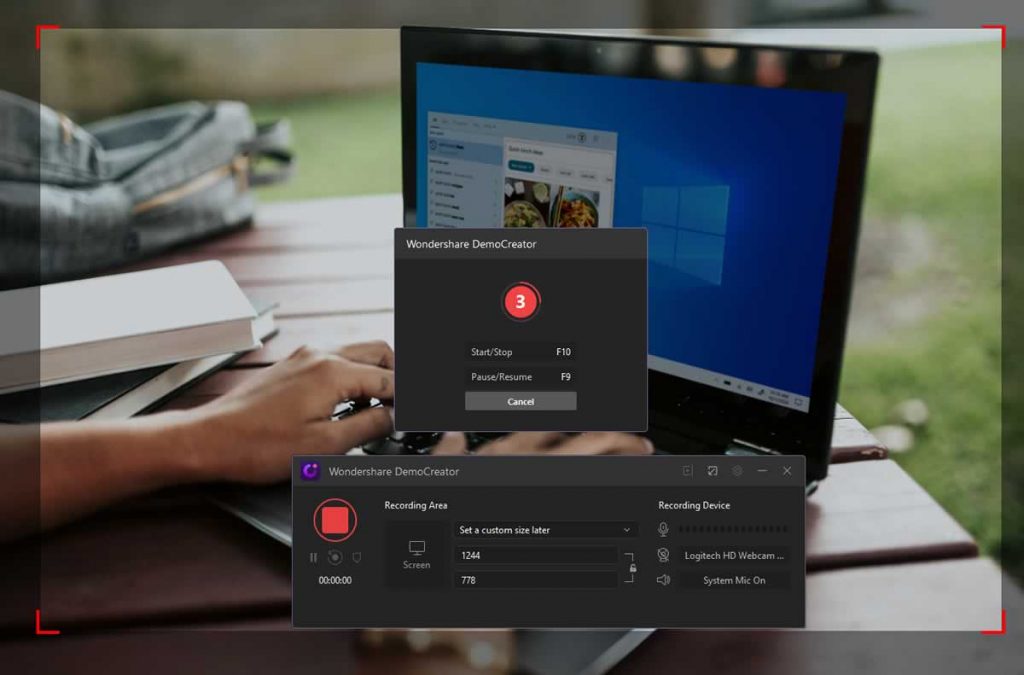
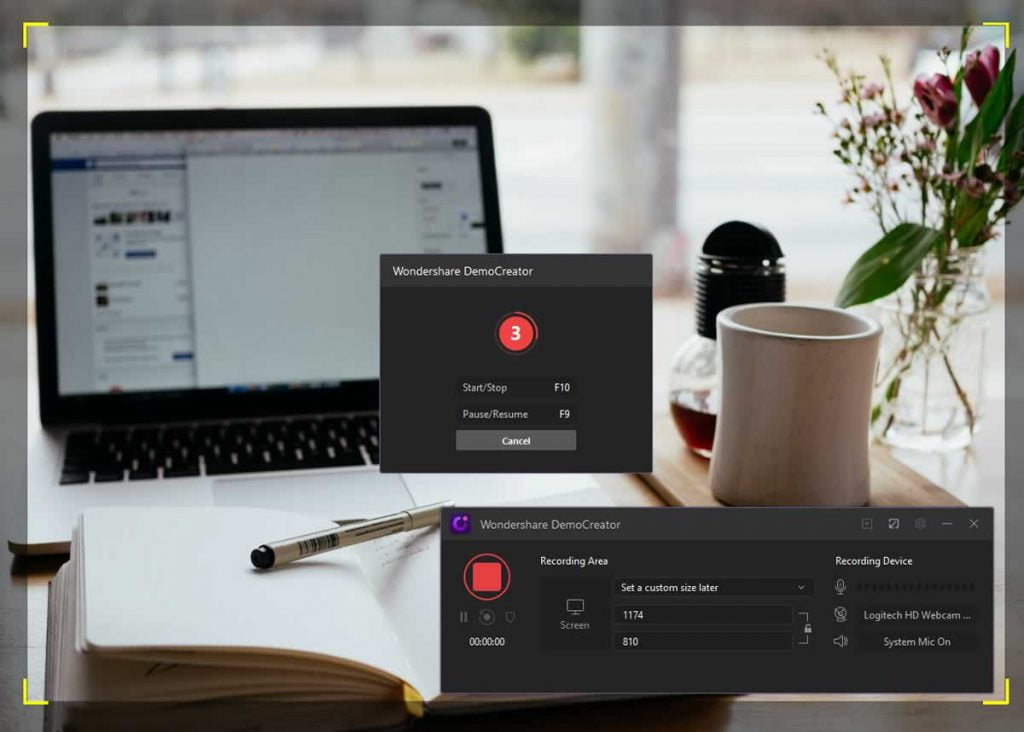
Click on the capture button and set the recording aspects, such as audio setting, size of recording region, webcam, and start the process. Customize the recording setting according to your need, such as the frame rate, recording region, etc. Soon after completing the process, select on “F10” or “Start Capturing”, and with the countdown of 3, the process starts.

Wondershare DemoCreator

4. Editing Videos 

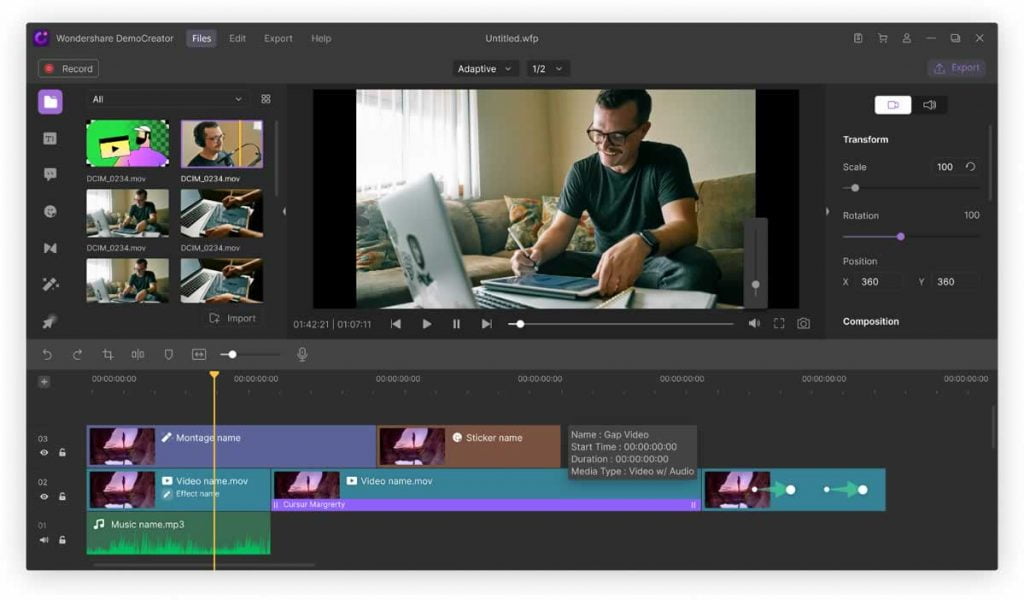
Once you have recorded the video, now it’s time to edit it. Make sure that you edit your video in such a way that it uplifts the video quality. Here you can add a media file, resize videos, cut unwanted clips, add markers, crop video clips, audio editing, trim videos, and many other things. Do not forget to add such effects as they are essential if you wish to get more audience onboard.

Wondershare DemoCreator

Choose the DemoCreator screen recorder!

To ensure that your company is earning leads, it’s essential to opt for product demonstration videos. To record such videos, innovative and powerful software like Wondershare DemoCreator would be the best choice. It is an excellent tool for editing videos, recording audio, and videos.

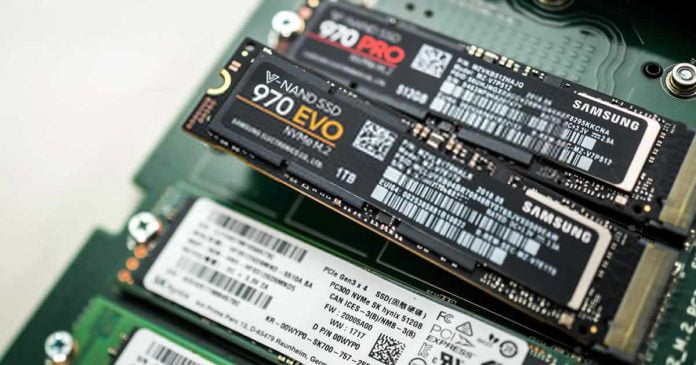
Choose the best SSD: What does SLC, MLC, TLC, QLC, and PLC mean?

Choose the best SSD

SSDs have revolutionized the desktop and laptop industry — retiring old mechanical disks thanks to its lightning speed, ease of installation, and resistance to shock and strain. 

The SSDs are now very popular. Without having to focus on mechanical disks (now usable exclusively as data disks for network-attached storage (NAS) or as backup disks, it is now possible to buy new SSDs of 1TB and more at competitive prices.

During the purchase of an SSD, you will surely have come across some strange acronyms, which apparently mean nothing but which in reality can indicate the quality of the chosen drive, regardless of the model or capacity.

In this guide, we will show you what do SLC, MLC, TLC, QLC, and PLC really mean, ie the abbreviations next to the SSD name or in its description.

How to choose the best SSD?

In order to choose the best SSD, we will have to pay attention to the abbreviations SLC, MLC, TLC, QLC, and PLC, which are often not indicated in the titles of the products sold online or on the technical datasheets of the SSDs sold in a computer store. 

To obtain this information, we will have to access the detailed technical data sheet of the drive available at the manufacturer’s website.

So let’s understand in detail what these acronyms mean, and why they are so important in choosing a new SSD.

Terabytes Written (TBWs)

Normally speaking, SSD durability is expressed as TBW. This is the number of terabytes that can be written to the drive before it fails, which means that the TBW is kinda like the lifespan of SSD.

An example from Samsung SSDs, they state that their Samsung SSD 850 PRO SATA, with a capacity of 128 GB, 256 GB, 512 or 1 TB, can handle 150 terabytes written (TBW), which is equal to a 40GB daily read/write workload over a period of ten-years. 

Samsung even promises that this product will be able to “withstand up to 600 terabytes written (TBW).” A normal office user writes approximately between 10 and 35GB on a normal day. 

TBWs are also “safe level” estimates — well, SSDs commonly exceed these limits. 

NAND memory indications

The strange acronyms we talked about in the introduction represent different types of NAND cells, that is, the cells that function as a “data warehouse” within SSDs. 

Compared to mechanical disks — which used a magnetic disk and a head, in SSD, NAND flash storage is the building blocks of the memory cell. These are the base units onto which the data is written in an SSD. 

Each memory cell will be able to accept a certain amount of bits, which will be registered on the storage device as 1 or 0. These cells are arranged in a particular way or functioning with precise characteristics.

The strange acronyms — SLC, MLC, TLC, QLC, and PLC — that are explained below provide you with a valuable indication of the type of NAND cells that we can find inside the drive, each with different performance characteristics.

SSDs: SLC vs MLC vs TLC vs QLC vs PLC

SLC: Single-Level Cell

The simplest cell type is SLC. SLCs accept one bit per memory cell, offering considerable advantages in terms of speed and reliability since they are less error-prone, so they are considered very reliable and durable.

SLC SSDs are very fast and last much longer than other types of cells. For this reason, they have a very high price and are usually offered only for SSDs in the business environment where data loss is less tolerable, and durability is needed. And not for the consumer environment — ie disks reserved for domestic use — they are used only to provide a fast cache to the entire disk.

MLC: Multi-Level Cell

MLC SSDs allow you to write two bits to a cell — yeah, the name multi doesn’t really suit it. MLC SSDs retain much of the single-cell benefits but increasing the total capacity of the cell. 

They tend to be slower than SLCs, also these take hit on durability and reliability because data is written to the NAND flash more often than with an SLC, but they make up for this small flaw with greater capacity and better value for money.

TLC: Triple-Level Cell

The cheapest SSDs are indicated with the abbreviation TLC. They allow you to save three bits in a single cell but sacrifice something pretty important factors — which is speed and duration. Although they don’t break immediately but last less than the models seen previously. 

The TLC cell is currently the most popular in the consumer environment, since they still offer a good compromise between duration, capacity and speed, even if they are not recommended for use as data discs. Don’t get me wrong, TLCs last several years.

QLC and PLC: Quad-Level Cell and Penta-Level Cell

Similarly, QLC drives can write four bits per cell, and PLC SSDs can write 5 bits per cell.

You can see modern SSDs like QLC and PLC are moving towards an even greater compression of the amount of bits that can be recorded in a single cell. However, such a high number of bits saved in a single cell has a downside — they do not last long, at least when compared with the types of cells seen previously.

Even if the minimum duration values ​​go far beyond the real capacities with which SSDs are used, this disadvantage is kind of major and taken into consideration — there is a possibility of having to change the SSD within 5 years of purchase. 

From a performance point of view, QLC and PLC SSDs are very good, even if they do not reach the speeds seen with single cells (SLC), but still, they are good.

Conclusion:

When choosing a new SSD disk, it is advisable to inquire about the type of cell immediately it has to know precisely its estimated duration, the performance it can achieve, and the maximum capacity for that particular type of cell.

If we do not know which SSD to choose between two apparently identical models, we advise you to focus on MLC or TLC SSDs, leaving the SLC only to gaming PCs or PCs on which the SSD must operate as a data disk. And don’t forget to look at there TBWs too.

The Ultimate Guide to Google Maps Customization

Google Maps News and Stories

Customized maps are helpful for any industry interested in tracking growth and development or analyzing areas of opportunity. Mapping software can also be useful for providing visually engaging and functional navigation tools for visitors. Knowing how to produce a captivating and informative map can benefit business development and client recruitment.

Google provides basic customization for its mapping services via Google My Maps. Users can add location-specific pins, change the icon shapes and colors, and designate specific navigation paths. For simplistic and user-friendly custom map designs, Google My Maps will meet your functionality and multi-user collaboration and sharing needs. However, for more complex designs, web-based applications such as Maptive may provide additional customization options and more complex personalization.

What do I need to create a custom map?

Your data compilation may look different from other custom mapping creations, depending on your industry or business initiatives. If you are in the tourism industry, gathering detailed information about your map’s primary locations will be critical to providing an informative and functional navigation tool. Photos, videos, and business hours may be relevant when promoting places to eat, visit, or stay. Reviews, services, and price estimations may also be of interest to tourists.

If you are creating a map for data analysis or business development, maintaining an organized file of critical data such as demographics, sales, and specific consumer behaviors may help. When it comes to data analysis, it is essential to establish a clear purpose early in the process so that the data will be relevant. For example, if you are producing a custom map to communicate changes in sales over time, you might need to compile demographic data and company transaction history.

How do I make a customized Google Map?

Depending on the purpose of map customization, there are several ways to develop an effective visual representation for your personal or business goals. You can create a custom map by utilizing the online development tools hosted by Google My Maps or websites like Maptive.com. Additionally, you can import previously compiled data to design a custom appearance quickly. Imported data can include features, including locations, lines, and even shapes.

Using Google My Maps to create a custom map

To create a map using Google My Maps, sign in to the web-based application and select, ‘Create a new map.’ Here, you can add a title and /description for your project. Selecting a base map is one of the first steps to personalizing the appearance of the map. Users can choose from several styles, including roadmap, satellite, hybrid, and terrain. For additional base maps such as dark mode and other custom styles, it may be necessary to use Maps Javascript API.

After establishing a set of layers, you can begin building your custom map by adding markers and drawing navigation routes. Markers are customizable regarding color and shape, and routes can indicate various transportation methods, including walking, driving, biking, and utilizing public transportation. You can add photos, videos, and additional location details by selecting a marker and uploading other content.

Using Maptive to create a custom map

Like Google My Maps, Maptive can utilize previously compiled data or a single address to build a custom navigation tool. The software is similar to Google in that you begin by creating a new map and adding a title and description. From there, users can upload data from a spreadsheet, copy and paste their data into Maptive’s program, or build off of a blank map. Maptive provides an additional data processor that encourages users to verify that the data they’re importing is reflected accurately.

 Once Maptive finishes geocoding the locations, you can begin customizing the appearance with base layers, map makers, zoom functionalities, labeling, and more. You can also hide specific layers of data should some of it not be suitable for public sharing. Password protection is also available to protect more sensitive data. Finished maps can be embedded in websites and blogs, or shared via a link for convenient viewing and navigation.

Importing data from a spreadsheet

Both Google My Maps and software like Maptive allow users to import data for map creation. When compiling a spreadsheet for map creation, it is critical to utilize the first row of data for labels, including coordinates, addresses, and place names.

Acceptable file types for customized data import are:

  • CSV
  • XLSX
  • Google Sheet
  • KML
  • TSV
  • KMZ
  • GPX
  • One or more photos on Google Drive or Google Photos

For ease of import, files should not have more than 2,000 rows of data, and only 100 photos should upload at any given time. Be considerate of file size as Google prefers files that are 40MB or smaller.

Final thoughts

Custom maps are a personalized solution to providing clients and local visitors access to concise information about a particular location. 

Whether for data analysis or an engaging visual representation of nearby accommodations, uniquely designed maps can help address the needs of a target audience with efficiency and organization. Taking advantage of user-friendly applications like Google My Maps and Maptive can make visual data analysis and tourist information more readily accessible.

3 Online Tools to Help You Get Ahead with Your House Move

Online Tools to Help House Move

Technology has had an impact on our lives in so many ways through the years, from how we unwind in front of games to even the way that we track our efforts to keep fit.

Another area which has certainly been improved by new innovations is the property and real estate market – and that is particularly good news if you’re planning a house move anytime soon.

Many things to consider

Purchasing a house or simply planning a move from one rental property to another is not always a straightforward process, as there are plenty of different things for you to consider.

As well as ensuring that the financial aspect of the move is OK, you also need to figure out how you intend to shift your belongings to your new address. Then there are other pressing matters to tackle, including how you intend to tell friends, family, and organizations that you live somewhere new.

Fortunately, there are a few useful technological tools out there these days which can take some stress out of the situation. Here are just three that you should look out for.

1. Moving apps

We use apps for so many different things these days, so why not turn to them for help with your move? One to look out for is Moving App – Moving Checklist from New Resident Services, which gives you a chance to keep on top of all aspects of the experience.

Available on Google Play, the app’s description explains how it offers you reminders on completing a range of tasks, while you can also print box labels to highlight where you have packed specific belongings.

2. Online mortgage search

Knowing you have access to the finance you need is vital when planning a move. Finding the time to sit down and chat with a financial advisor while juggling work, kids, and other matters is not always easy, so one alternative could be to take your search online.

For example, people in the UK can compare mortgages with Trussle, which offers up information on 12,000 different deals from around 90 different lenders. Using such a service could be an important step as you figure out affordability and how your budget adds up.

3. Change of address services

Arranging a house move is one thing, but there are plenty of other tasks you need to sort once it is complete. For instance, informing various utility providers and other organizations about your move can be time-consuming, but it must be done.

Fortunately, a service like SlothMove might come in handy. The concept allows users to fill in their details and then update a host of institutions on their move. Users may also be eligible for a free gift afterward.

The tip of the iceberg

Moving house is not always easy, but there are tools out there that can help you along the way. The services highlighted above are just the tip of the iceberg in terms of what is available, so take some time to do research and get ahead on your upcoming move.

Reduce the Cost of Your Smartphone in Six Easy Steps

Android Smartphone With Massive 10000 mAh Battery

Smartphones seem to get more and more pricey with time. With new fancy features, updated screens and cameras, and faster processors, this development isn’t likely to stop any time soon.

If you’re anything like us, you don’t need top of the range phones and would be just as happy with a decent, reliable phone that doesn’t cost the world.

Luckily for you, we’ve broken down the best ways to save money on your smartphone.

These are tricks that phone companies don’t like you to know, and many of these tips revolve around ignoring their marketing ploys and doing what’s right for you.

Let’s take a look:

Avoid International Calls or Use a Solution

International calls are easy to way to rack up fees rapidly. Luckily, there are a ton of apps and solutions available that make international calls completely unnecessary.

Things like Skype, Whatsapp, Zoom, and more let you call your international friends, colleagues, and families without spending a penny.

Even iMessage can help with quick communications across borders, especially if you are on Wi-Fi.

Don’t Forget Your Data Allowance

It’s pretty easy to lose track of how much data you’ve used, but you can cut down the amount you need by using Wi-Fi wherever possible (even in public).

There are also settings that prevent apps from downloading data in the background, which can save you a lot of data in the long run.

Beyond that, be careful what you download or stream. Instead of downloading a huge movie file or streaming Netflix while on the train, why not plan what you want to watch in advance and download it at home via Wi-Fi? This allows you to access your files while out and about without needing to use any data.

Sell Your Old Phone

If you upgrade your contract to a new handset, you are often left with the old one which is still in perfect working condition.

Most people just throw it in the back of a drawer never to be seen again, but by trading it in or selling it online you can make enough to pay for the first few months of your new contract.

You can go to a local pawn shop or gadget dealer, or even just throw it on eBay. It might seem like a little effort, but you’ve already paid your previous contract provider for your phone – why not get some of that money back now that you have no need for it?

Plan Your Renewal Date Strategically

Phone manufacturers tend to follow a pattern when it comes to launching new handsets. For example, new iPhones always come out in September.

This is a great time to shop even if you aren’t looking for the new handset, because it is around this time that the older ones tend to drop in price too.

By doing this once, you can ensure your contract ends at that time of year every single time going forward, which puts you in a much better position when the time comes to start looking for a new phone.

Don’t Buy a Phone If Unnecessary!

Whenever a contract runs out, it’s easy to immediately start thinking about what phone you’d like to get next. Smartphone marketing is mostly designed to encourage this and keep us thinking about the new phones and how much we want those new features.

But if your existing phone still works well, has good battery life, and hasn’t experienced too much slowdown, is there any point? For some people yes, for others, absolutely not. You will have to weigh up your interest in the new features and the budget you have available to make this decision.

Often, by sticking with your existing handset, you can get switched over to a SIM-only contract, which is a fraction of the cost of contracts that include the phone price. A SIM-only contract also means you can use any handset you like, reducing the risk that your old phone will break and leave you without a handset.

Consider Buying a Phone Outright

Maybe you do want a new phone after all, but are still looking for ways to save money?

Many people in this situation just buy phones outright.

This means a higher upfront cost, of course, but it also means you can get a SIM-only contract, which will work out much cheaper in the long run. Add to this the fact that companies like Buy Mobiles have heavily discounted contracts, and you can save a lot of money this way.

It also gives you a lot more flexibility, as you can sell your phone and buy a new one in the middle of a contract with no issues – that’s without mentioning that SIM-only contracts are often 12 months instead of 24, helping even more with your freedom to switch at any time.

Moving Content from Your Mailbox to Microsoft Server

email and email server

Moving to the entire mail ecosystem of the corporate Office 365 system involves a number of tasks to be handled in a timely manner. Specifically, you might need to migrate your corporate mail to proprietary Exchange Online software. The step shouldn’t be skipped if you do not want to lose a piece of critical information.

This process is laborious and requires the connection of additional technical means. This is especially true when the working mail services of large organizations are subject to migration. Quite often, employees use email as a kind of file sharing, ignoring cloud solutions and other services. This creates a problem with the rather large amount of data that needs to be migrated. In this case, you won’t go far without a specialized Outlook migration tool that will take care of the process.

Some businesses can have serious issues associated with the acquisition of additional storage, which actually comes in handy once. It is much more rational to entrust the solution of the migration task to reliable programs and dedicated assets.

Migrating Mail to the Cloud

As a rule, the transition to separate email services based on Office 365 remains almost invisible. The term for performing all actions is quite individual and can range from days to several weeks, depending on the migration scale.

After completing the creation of backups and copying all the necessary materials, the migration program proceeds to an equally important stage – editing MX records. They store information based on which each incoming letter gets to the required address. The speed of work will depend on the number of mailboxes used by the enterprise. 

The correct approach helps to avoid disruptions in the continuous operation of an established system of exchanging letters or files. If necessary, not only the migration of emails to new addresses can be performed. In the process, the following data are also transferred:

  • Contact lists;
  • Calendar entries;
  • Planner data.

Accordingly, after the successful execution of the operation, the dependence on third-party resources disappears. All future actions will be carried out within the framework of the Microsoft Office system set up in advance within the selected tariff plan.

Implementation of hybrid deployment deserves special attention. It is relevant in cases when a separate part of the letters is planned to be stored on local physical servers, and the other to be redirected to the cloud. This is most often used to optimize data archiving. Such a decision is justified: you can use your own physical storage, the volume of which is limited exclusively by the company’s equipment.

Good to Go?

In the modern IT structure, there is no single way to transfer mail and file attachments stored in it. Determining the best practice will require careful study of many parameters and should be trusted to reliable software solutions. Before deciding on a program to use, check its specs, technical capabilities, and compliance with your email service ecosystem.

How to Color Grade Videos Using Filmora

Color Grade Videos Using Filmora

Unquestionably, color correction, and color grading are the two most important steps for the production of high-quality videos. The way you manipulate the color of your footage can instantly change the mood and overall message that you want to deliver from your video. Over the years the misconnection that color grading is a difficult task and takes years of practice has developed among upcoming filmmakers, video editors, and all sorts of content creators.

Luckily, that’s not true. However, finding out a video color grading software that is easy to use and offers professional results is a difficult task. Well, if you are facing this difficulty, then two check the prominent Filmora9 Video Editor.

In this article, we have shared some details about the color grading capabilities of Filmora.

Color Grade Videos Using Filmora

There’s no denying the fact that Filmora is one of the easiest and most feature-packed video editing software out there. Many famous vloggers and YouTubers use Filmora to produce high-quality videos. In comparison to complex color grading programs like DaVinci Resolve or Premiere Pro, Filmora is quite simple to use. Moreover, it doesn’t consume much system resources and performs really well, even on low-powered laptops and aging desktops.

So here’s how you can color grade videos using the Filmora video editor.

Color Grade Videos Using Filmora

STEP 1: Similar to every other video editing project, to color grade a video, you have to first import your footage into Filmora. To do so, you can either drag and drop your videos or simply use the import button option.

Color Grade Videos Using Filmora

STEP 2: Once the footage is on your timeline, locate the color tuning tool in the timeline menu. Based on your preference, you can now either select a preset or manually manipulate the colors of your video. Finally, click “OK” to save the changes to your video.

Once your edits are completed, you can directly upload your edited footage on video-sharing platforms like YouTube and Vimeo. Filmora automatically optimizes your exported video files for these platforms, and while doing so it pays great focus on offering the highest quality video output.

The Five Best Color Grading Features Of Filmora

In no particular order, these are the five best color grading features of Filmora.

Color Grade Videos Using Filmora

1. White Balance

Using two simple sliders in Filmora, you can effortlessly control the White Balance of your footage. These sliders will help you to control the temperature and tint. Consequently, use the white balance slider of Filmora to either make your footage warmer or colder.

2. 3D LUT

If you have been producing videos for quite some time now then you would have definitely come across the term Look Up Table or often abbreviated as LUT. 3D LUTs make the process of color grading very time efficient. Furthermore, they can help you achieve a certain look without having to adjust individual settings. Luckily, Filmora supports 3D LUTs and there are many great pre-installed LUTs in Filmora.

3. Color

The dedicated color section in Filmora can help you control aspects like videos’ exposure, brightness, contrast, vibrance, and saturation. A perfect combination of these effects will yield professional results.

4. HSL

Using Filmora you can manage the Hue, Saturation, and Luminance of individual colors. Changing the hue will offer a unique look to your videos. While saturation can help define how pronounced your color is. Lastly, luminance comes in handy for brightening or darkening a particular color.

5. Vignette

Vignette is another great feature of Filmora. It can be used to darken the sides of a video and draw the viewer’s attention to the lead character. You can control the amount of vignetting using a basic slider.

Lastly, Filmora can be used on both Windows 10 and macOS Big Sur desktops and laptops.