If you want to hire professional programmers, you have to analyze many things. This article will highlight the most important aspects that need to be considered before employing the programmer for your company.
The most important points to consider
If you are looking for programmers, there are a lot of things worth thinking about. Here are some of them:
Do you need to meet your engineers every day in your office, or the remote online cooperation is enough? Nowadays, a lot of programmers work from home, and as a result, their services are much more affordable compared to having the programmers in your office daily.
Do you want to hire foreign programmers? If you need to reduce the employment costs, it is worth considering hiring programmers who live in Central/Eastern Europe or Asia. The quality of their services is at the same level, but their hiring costs are significantly reduced.
Do you need a well-qualified and experienced programmer or is it ok for you to hire less-experienced workers? The level of work experience determines the cost of service. However, if you do not have much money to hire the most talented and skilled programmers, it is worth giving a chance to less-experienced workers. They usually tend to agree for lower salary rates but, at the same time, value the knowledge they can get while working on your projects.
The online places where you may find talented programmers
If you want to cooperate with the programmer online, it is worth to get familiar with the places where you may meet the most talented, skilled, and experienced programmers.
The list of the online platform is quite long. Some of them are: Toptal, PeopleFluent, Hired, Upwork, Guru, and many more.
Why is it worth to trust online platforms who hire professionals online? There are many reasons:
They hire only professionals who know how to do their job.
They verify the knowledge of the programmers.
The customers who cooperated with the programmers provided the feedback and rates that are essential for future customers.
There are many programmers from different parts of the globe who offer their services at different prices to meet the budget expectations of every customer.
As can be seen, there are many aspects worth considering before you hire the programmer. However, if you do not mind working remotely with the professional developer, it is worth to hire one of them online.
CMMS is a maintenance software or system which is an integral part of any business as it can help streamline business operations, thus making everything run smoothly without errors. But its performance or usage stands out when it comes to machine plant maintenance management. And this article is all about how you can use CMMS for optimizing your preventive maintenance strategy. Read on to know more.
Waiting for a piece of equipment to fail is never a good idea. It will cause unexpected downtime, not to mention the cost of replacing/repairing the equipment. It is hence better to avoid this situation completely if possible. This can be done by regularly servicing your assets and applying preventive maintenance operations.
CMMS helps you keep track of the health and performance of your assets and to identify beforehand in case anything is wrong. Thus, it helps in preventing machine failures. It also helps you schedule regular servicing so that your machinery is maintained in perfect condition and has a longer life. In case any failures do happen, CMMS helps identify the problem quickly so that you can fix it as soon as possible. It will also make sure that the same problem won’t happen again. Hence, the CMMS plays a crucial role in preventive maintenance.
Set clear objectives and put CMMS to work to achieve them
Maintenance management comprises of a number of processes all of which have to work together and well in order to maintain your assets in prime condition. But these processes differ with businesses. Hence, it is important to identify your maintenance objectives before you plan a preventive maintenance strategy. After you identify the key objectives, you can start devising methods to achieve them. CMMS can be of great help here.
It makes a lot of things much easier through automation, real-time data analysis, inventory management, etc. Since CMMS is so versatile, you have to decide how you are you going to use it, that is, you have to decide the objectives that you want to achieve with the CMMS. Once you have that fixed, it is easy to configure CMMS to work to achieve those specific goals. This will make sure that you stay on top of all your maintenance goals and ensure that your assets have a long lifespan.
Evaluate your maintenance strategy strengths and weaknesses
Now that you have set your goals and put your CMMS to work, it is time to go over everything. Maintenance management is not a ‘do once, ignore forever’ thing. You have to constantly revise it with better ideas to get the best out of it. Fortunately, CMMS can be of huge help here. CMMS allows you to access real-time data of all the processes like machine running times, maintenance in progress, where and when, inventory data, etc. That is, CMMS allows you to keep a birds-eye view on all the things happening in your business operations and maintenance management.
You can use this data to assess the strategy and figure out the weak spots. Once you have the weak spots identified, you can devise new methods to strengthen it. Through constant revising and changing, you will end up with the best maintenance plan that is perfect for your business operations. Hence it is imperative that you always keep track of your CMMS as it is an invaluable tool in maintenance management.
Final thought
Hence, CMMS is a complete system with different solutions which can help make your preventive maintenance strategies so much better and easier to implement if you use it wisely.
Technology-related robotics is an interrelated sector of scientific and engineering modeling of hardware and software robots. Today’s modern technology has typically tried to anchor its collaborative efforts in mass production of goods and services beyond human ability, especially in the industrial sectors. This has prompted talented engineers to come up with mechanical structures with some levels of computer programming, which undoubtedly tend to function efficiently as capable human beings.
In most densely populated areas, especially in sophisticated cities, technology-related robots are being employed in the stable door to door delivery of valuable goods. Due to their instinct features like programmable brains and speed capability, these robots possess unique characteristics that enable them to execute the expected tasks. These specific types of instructional machines are often used during unexpected life-threatening environments, which include disease epidemics and natural calamities.
Entertainment Robots
Entertainment robots are robots developed to amuse humans instead of performing specific tasks. They can be used, for example, at business conferences for marketing purposes, or in animated roller coaster rides. Additionally, robotic toys for children or pets remain popular, and we can even consider algorithms used in casino games like those played at any cryptocurrency casino are automated, kind of like a digital robot of sorts. The use of robotics in entertainment is growing increasingly popular with the rise of new technologies.
Educational Robots
Educational robots provide students with academic knowledge of robotics and programming, while at the same time teaching them other cognitive skills which later support them in solving a wide range of technology-related and other issues. Learning robots typically provide scholars with everything they may need to build and program a robot capable of performing various tasks. The cognitive complexity of this academic field is typically adapted to talented students.
Life Saver Robots
Technology-related robots are already used as remote-controlled tools that offer help in dangerous situations, for example, by locating buried accident victims, calmly defusing bombs, and dismantling hazardous energy plants. Emergency workers risk their lives during fires, floods, earthquakes, chemical accidents, and bomb disposal work. Intelligent robots are to be deployed when matters are simply too dangerous for the humane rescuer. In this way, a human is exposed to less danger.
Hospital Robotics
Hospital robotics works collaboratively with knowledgeable doctors in life-saving technology-related practices. The robotic physicians’ aid remains a crucial tool to extend the capabilities of a doctor. Robotics can also reduce costs by a significant margin and help achieve a high level of productivity in hospitals. However, there are still many potential improvements to make within this area, and people should expect robotics to become increasingly utilized in the medical field.
Security Robots
Security robots are gradually becoming a more familiar sight in modern shopping malls, inclusive workplaces, and social areas. These robots are frequently used as replacements for human security personnel, as robots are able to gather much more data and supervise more areas at once than a human being could. However, they are not able to respond the same way as a human, meaning they’re more satisfactory as mobile supervision engines than conventional lookouts.
Modern technology-related inventions have eased economic activities in many fields, relieving pressure on workers by automating certain processes. This technology is critical in social innovation and cost reduction since one robot can perform a duty that previously required a large amount of human labor. Contemporary robotics technology can overall be considered a huge accomplishment since it has brought, and will continue to bring, many great improvements to the working and recreational lives of many humans.
In our ever-connected world, it is vital to be present and discoverable online. The best way to showcase your product or service to the world is via a website.
This is where customers will typically learn about your company and interact with your business, perhaps even make a purchase, so you want to make sure it’s right.
When building your online presence, the first step is to find a suitable web hosting plan. Every single website will consist of both a domain name and a web host.
There are plenty of options out there, like Hostinger’s plans, which focus on quality customer support extensively.
When choosing a web hosting provider, you will need to take some time to make sure it is the right one for you. Web hosting companies vary in terms of the services they offer, so first, consider what is important to you and your website.
There are some things that are essential, such as speed and security, but you should also consider the level of support and guidance offered.
Most web hosts ensure that your website will be fast, reliable, and secure, but the best web hosting providers will offer all of this and provide support every step of the way.
Why You Need Customer Support
Technology sometimes fails us, and we have all been there. Every website will encounter errors or malfunctions at some point.
There are so many things that could go wrong, many of which are completely unexpected or seemingly unexplained. It is very likely that problems will arise, especially when you begin your new website venture.
This is why it is important to ensure that your hosting provider can adequately support you. It is one of those things that you do not know you need until you really need it.
When you encounter complications, errors, or have queries, it is crucial that you are able to resolve them quickly.
Good web hosts offer support in one way or another, whether it is through a forum, an FAQ section, or via help tickets or chat systems, but more often than not you’ll want to communicate directly with someone to sort the issue out.
This is where a dedicated customer service department can help. Many of the major hosting providers will have a customer support team or customer success department that is fully trained and prepared to provide help and guidance wherever you need it.
Save Time
Scrolling through online forums or FAQs to find a solution can be time-consuming, and often you do not find exactly what you are looking for.
You are busy, and there are plenty of other factors to consider when running a business. You do not have time to teach yourself how to fix issues by watching tutorials or reading streams of information online.
It is a much more efficient use of your time to contact the customer service department and make use of the incredibly knowledgeable and helpful individuals who are there to help you succeed online. They will be able to quickly resolve the matter and get your website back up and running in no time.
Image source: canva.com
Resolve Downtime
Most web hosting providers promise little to zero downtime. In theory, you should not have more than a few minutes of downtime a month. In practice, as we have learned before, technology can let us down, and this cannot be avoided sometimes.
Downtime means that your website cannot be accessed so any downtime may result in loss of business and revenue. Quickly resolve unexpected downtime with a customer support team who will locate the issue and solve it before anyone has even noticed.
24/7 Support
We are able to browse the web 24/7 365 days of the year so anyone can visit your website at any time of the day, from anywhere in the world.
If there is something not working, like a button, a link, or if your page is slow to load, a solution needs to be found quickly.
Having a professional support team available around the clock is invaluable when you need to solve any late-night issues. Plus, they are always available to answer your burning questions, whatever the time of day or night.
Everything is so well-maintained by the hosting provider that any potential issues are prevented from arising in the first place, but most service providers also offer 24-hour monitoring. Staff are alert to any possible problems before they happen and will resolve them before you know it.
Image source: canva.com
Maintenance Support
You may be surprised to hear that a good website requires on-going maintenance. It is not as simple as setting it up and leaving it alone to do its job.
You will probably want to add integrations or upgrades to streamline the functionality of your website too. The installation of such integrations is often not as simple as clicking a button.
Customer support will be able to guide you through the process and ensure any necessary maintenance is carried out.
So, what determines a good customer success team? Here are some things to consider:
How quickly they respond to you.
How quickly they resolve the issue.
How you are able to contact them.
When deciding on which web hosting plan to choose, take some time and do your research. Try not to rely too heavily on price; as the old adage goes: buy cheap, buy twice.
Conclusion
Good customer support should always be a significant factor to consider. If you’re deciding between a couple of web hosting services, always make sure you go with a company that offers the best support team. Hopefully, you’ll only need to contact them once or twice, but it’s always reassuring to know that a good customer service team is there for you if you need them.
Human error and the inevitability of bad luck make insurance a must for every individual. Each day, people encounter situations that require them to change, alter, or make use of their insurance policies. Unfortunately, accessing those policies can often be as much of a headache as filing a claim.
Insurance apps are quintessential because they allow users to access their insurance account, file a claim, and make changes with total ease. Custom ios app development makes it possible to build an insurance app from the ground up, creating a mobile platform that eases the frustrations of dealing with insurance and ensures that customers are always engaged and happy. Not only is this key to building a loyal following, but a great insurance app allows you to access the key analytical data that can be key to true growth in the technology space.
Below, we’ve laid out the top 10 features every insurance app should include by 2021. Not only are these features necessary to appeasing your audience, but they are key in garnering the data and analytics necessary to understand your consumer base. That’s a win for everyone involved!
The Top 10 Features For Your Insurance App in 2021
The advantages of an insurance app for customer satisfaction and analytics are numerous. Most will be obvious to your business, yet you need to make sure you include a few key features to increase service level, broaden your audience, and build a foundation of brand loyalty.
1. Ability to Track Insurance Claims
Without question, users want the ability to monitor insurance claims and garner insights into how their particular claim is being processed. In any insurance app, users will want to be able to do the following things:
View claim information online
Upload photos or documents
Update contact information
Speak with/contact an agent directly through the app
File an initial claim
Much like users want to track a long-awaited package, they want to know the status of a claim without having to call into the agency or be placed on hold. To make this feature one step further, use custom ios app development to allow users to communicate with contractors, repair shops, or agents who may be working on their case.
2. Unique User Profiles
Oftentimes, there is more than one person in a household on an insurance policy. In order to make your app truly efficient in 2021, you’ll want to make it easy for each user to create a profile and then access their individual profile with ease. Custom IOS app development teams can help you to develop an auto insurance application that provides individual profiles to every user. Additionally, it should be very simple for new users and existing users to create an account. These user profiles can also garner valuable data for your company and analytical insights into your consumer base.
3. Electronic Insurance Card
Depending on the type of insurance you’re offering, it is paramount that your insurance app includes access to an electronic insurance card. This is a practical feature that can quickly allow users to pull up their insurance cards on their smartphones and provide proof of insurance. Not only does this eliminate the need for users to carry paper cards on their person at all times, but it can be handy in instances where they happen to misplace a card or simply forget it at home. Right now, 31 states allow individuals to show proof of insurance on their smartphone. This number will only continue to grow.
4. Virtual Account Assistance
Let’s face it; most people don’t want to call into their insurance company to ask a simple question. Wait times can be long and frustrating. When you’re building your insurance app in 2021, strive to include a virtual assistant that can help with account questions and management. This assistant should be able to assist in making payments, understanding coverage terms, viewing claim information, and answering frequently asked questions. Another option would be to include the option of having “face to face” conversations between customers and agents. In other words, it should be easy through the app to manage an account and speak with an agent.
5. Ability to Add or Alter Coverage
In the modern-day, users want the ability to open up an app on their smartphone and check a box of their to-do list. When it comes to insurance, there are many instances in which one needs to add coverage or alter coverage. Granting the ability to do so through the app will gain you major bonus points with your consumer base. For example, a great car insurance app will allow you to add new vehicles for insurance and remove old vehicles you no longer have through the app. A homeowner’s policy should be able to do the same.
6. Push Notifications
You cannot work with a custom IOS app development team and not include push notifications on your insurance app. These notifications keep users notified about claims, payments, and even policy expiration dates. Not only is this essential to keeping consumers in the loop, but it can serve for both service and marketing purposes by offering advantages to your clients and business simultaneously. Of course, you should include the option for users to turn push notifications off or to tailor the notifications to suit their specific needs. For example, not every user will want a reminder on policy renewals, but most will want to be reminded when a payment is due.
7. Real-Time Quotes and Pricing
For too long, the process of obtaining an insurance quote has been a headache that resulted in a lot of emails and messy marketing ploys. Consumers are over that whole scene. Most people simply want to input their information into the app to garner a real quote right away. No, they have to wait for an email or a call from an agent.
Once a customer has obtained a quote, then give them the option of contacting an agent for more information or simply let them sign up for that particular plan on the app. In an increasingly busy world, most people just want to get the information they need as quickly as possible. As a bonus, real-time quotes allow you to garner information, data, and analytics on every customer. This can be valuable for marketing purposes or simply appealing to your base.
8. Geolocation Services
Most of us don’t equate insurance apps with geolocation, yet adding this feature to your insurance app in 2021 could really set you apart from the pack. This feature makes it possible for your clients to access their information from anywhere while making it possible for you to track their movements and discerning valuable information should a claim be filed. In the event that users are visiting or staying in a foreign nation, geolocation can also help you to guide them accordingly or to find a necessary institution.
9. Live Chat Support
Easy interaction between parties is key in appeasing customers and starting a great foundational relationship. Include a 24/7 customer support screen that allows users to get answers to their most basic questions and to problem solve larger problems. This should be accomplished through chat support that connects users with live agents who can assist them with ease. Choosing to include this type of customer service can also help you to reduce operational costs as you will need fewer staff members to assist customers. Additionally, most customers will, in general, be quite a bit happier.
10. Multi-lingual Assistance
If you want your insurance app to really appeal to a wide audience, you’ll need to include a multi-lingual assistance function with your IOS app development team. The world is a diverse place, and if you want to cater to customers from all walks of life, you’ll need an application that can assist all users regardless of their native language. Only catering to English speaking customers won’t do, nor will it gain you a loyal following from all corners of the world. Make sure anyone can access your app and make the app as inclusive as possible. Multi-lingual assistance will set you apart from apps that only really work to those who are native in English.
In Conclusion
If you want your IOS development team to build an app with the top 10 features for your insurance app in 2021, you’ll want to think like a customer. Sure, you want to gain some valuable analytics, marketing, and customer loyalty from the app itself, but you also want people to start using the app initially. By including each of these ten features, you’ll check all of the boxes a user could want from an insurance app and create a seamless experience that will keep your client’s coming back for more.
Govt. of India blocked 59 Chinese apps, including hugely popular TikTok and UC Browser today.
The Chinese app ban is due to the huge economic backlash against China following the June 15 clashes at Ladakh in which 20 Indian soldiers died in action, and more than 70 were injured.
According to the sources, Indian intelligence inputs suggested that the apps have been violating the terms of usage, compromising user’s privacy, and being used as spyware or malware. Resulting Government has decided to disallow the usage of these 59 Chinese apps both in mobile and non-mobile Internet-enabled devices.
According to the government press release announcing the ban stated: “The Ministry of Information Technology, invoking it’s power under section 69A of the Information Technology Act read with the relevant provisions of the Information Technology (Procedure and Safeguards for Blocking of Access of Information by Public) Rules 2009 and in view of the emergent nature of threats has decided to block 59 apps since in view of the information available they are engaged in activities which is prejudicial to sovereignty and integrity of India, defence of India, security of state and public order”.
The press release also noted that “The Computer Emergency Response Team (CERT-IN) has also received many representations from citizens regarding security of data and breach of privacy impacting upon public order issues,”.
It further says that the move to ban these Chinese apps move will “safeguard the interests of crores of Indian mobile and internet users”. This decision is a targeted move to ensure safety and sovereignty of Indian cyberspace, it said.
Kali Linux, by Offensive Security recently released its new version of penetration testing platform Kali Linux v2021.1 with some new features. Also, Microsoft released its most advanced final version of the Windows Operating System, Windows 10.
So how it will be when these two killer badass OSs come in the same device. In this article, we are going to guide you on how to dual boot Kali Linux v2021.1 with Microsoft Windows 10. Dual boot means running two separate OS in the same HDD.
If you are not a fan of Windows 10, then don’t worry — with this tutorial you can also dual boot Kali Linux with Windows 7/8/8.1.
Video tutorial available at the end of the article.
So let’s start:
Dual Boot Kali Linux v2021.1 With Windows 10:
Step 1:
First, download Kali Linux latest version ISO file from the above-provided link. Download either 32 bit or 64 bit, that’s your choice.
Step 2:
After downloading Kali Linux the next step is the creation of a bootable USB. For that, we need Rufus – a utility that helps to create bootable USB flash drives. So download it from the above link and install it.
Step 3:
Let’s start making a bootable USB. First, connect your USB drive. As already said we need a minimum 4GB memory pen drive.
Now run Rufus and follow steps to create a bootable USB.
Step 4:
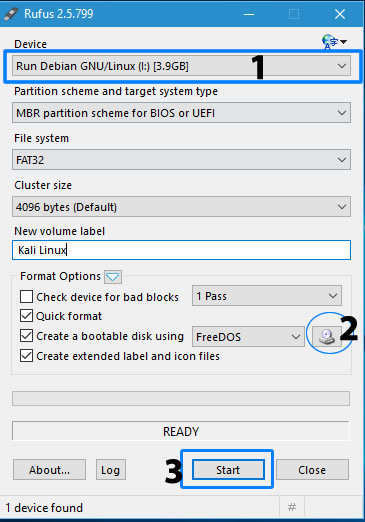
Now you get a screen like the below image.
Step 5:
First, check your USB drive is selected. Then click the small CD drive icon below (2) and locate the Kali Linux iso file that you downloaded from Kali official website. And finally, click “Start” and wait for the process to complete.
Step 6:
After process completion, click the close button to exit from the Rufus window and yes, here is your Kali Linux bootable USB drive.
Other than dual booting Kali Linux with Windows, you can also use this bootable USB to live boot Kali — means run Kali without installing it but with some limited features and functions.
Step 7:
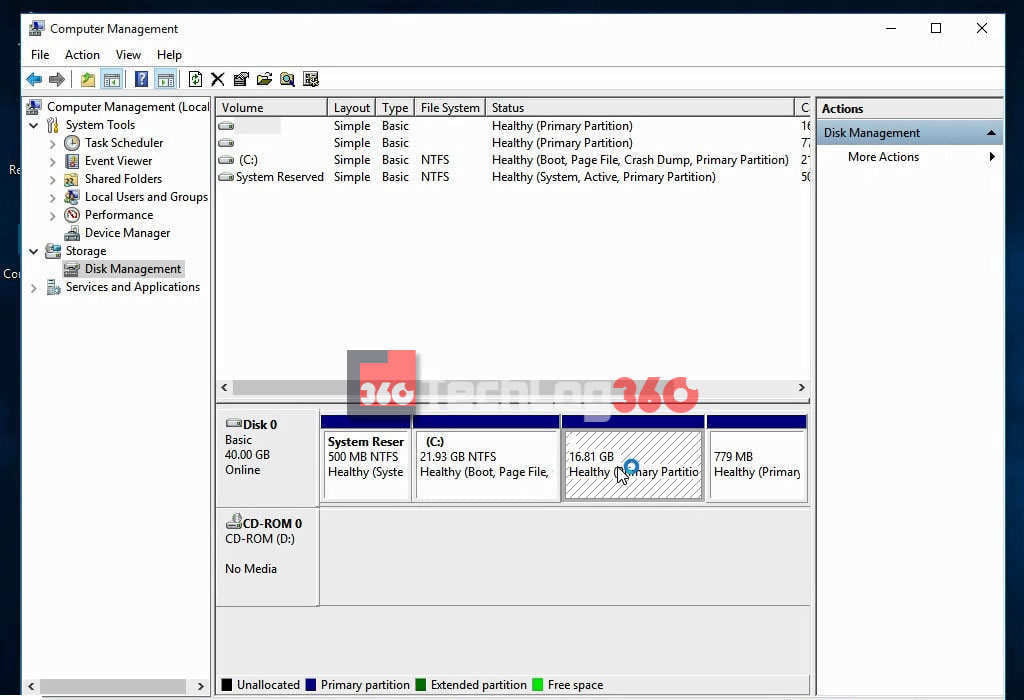
Next, we are going to create a separate partition for the Kali Linux installation. So open your Disk Management settings or Run “diskmgmt.msc” command in Windows.
Create a new partition of size about 15-20GB minimum by shrinking an existing volume. Here we created a new partition of size 17GB.
Step 8:
Initial processes are all done. Downloaded Kali Linux ISO, created a bootable USB drive and created a separate partition for Kali Linux installation.
Before going on keep in mind always Disable Secure Boot and Fast Boot option in BIOS.
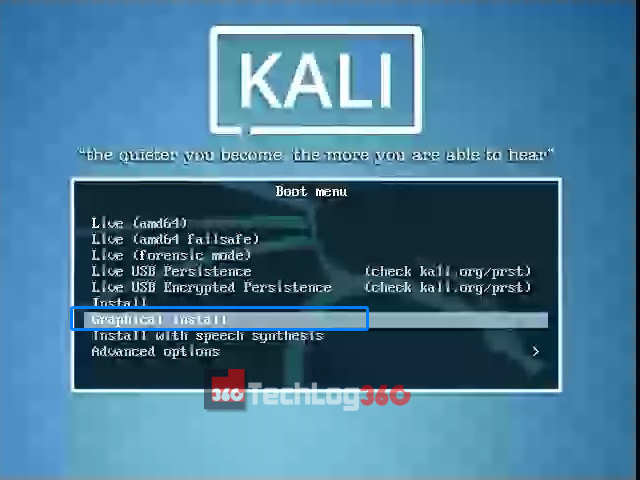
Now restart your PC/Laptop and go to boot manager and select the option boot as USB [Options will be different for different brands]. Now you will see the installation window of Kali Linux.
There are different options to install Kali Linux. Here you have to choose “Graphical Install” to start with ease.
Step 9:
Choose the language to be used for the installation process. And press “Continue”.
Step 10:
Choose your country and continue the installation process.
Step 11:
Next set type of keyboard layout. Here I choose “American English”.
Step 12:
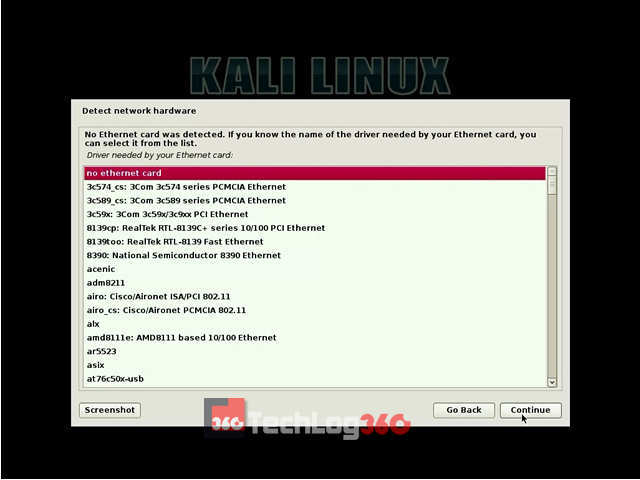
Next step set IP configurations. You can configure your network automatically or manually.
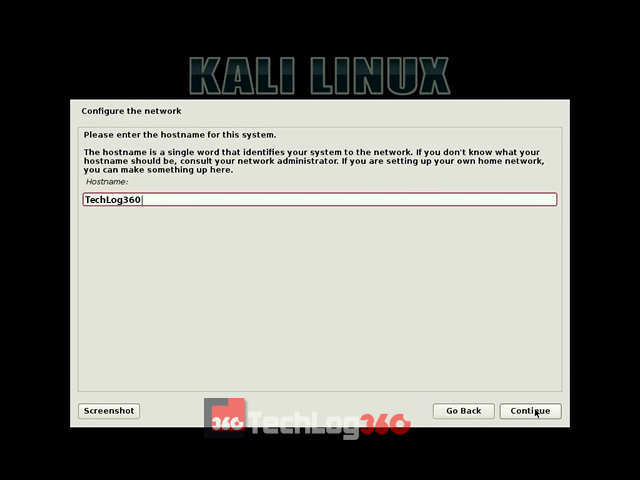
Step 13:
Now the installation will ask for a Hostname. Set any name you want. It’s kinda like a username.
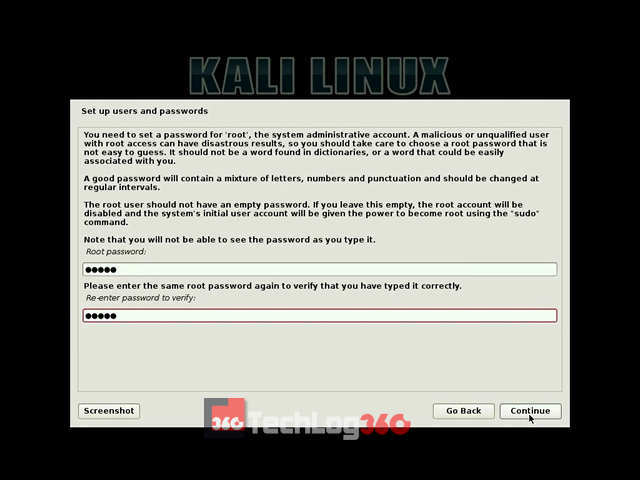
In this step, you have to enter a password for “root user “. After entering the administrative account password click “Continue”.
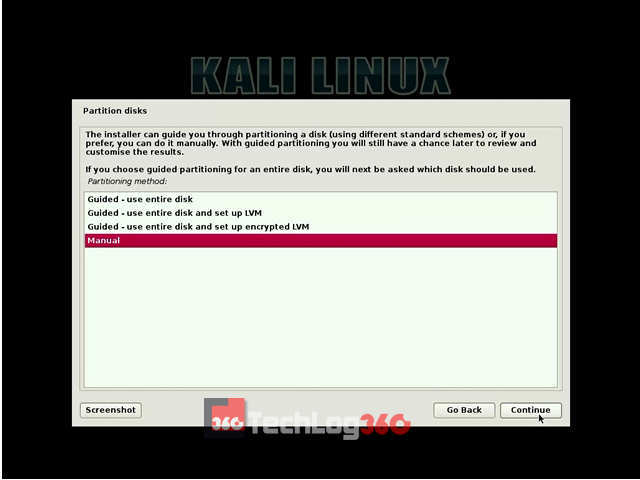
Step 15:
Next, choose the partitioning method as “Manual“.
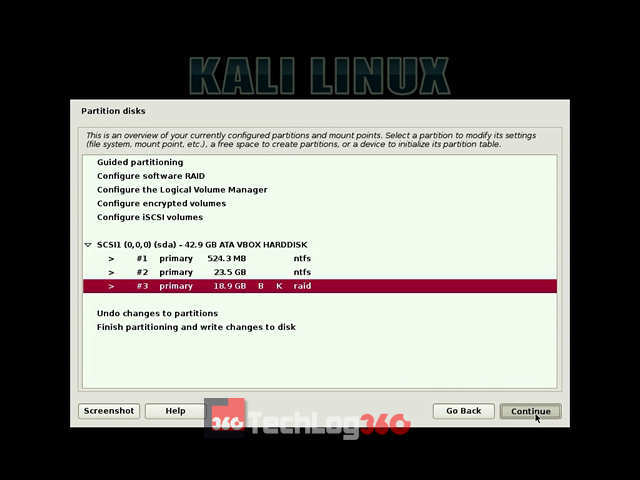
Step 16:
Carefully do this step. Only choose the partition that we created earlier for Kali installation and press “Continue”.
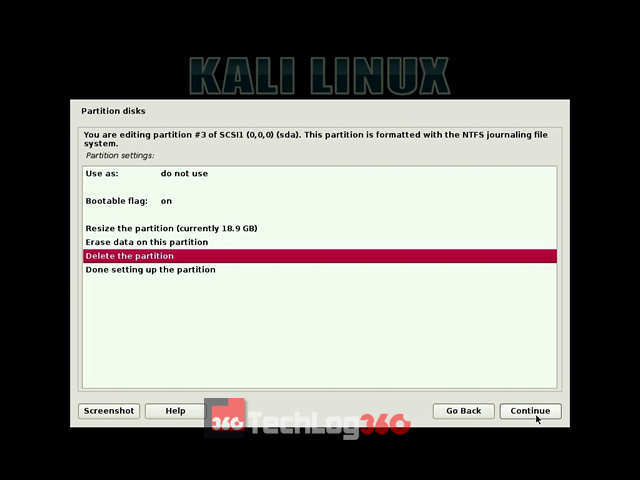
Step 17:
Then select the option “Delete the partition” and hit “Continue”.
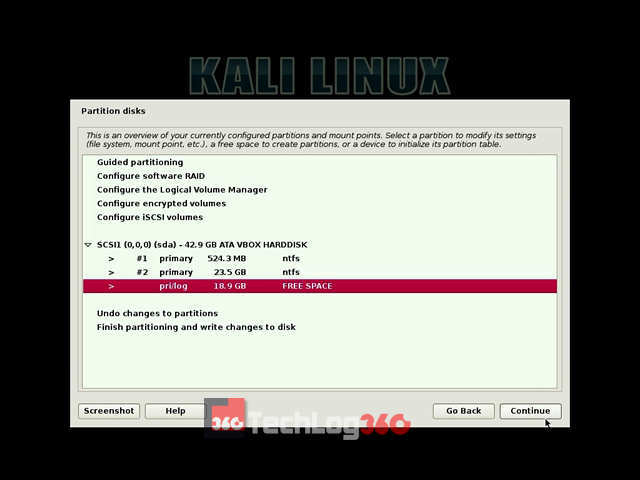
Step 18:
After the above step, now you can see that your Kali installation partition is now shown as “FREE SPACE“. Choose that free space partition and “Continue”.
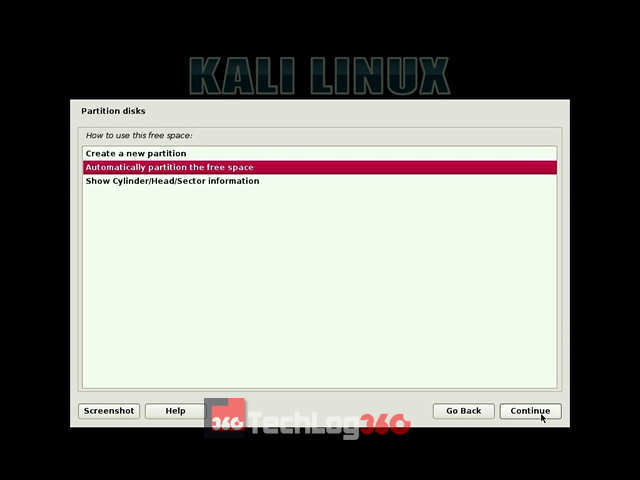
Step 19:
Now, it will ask us how to use those free space. Select the option “Automatically partition the free space” and “Continue” the process.
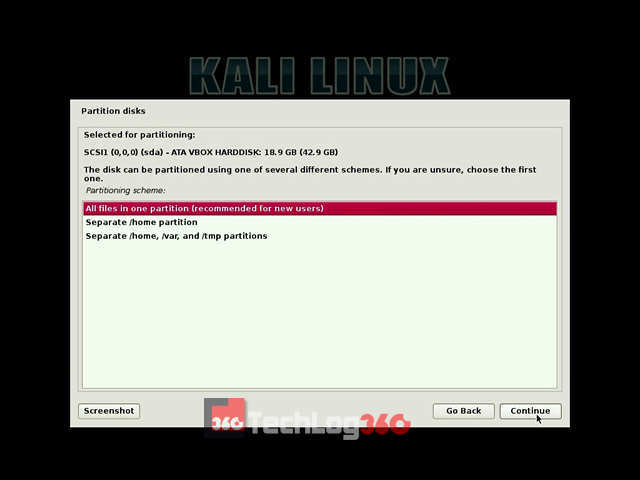
Step 20:
Next, choose the option “All files in one partition” that is recommended for new users and press “Continue”.
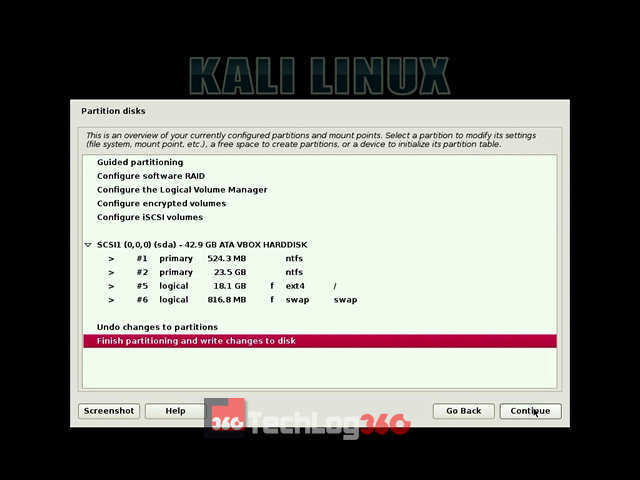
Step 21:
Finally, select the option “Finish partitioning and write changes to disk“.
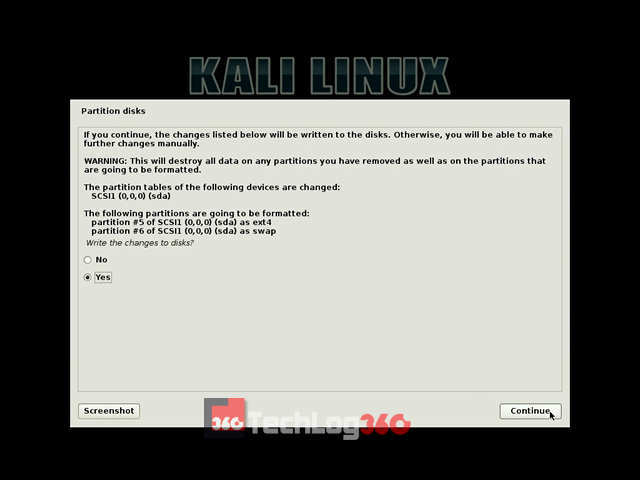
Step 22:
Here, it will ask permission to write changes in the disk. Choose “Yes” and “Continue”.
Now the Kali will start the installation process. Wait 10-15 minutes to complete the installation.
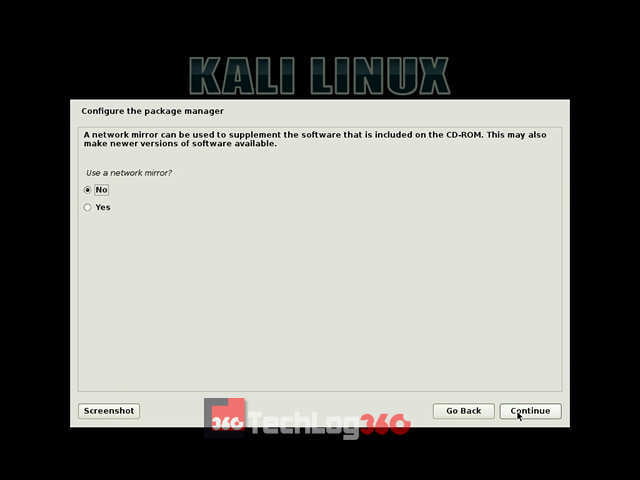
Step 23:
In the middle of the installation, it will ask for the network mirror, choose “Yes” or “No”. This setting is about an update option. So we recommended you to choose “No” now. You can later enable it.
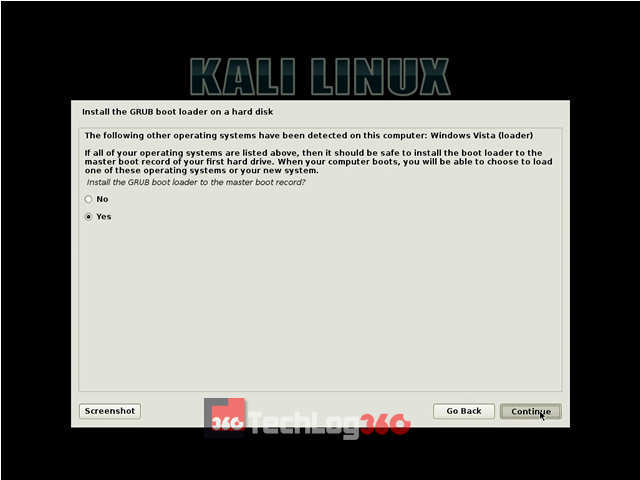
Step 24:
Next, it will ask for installing GRUB boot loader, choose “Yes” and “Continue”.
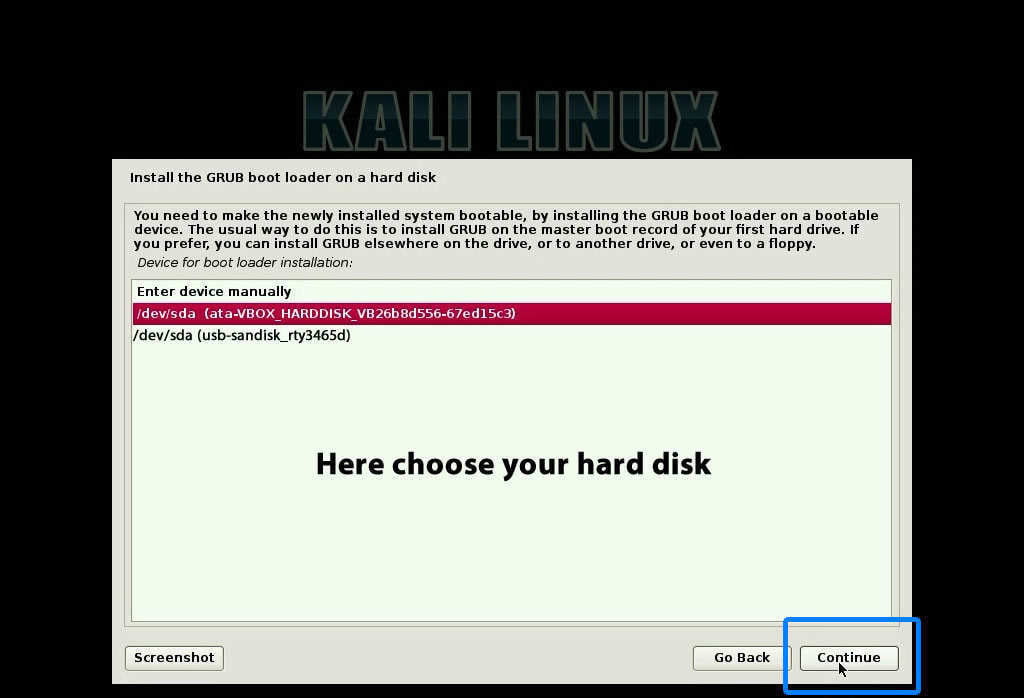
Step 25:
Next, it will ask where to install Kali GRUB boot loader. Choose your hard disk, second option. Remember only choose your hard disk to install GRUB. Otherwise, after the installation of Kali Linux, your system will not display the option to choose the operating systems on startup.
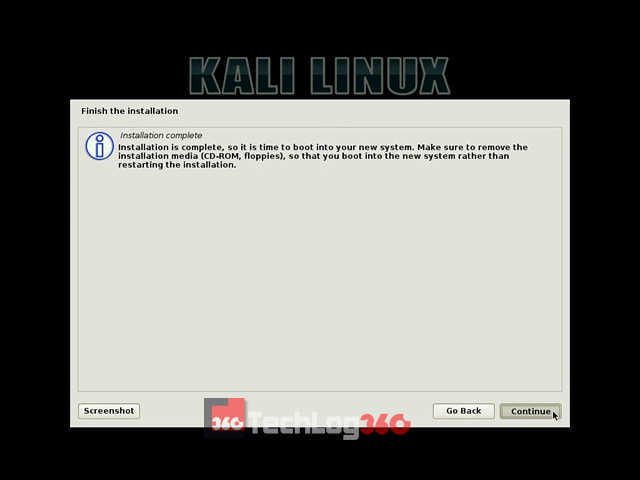
Step 26:
After the successful completion of the installation process, now you can see a screen similar to the below screenshot. Choose “Continue”.
Step 27:
Now eject USB drive and restart your system.
During startup you can see the GRUB Loader of Kali Linux. Here you can choose “Kali GNU/Linux” to boot your PC/Laptop with the new Kali Linux or else choose “Windows Recovery Environment” to boot into Windows 10.
Cool, here is your new hacking and penetration testing partner. Start to break stuff like a pro. Also, check out our full A-Z list of Kali Linux commands.
We hope you like the article regarding how to install Kali Linux v2021.1 with Windows 10. If you have any doubts or facing any problem during installation please contact us or comment below. We are here to help you.
Check out Video Tutorial ► Dual boot Kali Linux With Windows
[Solution] – Authentication Problem During Kali Linux Startup
Sometimes, even after the successful installation of Kali Linux, many users fail to login to Kali first time. The problem they are facing is authentication.
You may also experience the same problem, even after entering the correct Username & Password (one that provided during installation), you fail to login to Kali Linux. Don’t worry we have a solution for you.
When Kali Linux asks you to enter Username for the first time, do not enter the Username you given during installation. Instead, just type “root” in username field and then enter the password as “toor“. If that password didn’t works enter the one that you set during installation. Yes, this will solve your problem.
[Solution] – Missing GRUB in Kali Linux
Some of our readers are reporting a problem, that after installing Kali Linux they are unable to boot into Windows. This is because of missing GRUB loader. So to solve this problem you have to reinstall the GRUB menu so that it can detect Windows. To do so boot into Kali and open terminal and type following commands :
[Solution] – After Installing Kali, PC Directly Boots to Windows
Many readers are reporting that even though after successfully installing Kali, every time PC boots automatically to Windows without showing GRUB. This is due to failed GRUB installation happens because of Bootable flag option is off. GRUB installs successfully only when this option is on. See step 17, you can find the bootable flag option is turned on there during installation.
So this is one of the possible solutions for that problem :
First boot with your Kali USB
Select the “Live” option to boot into Kali Live mode.
Open Terminal window.
# fdisk -l          (First we have to find out the partition Kali is installed on (: /dev/sda1, /dev/sda2, etc) )
# mount /dev/sda1 /mnt           (Mount your kali partition)
# mount --bind /dev /mnt/dev          (You will need to mount the /dev directory into mnt)
# chroot /mnt           (change the root to the mounted partition to be able to run the command from the mounted partition)
# grub-install --recheck /dev/sda           (install grub in the HDD sda, not sda1, sda2, etc.., just sda.
Now reboot the system, you will see your boot-menu showing Window and Kali Linux both simultaneously.
Now, please issue these 2 commands, if they fail, do not worry, you will have to do it after reboot. This will make Windows show up in the grub menu. # os-prober (looks for partitions in the HDD and register them in the os-prober file. # update-grub (Takes some templates, including the os-prober file and writes them in the menu)
That is all, once done, reboot. You should see the grub menu. If you do not see the Windows option in the menu, don’t worry, just enter Kali, open up a terminal and run the 2 commands I posted above.
Reboot again, you should see the Kali and Windows option in GRUB menu
If this method didn’t work out for you then try the below mentioned on.
[Solution] – Adding Kali Linux to Windows Boot Manager using EasyBCD
As we told before, sometimes because of some reason Kali Linux won’t boot after installation and directly opens Windows. And most instance above mentioned method solves this Kali grub not showing on the Windows problem.
If you already tried the above solution and still not solved the problem, then probably this method will help you to add Kali Linux bootloader.
In this method, instead of installing GRUB bootloader we are adding Kali Linux boot entry to our Windows boot manager. To do this task, we are using the free edition of a simple tool called EasyBCD. So download and install EasyBCD Community Edition and do as follow :
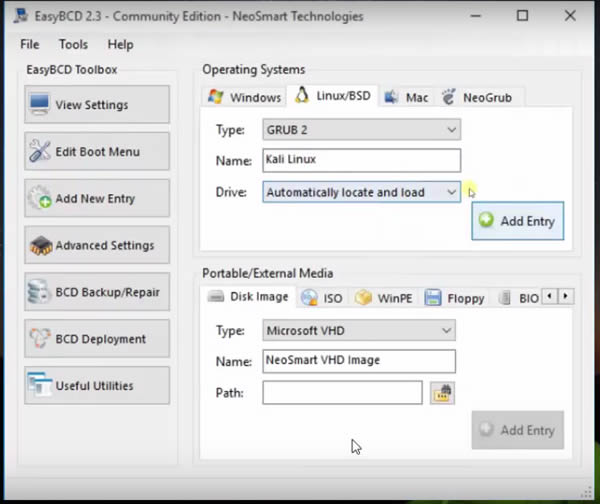
Open EasyBCD and go to the “Linux/BSD” tab and choose the option “Add New Entry“.
Next, you have to select the type of bootloader for your Linux distribution. Since we are using Kali Linux — choose GRUB2. And next, change the name of the operating system to Kali Linux. And finally set the drive option as “Automatically locate and load” and hit the “Add Entry” button.
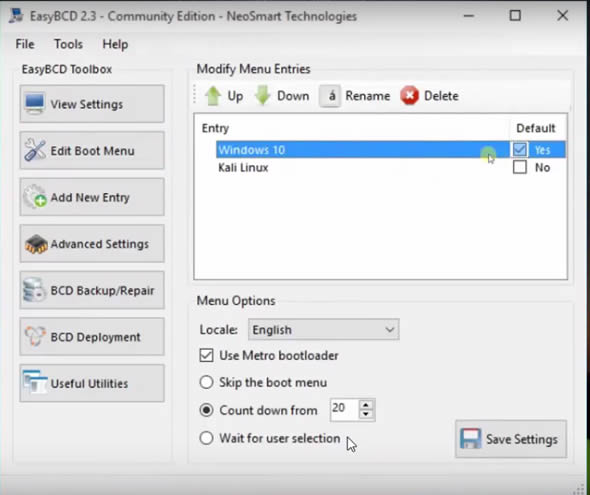
Now you have to set Windows 10 as the default OS so that your system will boot directly to Windows during startup. So go to the “Edit Boot Menu” option and tick Windows 10 or your Windows version and finally hit the “Save settings” button. And finally, restart your PC and boot into Kali.
Let us know the above-mentioned step resolved your issue. If not try this solution.
With the attention span of your audience getting shorter and shorter, it becomes imperative for you to make the switch from text to visual content or videos on your website. Including videos on your website can make it easier and faster for your users to consume content. They will consume more content and remember it for longer.
Hiring a professional videographer to create the video content for your home page can be extremely useful if you are looking at your site and standing out from your competitors.
The main point of including videos on your website is to maximize your conversions by making your visitors stay on your site for longer. In fact, by adding a video on your website, you can increase your click-through rates by 30 percent.
You get to engage with a responsive audience and convey your message in the right way.
They create a better first impression and help you achieve your goals and objectives in a faster and more efficient way.
Videos are great attention grabbers.
They make for the easiest way to engage with your visitors.
Since videos are shareable, you can use them to reach a wider audience.
What Value Do Videos Add Your Website?
Having high-quality video content has become all but a requirement for successful digital marketing. If you leverage video production and integration successfully, the videos add value in the following ways:
Increasing Traffic – Adding content through a custom video makes it easy to increase your search engine ranking, provided you use the right targeted keywords in the tags, video title, and description. You can even post your videos on multiple locations without facing any duplicate content issues.
Building Brand Identity – Presenting your culture and establishing your company’s personality becomes easy if you include a custom video on your website. You can feature your employees in these videos and build a strong bond with your website visitors.
Expanding Your Reach – The shareability factor of videos makes it easier to integrate it with your blog as well as social media platforms. You can even encourage your visitors to share your videos on their social media pages.
Standing Out From the Competition – Utilizing custom videos on your website is the best way to stand out from your competition. This will give you a chance to emphasize your vision, explore your creativity, promote your products and services, and represent your company in the best way possible.
What Can Hiring a Professional Video Producer Do to Help Your Website?
Equipped with high-quality gear, a seasoned professional video producer brings to the table their expertise in using the required tools to edit your clips and create perfect videos for your business. They can make it easier and faster for you to achieve goal-oriented storytelling and proactive management without spending too much time or money. Including a custom video on your website is all about presenting your brand in the right light, and a professional video producer will have the right experience.
What Questions Should You Ask A Potential Video Producer?
You can find a variety of potential video producers if you run a search on the internet. However, not all these may be suitable for your needs. To identify the best option for your business, there are a few questions you will want to ask:
What kind of experience do you have in producing videos?
What can you help us accomplish by creating a video for our business?
Will you have a team working on the production of this video? If yes, how many members will this team have?
Is there any video in your portfolio that you are very proud of? If yes, can you share it with us?
In case you make any mistake while completing this project, how will you remedy it?
You will also want to think of more questions you want to ask before hiring the best video producer for your website. If you’re going to look at some samples and then decide, just run a search on demo video production professionals.
What Skills Should a Potential Video Producer Have?
Expertise in using the video editing tools and knowledge about capturing the best video in the ideal lighting should be the main things you need to look for while hiring a potential video producer. Here are a few other things you will want to think about before hiring a video producer:
Creativity – You want to make sure their videos are diverse and showcase each client’s specific niche.
Excellent Communication Skills – Working with someone who is always available to you and communicates their process is vital to a good working relationship.
Experience – Understanding of various platforms where you can host videos. This will help you reach more people.
Demos – Give demos reals as examples of their previous work.
Content Research Skills– Should be able to identify content that is making an impact and create their videos to reflect it.
Digital Awareness – Be aware of the various platforms and tools that can help them reach a broader audience.
Organization – The ability to stay organized and multi-task is important when choosing a video producer. You will want to find someone who can troubleshoot issues and come up with solutions.
Video Editing Tools – Have up-to-date equipment and consistency with editing skills.
Social Media Presence – Video producers should be active on all social media platforms, so they are visible to potential clients.
Are You Ready to Go Visual?
It won’t take much for you to include a custom video on your website if you hire a professional video producer. Make sure you do your research, compare your options, and choose the best person for the job. Discuss your requirements and provide all the information required to create the video for your business website.