Home Blog Page 85

Google Maps will Introduce Immersive 3D Views of Cities Soon

Google Maps Immersive 3D Views

Google Maps is rolling out one of its most impressive updates in years — a 3D view of some of the most important cities on the planet that almost appears real. 

The immersive 3D view was announced at last year’s Google I/O, but the deployment has been very slow, making it one of the slowest deployments of Google Maps. However, a Reddit user has discovered that the feature is now available in cities such as London and Berlin, so it is likely that the feature will soon be available in other parts of the world, including Spain.

This immersive view offers a 3D perspective of the most important areas of cities, allowing users to contemplate the best perspectives of cities they have not yet visited and get a better idea of ​​the urban decoration before actually setting foot in them. The view is available after navigating to a localized area and looking at the photo gallery for that location. The label “Immersive View” appears, and clicking on it enables users to experience the view of 3D graphics that increases the vision almost as if it were real over a point in a city.

One advantage of the new immersive view of Google Maps is that it allows users to enter very popular buildings, such as Madison Square Garden in New York, via an option on the left side of the screen. This feature provides data on weather and traffic, making the experience more realistic and giving Google Maps a new perspective from which to view the most visited sites in said cities.

However, there is a downside to this view in Google Maps — it seems to consume a lot of data. Using this new function of the maps app for 30 minutes consumed 2 GB of data, which can be counterproductive if users are under a limited amount of mobile data.

NVIDIA Announces H100 NVL: A New GPU Variant for Large Language Models

NVIDIA H100 NVL GPU

NVIDIA has announced the H100 NVL, a new variant of its Hopper GPU specifically designed for Large Language Models (LLMs) like OpenAI’s GPT-4

The dual GPU card has two H100 PCIe boards already bridged together and a large memory capacity, making it the most memory per GPU within the H100 family and of any NVIDIA product to date.

The H100 NVL is aimed at a single market of large-scale language model usage on the bandwagon and to further NVIDIA’s AI success. Large language models like the GPT family are, in many ways, constrained in memory capacity. Even the H100 accelerator fills up quickly to hold all parameters (175B for the largest GPT-3 model). Therefore, NVIDIA has developed new H100 SKUs with more memory per GPU than the regular H100 parts that cap at 80GB per GPU.

All GH100 GPUs come with six stacks of HBM memory (HBM2e or HBM3) with 16GB per stack capacity. However, due to yield concerns, NVIDIA only ships regular H100 parts with five of the six HBM stacks enabled, which means that each GPU has a nominal 96GB of VRAM, but the regular SKUs only have 80GB available.

The H100 NVL will be a special SKU with all six stacks enabled, offering 14GB of memory per GH100 GPU, a 17.5% memory increase. The dual GPU/dual card H100 NVL looks like the SXM5 version of the H100 arranged on a PCIe card. Regular H100 PCIe is being held back somewhat by slower HBM2e memory usage, fewer active SM/tensor cores usage, and lower clock speeds, but Tensor Cores NVIDIA is presenting for H100 NVL. The performance numbers are all on par with the H100 SXM5, indicating that this card isn’t further reduced like regular PCIe cards.

The H100 NVL’s big feature is its large memory capacity, as the dual GPU card offers 188GB of HBM3 memory (94GB per card). It also has a total memory bandwidth of 7.8TB/s, and 3.9TB/s on individual boards, making it the most memory per GPU within the H100 family and of any NVIDIA product to date.

The provision of this SKU is probably in anticipation of the explosive hit of ChatGPT and the rapid increase in AI demand due to the subsequent appearance of Bing and Bard. The price will go up accordingly, but given the booming LLM market, there will be demand to pay a high enough premium for a near-perfect GH100 package.

In conclusion, the H100 NVL is a new variant of NVIDIA’s Hopper GPU specifically designed for Large Language Models (LLMs) like OpenAI’s GPT-4. Its large capacity makes it the most memory per GPU within the H100 family and of any NVIDIA product. Its increased memory capacity will help to further NVIDIA’s AI success. The H100 NVL is a significant step forward in the LLM market, and it will be interesting to see how it performs when compared to other GPUs in the future.

Nothing Unveils Ear (2) Wireless Headphones with Adaptive ANC and Hi-Res Audio Streaming Support

Nothing Ear (2)

OnePlus founder Carl Pei’s company, Nothing, has unveiled its latest product — the Ear (2) wireless headphones. While the design looks the same as the first-generation Ear (1) earphones, Ear (2) boasts several improvements in terms of components and capabilities.

One significant upgrade is the LHDC 5.0 audio codec support, allowing for Hi-Res audio streaming. The Ear (2) also features a new personalized sound profile that allows you to calibrate the headphones to your specific hearing after taking a quick test in the companion app, Nothing X. Additionally, you can customize the equalizer settings to your preference.

Ear (2) also has adaptive active noise cancellation that filters out unwanted noise up to 40dB based on your ear profile and surroundings. The headphones also have updated 11.6mm drivers with a new diaphragm made from graphene and polyurethane and improved wind protection for clearer voice capture in challenging environments.

Battery life has also been improved, with up to 36 hours with the charging case and 6 hours of playtime on the earbuds alone. The charging case can be charged via USB-C or wirelessly at 2.5W, and the headphones support Google Fast Pair for Android and Microsoft Swift Pair for Windows. The Ear (2) is also rated IP55 dust and splash-resistant, while the earbuds are IP54.

Ear (2) is priced at $149 or €149, the same price as Ear (1) after its price increase. The headphones are available for pre-order starting today, with sales set to begin on March 28. Ear (2) only comes in white, unlike Ear (1), available in black and white.

Despite looking similar to Ear (1), the Ear (2) packs several improvements, making it a worthy upgrade for those seeking high-quality wireless headphones.

Valve Announces Counter-Strike 2 as Free Upgrade: What to Expect from the Source 2 Engine and Other Innovations

Counter-Strike 2

Valve has announced that Counter-Strike: Global Offensive (CS:GO) will be upgraded to Counter-Strike 2 (CS2) this summer, with the technical switch to the Source 2 engine promised to be the greatest technical advance in the history of Counter-Strike. The game will be available as a free upgrade to existing CS:GO players, with revised maps, new features, and improvements to visual and audio effects.

Valve has not yet revealed the full scope of the innovations in CS2; the upgrades will include audio, maps, and visual effects revisions. In addition, the game will introduce dynamic smoke grenades and gameplay independent of the tick rate. A player’s CS:GO items will be transferred to CS2.

According to Valve, all visual effects have been polished, and new effects such as explosions, fire, smoke, and water have been added thanks to the lighting and particle systems of the Source 2 engine. The user interface has also been completely revised. The sound effects have been retuned to better reflect the physical environment and create a more enjoyable listening experience.

Valve describes the use of the new smoke grenades as a revolutionary change. The smoke can interact with the environment, so bullets and frag grenades can throw up smoke obscuring the player. The smoke also spreads naturally and pulls through broken windows or downstairs.

The tick rate, which refers to the intervals at which the server calculates the game situation, will no longer affect movements, shots, or throws. Regardless of the tick rate, movements and shots will react at the same speed, and grenades will fly and land the same way.

Instead of new maps, CS2 will feature revised versions of existing maps, with changes ranging from new lighting and improved readability to physics-based rendering. “Overpass” will receive a general overhaul with even bigger changes. Comparison images are provided on the Counter-Strike 2 official website.

A limited test phase for CS2 has already started, with selected players able to try out the new game based on criteria such as recent playtime on Valve’s official servers. The testers will be notified via the CS: GO main menu.

The Ethics of Parental Control Apps: Balancing Protection and Trust

Parental control

As our lives become more intertwined with technology, the need for parental control apps has become increasingly apparent. With the rise of social media and the internet, parents are looking for ways to protect their children from the dangers of the online world. However, the use of parental control apps like Bark, Qustodio, Google Family Link, and eyeZy raises ethical questions about trust and privacy.

On the one hand, parental control apps can provide a sense of security and control for parents. These apps allow parents to monitor their children’s online activity, restrict access to certain websites, and even limit screen time. This can be especially important for younger children who may not fully understand the risks associated with the internet.

However, the use of parental control apps can also be seen as an invasion of privacy. Children may feel like they are being watched or controlled, which can damage the trust between parents and children. In addition, parental control apps can be circumvented by tech-savvy children, which can lead to a false sense of security for parents.

One of the main ethical concerns surrounding parental control apps is the balance between protection and trust. While parents may have good intentions in monitoring their children’s online activity, they also need to respect their children’s privacy and autonomy. This means finding a balance between protecting children from the dangers of the online world and allowing them to explore and learn on their own.

Another ethical concern is the potential for abuse of parental control apps. While these apps can be useful for monitoring children’s online activity, they can also be used to control or manipulate them. For example, parents may use these apps to punish or reward their children based on their online behavior, which can lead to a toxic environment of control and fear.

To address these ethical concerns, it is important for parents to have open and honest conversations with their children about their use of parental control apps. Children should be made aware of the reasons behind the use of these apps and should be included in discussions about what is and is not acceptable online behavior. This can help to build trust and respect between parents and children, while still allowing for a level of protection.

Another way to address these ethical concerns is to use parental control apps in a way that promotes responsible and safe online behavior. For example, instead of using these apps to simply restrict access to certain websites, parents can use them to teach children about online safety and how to navigate the online world in a responsible and respectful way.

The use of parental control apps raises important ethical questions about trust and autonomy. While these apps can be useful for protecting children from the dangers of the online world, it is important to find a balance between protection and trust. By having open and honest conversations with children about their use of these apps and promoting responsible online behavior, parents can help to ensure that their children are safe and secure online, while also respecting their independence and privacy.

Meta Explores New Advertising Possibilities on Instagram with Ads in Search Results and Reminder Ads

New Advertising Possibilities on Instagram

Meta is testing new ways to increase advertising revenue on its popular platform. As the global economy slows down, the demand for advertising becomes more apparent. The company has introduced two new tools to Instagram to explore new possibilities.

One of the tactics is the inclusion of advertisements in Instagram search results. When users tap a post from the search results, this advertising will show in a scrollable feed. According to Instagram, the ad reaches users actively looking for a brand, product, or content. Meta intends to publish the advertising globally in the following months after the initial testing phase.

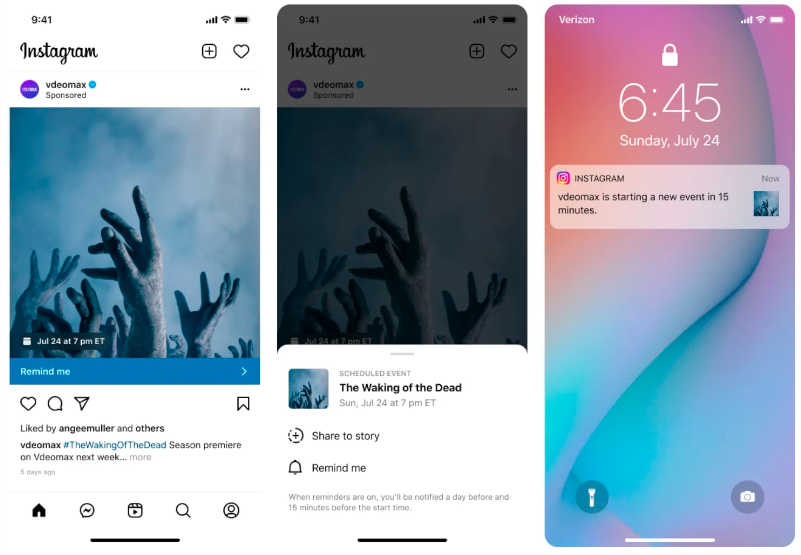
The “reminder ads” tool is the second new tool. This tool enables companies to publicise, remind, and alert users about upcoming events and product releases in which they may be interested. Instagram users may set reminders and get three alerts. This application will assist businesses in creating excitement for upcoming events. The adverts will be available in all advertisers’ feeds.

Reminder Ads in Instagram

These new technologies will assist Meta in increasing income when ad revenues are decreasing. According to Meta’s fourth-quarter 2022 financial results, advertising revenue declined to $31.2 billion from $32.6 billion in the same period the previous year. 

In addition, the company is introducing a new ad format for Facebook Reels, which will allow marketers to post advertising on the Explore homepage and profile feed.

NVIDIA Releases RTX Path Tracing SDK To Integrate Path Tracing Technology Into Games

NVIDIA RTX Path Tracing SDK

NVIDIA has released the RTX Path Tracing SDK, a tool for integrating path-tracing technology into video games. Path tracing is a sophisticated variant of traditional ray tracing, simulating light’s physical behaviour as closely as possible to the real world. It requires more graphics resources than conventional ray tracing technology.

Path tracing technology is commonly used in three-dimensional architectural projects or projects for the development of the design of future products when maximum accuracy and realism of image rendering are required. However, it has hardly been used in games and has only been implemented in Quake RTX and Portal RTX so far.

It should be noted that the RTX Path Tracing SDK release does not offer full integration of the technology into games. NVIDIA sees two options for using the technology in game projects. Firstly, it can be used to create a reference path tracer that ensures the “reality” of lighting in games during their development. Secondly, path-tracing technology can create high-quality photo modes in games.

The Path Tracing SDK uses video cards based on the Ada Lovelace architecture. Cyberpunk 2077 will soon receive path-tracing support, according to NVIDIA. The release of the Path Tracing SDK indicates that the GeForce RTX 40 series will not be retired anytime soon.

While the benefits of path tracing in games remain unclear, NVIDIA believes it can be useful for creating high-quality visuals and improving the overall realism of game lighting. With the RTX Path Tracing SDK, game developers now have the tools to explore the potential of path-tracing technology and its use in future games.

How to Build a File Upload Component with Angular Material?

File Upload Component

Whether it’s uploading documents, images, or videos, a file upload component can significantly enhance the user experience by allowing users to share files with others easily. 

One popular UI library for Angular projects is Angular Material, which provides several useful components and tools, including the Angular Material file upload component. This upload component allows intuitive file uploads in Angular projects with a sleek user interface.

Angular Material is a collection of UI components that follows the material design guidelines. It provides a set of pre-designed and customizable UI components that you can easily integrate into an Angular application.

In this article, we will explore the steps for building a file upload component using Angular Material, starting from setting up the environment and ending with creating the component itself. 

We’ll also examine how to customize your components’ interface and user experience.

Setting Up the Project

Before building our file upload component, we must set up a new Angular project and install Angular Material. If you already have the Angular CLI installed, you can create a new project using this command:

ng new my-project

Next, we need to install the Angular Material package. We can do this by running the following command:

ng add @angular/material

This command will install the necessary packages and add the required configuration to your project. You have successfully set up the project and are ready to create the file upload document.

Developing the File Upload Document

Now that we have our project set up, we can start building our file upload component. You can develop the file upload document by following these steps:

1. Install the Angular Material Package

In the terminal, run the following command to install the Angular Material package:

npm install -save @angular/material @angular/cdk 

@angular/animations 

2. Import the Angular Material Modules

In the Angular app module file, import the Angular Material modules you will use in your app. Here is an example of code you could use:

import { MatButtonModule } from ‘@angular/material/button’;

import { MatlnputModule } from ‘@angular/material/input’; 

@NgModule({ imports: [ 

MatButtonModule, 

MatlnputModule, 

// other imported modules]

 // other module properties

})

 export class AppModule { } 

3. Create a File Input Form Element

Create a file input form element in your HTML template that will allow users to select a file to upload.

You can use the mat-form-field and mat-input components from Angular Material to style the file input element.

<form> 

<mat-form-field> 

<mat-label>File</mat-label>

 <input -tInput type=”file” (change)=”onFileSelected($event)” I> 

</mat-form-field> 

</form> 

4. Handle the File Selection Event

When uploading files with Angular Material, it is important to know about the file selection event to handle the selected files and correctly perform any necessary actions. Here is one way of doing it:

onFileSelected(event) {

this.selectedFile = event.target.files[0];

5. Create a File Upload Button

In your HTML template, create a button that will trigger the file upload process when clicked. You can use the mat-button component from Angular Material to style the button.

<button mat-button (click) = “uploadFile() “>Upload</button>

6. Implement the File Upload Logic

Create a method for handling the file upload process in your component class. This method should use the Angular HttpClient service to send a POST request to the server with the selected file attached.

uploadFile() 

{const fd = new FormData();

fd.append(‘file’, this.selectedFile, this.selectedFile.name); 

this.http.post(‘/server/upload’, fd).subscribe(res => { 

console.log(res);

}); 

7. Display a Progress Bar

If you want to show the progress of the file upload, you can use the mat-progress-bar component from Angular Material to display a progress bar. In your component class, you can bind the value of the progress bar to a component property representing the upload progress.

<mat-progress-bar [value] = “uploadProgress”></mat-progress-bar>

Error Handling with Angular Material

Error handling is an important part of any software development process, and it’s especially crucial when creating a file upload component. Allowing users to upload files into an application can be a complex task, and mistakes in the code can lead to errors that could prevent successful uploads. 

Fortunately, Angular Material provides developers powerful error-handling tools to create reliable file upload components. It offers several features that make error handling easier. 

For instance, the Angular Material library has robust form state management, allowing developers to easily track each field’s validity status and display appropriate messages when errors occur. 

Additionally, developers can use the extensive input validation options available within Angular Material to ensure their application accepts only valid data. Together, these tools allow developers to easily create file upload components that are both robust and highly customizable.  

Best Practices When Using Angular Material for Error-handling

Error-handling

Here are five steps to follow when using Angular Material for error handling:

1. Validation Rules

Set up validation rules to ensure data integrity and accuracy when users submit information. 

Plus, use the Angular Material Dialog component to provide helpful feedback to users when input errors occur. It creates a better user experience by providing visual cues and clear instructions on solving the problem.

2. Reactive Forms

Use the Reactive Forms module in Angular Material to enable form-level validation and apply custom validators as required. It ensures that all form elements adhere to specific criteria before being submitted by users.

3. Use Mat-Error Directive

Use the Mat-error Directive from Angular Material to display validation messages for both individual fields and entire forms if needed. It prevents users from submitting a form in error, creating a better user experience.

4. Remove Errors From the Screen

Ensure that errors are removed from the screen once the user has corrected them. When submitting a form, you should use the Angular ngModel Directive and its Error Object to display validation messages for individual fields onscreen.

5. Use the Angular ngModelGroup Directive

Use the Angular ngModelGroup Directive to group form fields, making displaying validation messages for entire form sections easier. Then, utilize the Angular ngMessages Directive to display messages for the entire form if necessary.

The Takeaway

Building a file upload component with Angular Material is an excellent way for users to upload files in your web application easily. With just a few steps, you can create an intuitive and accessible user interface for uploading files. 

You can quickly set up this feature with minimal coding using Angular Material components like the File Input, Button, and Progress Bar. These features will make your web application more attractive and user-friendly. 

Furthermore, you can use other features from the Angular Material library, like custom themes and animations, to improve the look of the file upload component even further. With all of these options available, creating an intuitive, user-friendly file upload feature for any web application using Angular Material is easy.