Home Blog Page 143

How to Repair Your Corrupted MP4 or MOV Files

Video repair tool

Video files play an essential role in the modern world as your life, in a way, revolves around them. Your important data is stored in video form if you are a professional videographer or a content creator. In personal life, many memories are stored in this form, from birthdays to weddings and more. MP4 and MOV are the most widely used video formats for creating and storing videos. So, if your important MP4 or MOV files get corrupted, it can hurt you greatly. 

Luckily, now files getting corrupted doesn’t mean that these are gone. With the Wondershare Repairit video repair tool, you can easily repair even severely damaged MP4 and MOV files. We will explain the difference between MP4 and MOV, the reasons behind data corruption, and how to repair MP4 and MOV files.

Part 1: Major Differences Between MP4 and MOV Video Formats

MOV, developed by Apple, and MP4, developed by ISO, are among the most used video format in the digital world. MOV is the default and goto format for all Apple devices, while MP4 is supported by all operating systems, video players, and editors. MP4 and MOV work on the lossy compression algorithm, but MOV still retains high quality and boosts larger video. 

MP4 vs MOV

Regarding size scalability, MP4 is ideal as it could be scaled to the desired size while maintaining quality, though not as high as MOV offers. Due to its ability to retain high quality and being easy to encode, MOV is widely popular when it comes to professional video creators. MP4 is mostly popular with content creators due to its availability on a wide range of devices and flexibility regarding file size.

Part 2: Primary Causes Behind MP4 or MOV Files Corruption

There are many reasons behind the corruption of your MP4 and MOV files. It can range from malicious virus attacks to failed file transfers or because of a sudden system shutdown. The files can also be corrupted if you try to run them with incompatible software. Below are a few of the main reasons mentioned in detail:

1. Virus or Malware Attack 

A virus or malware attack can affect and corrupt data on your system, making it useless to you. Video files are usually very susceptible to virus attacks making them a prime target. You should always create a backup of your essential data or use good anti-virus software.

2. Improper System or Software Shutdown

MP4 or MOV files can also get corrupted if you run them and a sudden system shutdown occurs. It can easily make the file being played corrupted. Similarly, if the software you use to play or edit MP4 or MOV files gets closed suddenly, it can corrupt the file.

3. Disruption in File Transfer or Download

Video files can also get corrupted if you export them from an external device like a USB or external storage device, and the process gets disrupted in between. It can also happen if you copy files from one place to another. Similarly, in the case of downloading the file, slow internet speed or loss of connection can result in file corruption.

4. Improper Conversion and Compression

Your MP4 or MOV files can also become corrupted during conversion to another format if the process is disturbed. It can also be the case that the converter you were using was lackluster. In the same way, if you are not able to properly compress the files, your MP4 and MOV files can get corrupted.

5. Inappropriate Read and Write and Broken Headers

All the media files have an internal structure and set of written code that is constantly being modified when we run those files. So, files can get corrupted if you are running your MP4 or MOV files with an incompatible or corrupted media player. Missing or broken headers of MP4 and MOV files can corrupt them.

Part 3: The Walkthrough of Repairing MP4 and MOV Files Using Wondershare Repairit

Wondershare Repairit is, without a doubt, the most fantastic tool currently available in the market for repairing MP4 and MOV files. We recommend Wondershare Repairit because of its user-friendly interface, ease of the repairing process, and support for 15+ video formats. Aside from MP4 and MOV, it supports other video formats like MKV, 3GP, AVI, FLV, etc. It also allows repairing files in batch and multiple formats simultaneously.

When you add your corrupted files, it shows you the information regarding File Name, File Path, File Size, Video Watching Time, Video Resolution, and Filming Equipment. If a general repair procedure doesn’t repair your files, you can choose Advanced Video Repair for your damaged videos. 

The Advanced Video Repair function asks you to provide a sample file, preferably created in the same format by the same device, to repair your corrupt file. It will fix your file using the sample file as a basis. Below are the detailed steps explaining the repairing process:

Step 1: Selecting your MP4 or MOV Files

Start the Repairit and select your corrupted files by clicking the “Add” button on the interface in the “Video Repair” tool. If you have multiple corrupted files, you can add them simultaneously, even if they are in a different format. After adding your MP4 and MOV files, you can see all the details regarding them on the interface.

Repairit

Step 2: Repairing your Videos

After making sure that the targeted files have been uploaded, click the “Repair” button, and it will start repairing the files. After the process, you can preview the files by clicking on the “Preview” button separately for each video file.

Repairit

Step 3: Securing your Repaired Files

Now that you have previewed the files and are satisfied with the results, you can store the files into secure location. To do that, click the “Save” button and provide the desired location, ensuring it is different from where the original corrupted files were located. Wait for a few seconds, and files will be stored and ready to use.

Repairit

Conclusion

There is usually always essential data stored in the form of videos in our daily life. Loss of that data can be problematic as it can create trouble and hinder your working life. Similarly, it can make you feel bitter after losing memorable videos of your life. If your essential MP4 or MOV file got corrupted, download the Wondershare Repairit now and use it to repair your important files. Along with videos, it also offers photos, audio, files, and an email repairing tool.

Intel Unison: App That Lets You Sync Your Windows PC With Android Or iOS

Intel Unison

Intel introduced Unison — an app to sync iOS and Android smartphones with PCs running 12th Gen Intel processors and Windows 11.

When it comes to the possibility of keeping data and files synchronized between different devices — compared with the Apple ecosystem, one of the biggest shortcomings of Windows is the poor integration it has with Android or iOS. And Intel Unison is going to fix that problem.

Intel Corporation plans to provide seamless integration of personal computers based on its own Evo platform with smartphones using Unison technology.

Windows PC that has been certified under the Intel Evo program and equipped with 12th generation Intel Core processors (Alder Lake), in particular, some models from Acer, HP, and Lenovo, will be the first to receive Unison software support. In the future, owners of PCs based on the 13th generation Intel Core CPU (Raptor Lake), introduced on September 27, 2022, will also be able to use Unison.

Features of Intel Unison:

Intel Unison opens access to the four main functions of the smartphone on the PC: 

  1. making and receiving calls
  2. sharing photos and files (they are displayed in a special Unison gallery on the PC)
  3. receiving and sending text messages
  4. receive other notifications with the ability to respond to them in certain cases

However, due to iOS restrictions, Intel Unison will not be able to offer some advanced features to iPhone owners.

Now the owner of a Windows PC no longer has to choose a smartphone depending on what kind of computer he has. It doesn’t matter if it’s iPhone or Android; any device will be able to sync with a PC using Intel Unison.

E-Waste Recycling: What You Need To Know

E-Waste Recycling

Recycling is probably one of the most critical activities we can do to positively impact the environment. Today, everyone is constantly replacing their electronic devices with newer models. Unfortunately, this habit is creating more non-biodegradable waste.

This problem highlights the importance of recycling used electronic equipment. Read on and learn what you need to know about this process.

What Is E-waste Recycling?

E-waste or e-scraps refer to the trash generated from obsolete, broken, and surplus electronic devices. These electronics may contain hazardous materials and toxic chemicals. If not disposed of properly, they may release these harmful substances into the environment.

E-waste recycling is the process of repurposing and reusing these electronic wastes. Professional recyclers recover materials from e-waste and use them to manufacture new products.

This waste can include home appliances like air conditioners, electric cookers, microwaves, televisions, heaters, DVDs, fans, and radios. They can also be information technology (IT) equipment like computers, batteries, laptops, mobile phones, hard disks, circuit boards, and monitors.

Below are some electronic components that people can recover and reuse:

  • Plastic
  • Circuit Boards
  • Glass
  • Mercury
  • Metal
  • Batteries
  • Hard Disk

Because most of these electronics have a short life, they become electronic waste at a fast pace. To address this issue, organizations all over the world are promoting e-waste recycling.

This process is becoming a crucial trend initiated to protect the environment and human health. Especially now that the volume of e-waste generated all around the globe is steadily rising.

Why E-waste Recycling Is Important

In a 2021 news release from the World Health Organization (WHO), workers trying to recover valuable materials from e-waste are at risk of exposure to more than 1,000 toxic chemicals. These include hazardous minerals like lead, chromium, and cadmium. Danger can come from the accumulation of materials in water, soil, and food.

This issue not only puts people in danger, but it is also dangerous for land and sea animals. The risks are higher in developing countries because other developed countries send their waste there.

Because of this problem, organizations must ensure proper recycling processing in place to protect people and future generations.

Another benefit of recycling electronic parts means manufacturers are using less energy and creating less pollution. Recycling also minimizes the production costs of goods by eliminating the need to manufacture components from scratch.

Aside from having a positive impact on the environment, e-waste recycling can also benefit the community by increasing employment. 

Only experts can handle electronic waste properly. Distinguishing reusable and non-reusable components is also a task that requires a keen eye and product knowledge. 

An efficient e-waste recycling program in the community can create jobs. And there are several roles to fill in the field of recycling. There are experts out there with professional degrees relevant to recycling electronic waste.

These are only a few of the benefits of e-waste recycling. With more people contributing to the effort, we can reduce the volume of electronic debris we generate and save more landfill space.

How to Recover Your JPG or PNG Photos

Image recovery tool

You may be a professional photographer or freelancer in graphics or a normal person with many memorable and important photos. This means a lot of your data is in the form of JPG or PNG, and the sudden loss of this data can hurt your business. It can even affect your mental health in the wake of losing important pictures related to your unforgettable memories or business. 

You do not have to panic or get depressed because we got an excellent data recovery tool for you, designed specifically for these situations. The tool, Wondershare Recoverit, is both impressive and incredible when it comes to recovering a deleted file.

Part 1: How JPG and PNG Formats Differ from Each Other

In the digital world, both JPG (Joint Photographic Experts Group) and PNG (Portable Network Graphics) are among the most widely used formats. The main difference between JPG and PNG is the compression algorithm used by both, where JPG uses lossy compression while PNG uses lossless compression. In lossy compression, some data is lost while the size is reduced, making it a better choice for professional photographs. In lossless compression, no data is lost, meaning a larger photo size, making it an ideal choice for creating images.

PNG vs JPG

When it comes to transparency, JPG doesn’t support it, while PNG supports it, making it an ideal format for people working in the graphic niche. In the case of scalability, JPG allows you to reduce images to desired sizes, which is why it is widely used in general and professional photographs. PNG does not allow much scalability as it retains all information making it high quality and larger. 

In simple words, JPG is small-sized, easy to use and handle, and is the default format when it comes to taking photos. PNG is high quality, large-sized, and used mainly in graphics (icons, logos, charts, etc.) and screenshots on Desktop and Android devices.

Part 2: Main Possible Reasons Behind Your JPG and PNG Files Loss

When it comes to the reasons behind your sudden loss of JPG and PNG data files, it can be your mistakes, hardware issues, or malware. Here we have mentioned a few of the primary reasons below:

1. Human Mistakes

The main reason could be that you ended up permanently deleting your essential files unintentionally when trying to delete something else. It could also be that you accidentally formatted a disk without realizing that it contained your important photos. Sometimes improper exporting of the data to your system can result in being corrupted. The improper closing of software you were using can also result in files related to it being corrupted or lost.

2. Hardware Failure

It is also possible that the hard drive you stored your data on became damaged, due to which the data on it gets lost. The external hard disks stored in your house can also be affected by the environment. Your system’s hard drive can fail for many reasons, including power failure, heavy fall, overheating, or any other mechanical reasons. So, it is always advised to maintain backups of your essential data.

3. External Devices

When it comes to transferring photos from external devices, there is a lot that could go wrong and result in damaged or corrupted data. It could be the improper copying procedure, especially in the case of “Cut & Paste;” a sudden termination of procedure can result in data being lost or corrupted. In the same way, the USB you used for data transfer can already be infected. It is even possible that the digital camera you used for capturing photos got corrupted, and all images were lost.

4. Virus Attacks

Your photos and essential documents are usually a major target for any cyber-attack on your system. As photos, especially those related to your personal life, usually hold sentimental value to you, these become a prime target for hackers and people with malicious intent. These photos can also become collateral damage in malware’s attempt to destroy and infect essential data on your system.

Part 3: Introduction of Wondershare Recoverit with File Recovery Walkthrough

After going through why your JPG or PNG files can be lost and recapping the difference between both, it is time for the solution. It is time to give you the ideal solution and, most importantly, to provide you with reasons why we recommend it. Wondershare Recoverit is not just a recovery tool but a magic spell to recover your lost data. It has a long list of unique and incredible features like it supports 1000+ file formats and over 2000 devices from which you can recover your data.

It doesn’t matter if you lost your photos on a USB, digital camera, or memory card; Recoverit can easily recover data from any of these. It also provides helpful filters that include file type, date, size, and keywords, making your experience fast and relaxed. Now let’s go through the recovery process in three simple steps: 

Step 1: Selecting the Photos Location

After starting Recoverit, you can select the location of lost files from the “Hard Drives and Location” section on the software interface. If the photos you lost were on an external device, connect the device to your system, and you can select it from the option “External Devices” on the same interface. When the targeted location is selected, press “Start” to run the scan.

Recoverit

Step 2: Finding Your JPG or PNG Files

Now that Recoverit has started to scan your selected location, it will begin listing the recoverable files. You can apply the filters so that it only shows you photos or even specifically JPG or PNG pictures. Other useable filters include size and date to pinpoint your targeted files further.

Recoverit

Step 3: Recovering and Storing Your JPG and PNG files

Once you have narrowed down the files you feel are the ones you were looking for, you can confirm them by double-clicking them. It will let you preview the files, and you can confirm if these were the files you lost. Once confirmed that it is what you were looking for, click “Recover,” and it will ask you to provide the location where the recovered file can be stored. Now provide the desired location and have your important JPG or PNG photos secured.

Recoverit

Wrap Up

Photos, be these consisting of our work or our personal life moments, are very important to us. Most of the time, these are representations of our creativity or unforgettable memories we can look back onto. So, if you have suffered the loss of important JPG/PNG files, download the Wondershare Recoverit now. You can use the free 100 MB data recovery feature of Recoverit to recover your essential photographs.

GET3D: Nvidia Presented New AI Model To Create Objects And Characters In 3D

Nvidia GET3D

Nvidia has released GET3D (Generate Explicit Textured 3D), an AI model for creators of the company’s multiverse, the Omniverse, and other developers to simplify the process of creating 3D models. 

As the company explains, with the help of its several A100 Tensor Core GPUs, Nvidia GET3D was trained in just two days, utilising over a million 2D images of 3D shapes taken from various camera angles. According to the company, one GPU allows GET3D to generate up to 20 objects per second.

GET3D is capable of generating models of characters, buildings, vehicles, and other forms of 3D objects “with high-fidelity textures and complex geometric details“. These 3D objects are created in the same format as popular graphics applications, allowing users to immediately transform them into 3D rendering.

This means that it can be much easier for developers to create dense virtual worlds for games and the metaverse. Robotics and architecture were mentioned as other possible applications for NVIDIA’s new tool.

Also, with another Nvidia AI tool, StyleGAN-NADA, you can apply different styles to an object using text hints — make a car burn, turn a building into a haunted house, or paint any animal the color of a tiger.

The algorithm can detect subtle differences between similar objects — from vehicles, it can generate cars, trucks, racing cars, and vans; from animal classes, it can generate images of foxes, rhinos, horses and bears — the set of images expand as you learn.

According to Nvidia, future versions of GET3D will train on real objects rather than hand-crafted models.

The Safest Way to Keep an Eye on Your Kid’s Activities — Using a Parental Control Tool

Parental control

In this technological and modern era, the upbringing of children has become challenging. The main reason is that the kids are now more exposed to technological gadgets and a vulnerable environment. This can affect their mindset and indulge them in unethical or illegal activities. That’s why being a parent; you should take effective measures to examine your children’s daily activities. 

This article will introduce the best parental control app known as Wondershare FamiSafe. By reading this article, you can learn how to use the FamiSafe app efficiently. 

Part 1: Main Reasons to Use a Parental Control App

Have you ever used a parental control app? Nowadays, many parents prefer parental control tools to monitor their child’s activities without making them feel insecure. This part will briefly discuss some of the major reasons for the usage of parental control apps. 

1. Restricting Online Gaming

Online gaming can be extremely addictive to your children. There are various online games that promote violence, drugs, and other unethical activities. If your kid spends extensive hours on such online games, it can affect his/her mental health. Moreover, it can arouse violent behavioral patterns, leading to negative consequences. 

By using a parental control app, you can check the types of online games your child is playing. Also, you would be notified whenever your child exceeds the playing limit you have set before. 

2. Monitoring Web Browsing History

While browsing through the internet and different websites, there is a high possibility of the presence of unethical content. The content can be related to self-harm, suicide, drugs, or bullying. Moreover, your child may be redirected to adult websites. In such a situation, the parental control app can help monitor your kid’s web browsing search history and activities. 

By relying on an advanced parental control app, you can easily block explicit or adult websites. Also, you can analyze their daily activities on the websites efficiently. 

3. Management of Time 

Time management of your kids, especially in this digital age, is a hectic job. If your kid spends unlimited time on social media apps or other platforms, he won’t be able to manage his academic career. That’s why parental control apps help in time management. Using this tool, you can check the amount of time spent on particular social media apps. 

Moreover, the parental control app also allows you to modify the personal settings of your kid on social media accounts. By doing so, your child would use social media apps without the risk of privacy invasion. 

4. Prevents Cyberbullying 

Cyberbullying is an unfortunate factor that has taken several lives. To protect your kid from cyberbullying, threats, or trolling, you should use a reliable parental control app. It will help you instantly check the messages received on your kid’s phone. Furthermore, you can check the added contacts and the respective conversations easily. This will protect your children from cyberbullying issues or any security threats over the internet. 

Part 2: Introducing the Efficient Parental Control App – Wondershare FamiSafe

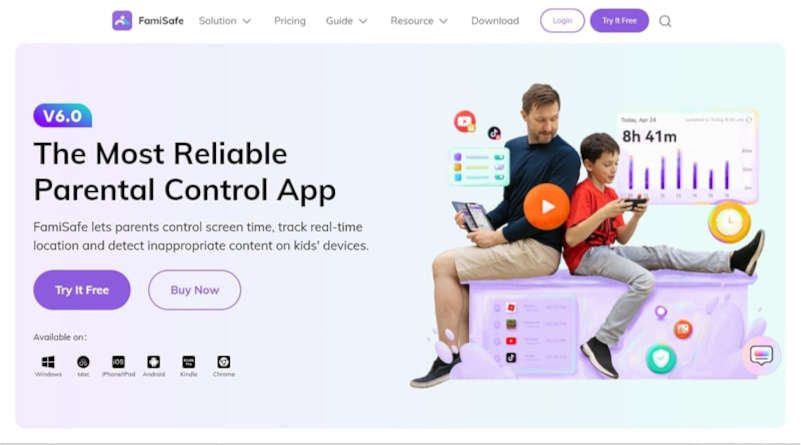
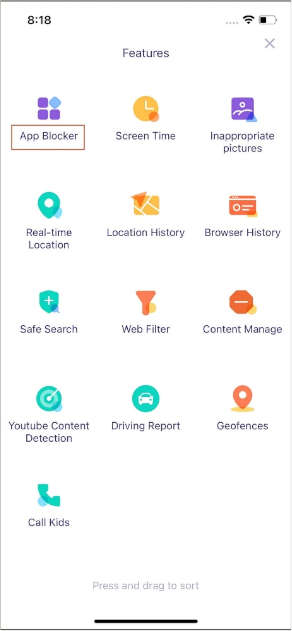
Do you want to use a reliable parental control app? Wondershare FamiSafe is a complete parental control app offering tons of options for the safety of kids. It’s a compatible tool that can be downloaded on multiple platforms like Android, iOS, Mac, Windows, Chrome, and Kindle. Through this efficient app, you can ensure the web safety of your children through the features like Web Filter, Safe Search, and Browser History.

FamiSafe app

Moreover, you can check your children’s screen time on their devices and the daily apps under their usage. It also functions as a location tracker through which you can check the real-time location of your kid. You can also check the activity report through this tool to check the apps and platforms your kid has accessed. By using this app, you can check your kids’ daily activities on their devices and prevent online dangers. 

Part 3: Method to Use the FamiSafe App to Check Your Kid’s Activities 

Are you ready to use the FamiSafe app? This section will offer detailed instructions on how to set up and use the FamiSafe app effortlessly. 

3.1 Set Up FamiSafe on Parent’s Phone

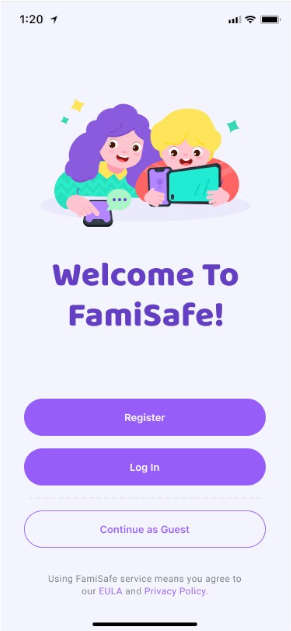
Step 1: First, start installing the FamiSafe app on your phone. You can visit Play Store or App Store, depending upon your phone. Once you have downloaded the app, register yourself through a Wondershare ID. Or you can use your Facebook, Google, or Apple account to log in.

FamiSafe app

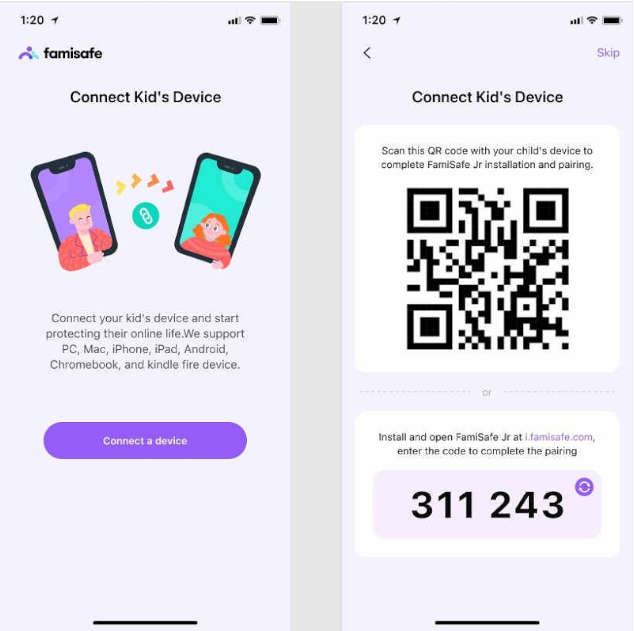
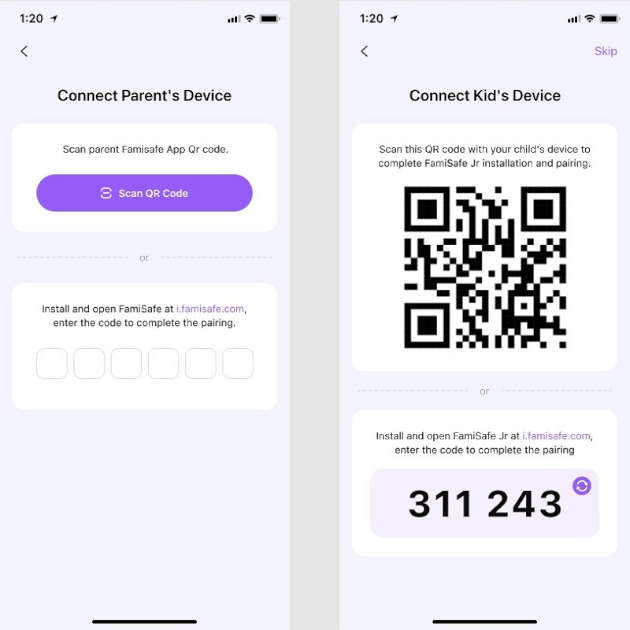
Step 2: To proceed, continue as a parent and use the QR code or pairing code to establish a connection to your kid’s phone. After establishing the connection to your kid’s phone, set a PIN code to protect your FamiSafe account, and you are good to go. 

FamiSafe app

3.2 Set Up FamiSafe on Kid’s Phone

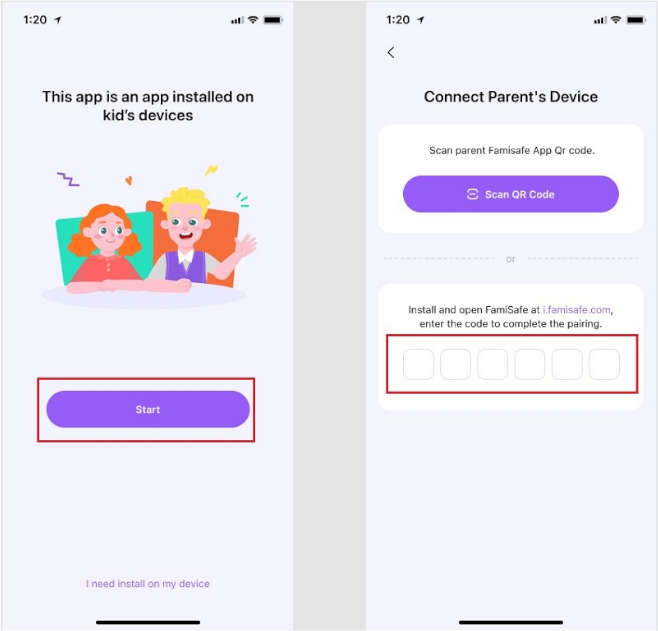
Way 1: You can install FamiSafe Jr on your kid’s phone by scanning the QR code on the parent’s phone. This will automatically install and pair the FamiSafe app on your kid’s phone. 

FamiSafe app

Way 2: You can also use the pairing code to set up FamiSafe on kid’s phone. For this, download the FamiSafe app from Play Store or App Store. Once done with downloading, press the “Start” button and enter the pairing code you have received from the parent’s device. 

FamiSafe app

3.3 Grant Permissions on Kid’s Android Device

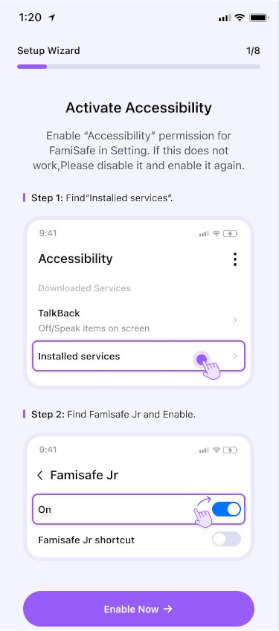
Step 1: To use the FamiSafe app efficiently, you need to grant permissions on the kid’s phone. For this, activate “Accessibility” by navigating to the Installed Services. Afterward, locate and enable FamiSafe Jr. 

FamiSafe app

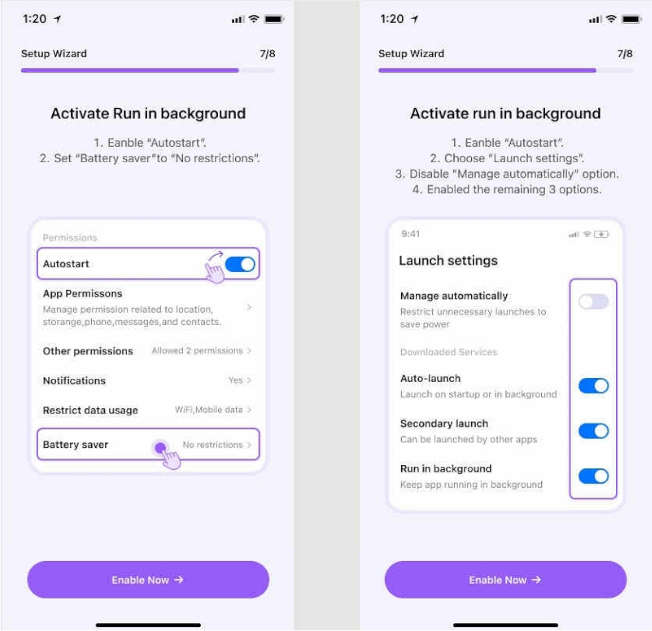
Step 2: To block certain apps, you can enable the option “Start in Background.” Moreover, you can enable the options like “Display over other apps,” “App Supervision,” “Notification Access,” “Device Administrator Permission,” “Auto-start,” and “Battery Saver.” Moreover, also enable the location to allow FamiSafe to track the exact location. 

FamiSafe app

3.4 Grant Permissions on Kid’s iOS Device

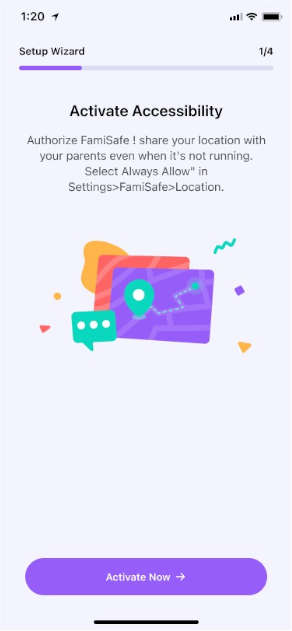
Step 1: On your kid’s iOS device, navigate to Settings and select FamiSafe. Afterward, tap on “Location” and enable “Always Allow.” This will activate the accessibility of FamiSafe. 

FamiSafe app

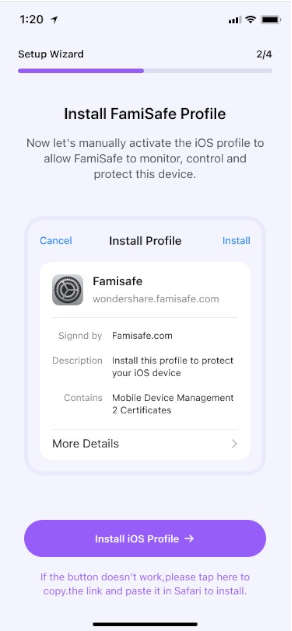
Step 2: Next, install the iOS profile to allow FamiSafe to control and monitor the device. Just follow the on-screen instruction to enable the necessary permissions. 

FamiSafe app

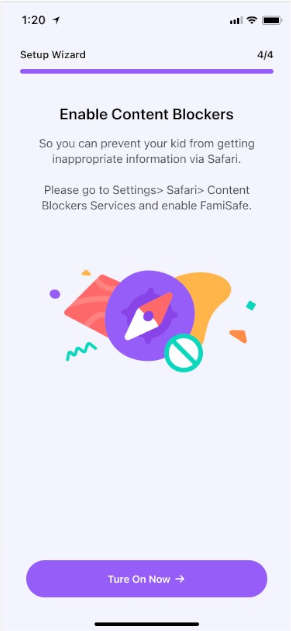
Step 3: To block the inappropriate content from Safari, proceed to Settings and choose “Safari.” Afterward, tap the “Content Blockers” option and activate FamiSafe. 

FamiSafe app

3.5 Start Managing the Kid’s Phone 

Once you are done with setting up FamiSafe and granting the necessary permissions, you can start using the app. You can generate Activity Report to analyze the daily activities of your kid. You can also trace the real-time location of your kids through this app to ensure their safety. Moreover, you can check the location history, web search history, and driving report efficiently through this app. FamiSafe also allows you to set restrictions on YouTube and TikTok to prevent unethical content from the children’s reach. 

FamiSafe app

Conclusion

Are you worried about your kid’s daily activities on the phone? This article has introduced FamiSafe as an advanced and efficient parental control app. Using this tool, you can easily ensure your kid’s safety and online activities. Moreover, it will help you to keep a check and balance on your child regarding his daily activities with technological gadgets. 

Google Has Officially Announced The Closure Of Stadia

Google Stadia new games

Google is exiting the cloud gaming business and discontinuing its Stadia service.

Google will discontinue the Stadia cloud gaming service on January 18, 2023. Phil Harrison, who is responsible for Stadia at Google, announced this on the company’s blog. The end of the Google gaming streaming service was already in the offing when Logitech announced its new cloud gaming handheld, and Stadia wasn’t there.

According to Harrison, the service hasn’t “gained the traction with users that we expected, so we’ve made the difficult decision to begin winding down our Stadia streaming service.”

Google also refunds all customers their money. This applies to all Stadia hardware purchased via the Google Store, as well as all games and additional content purchased via the Stadia Store. However, refunds will take some time. Google hopes the refunds will be complete by mid-January 2023, in time for the service’s retirement. Google still wants to comment on the country-specific refund options.

Google has a FAQ detailing how refunds will work. In the simplest case, these are carried out automatically without the user having to do anything. Google also offers the export of the data that users have accumulated with Stadia. The corresponding entry can be found at takeout.google.com.

The team members behind Stadia will work in other areas of the company, Google said. The company sees opportunities to use Stadia’s technology in other areas, mentioning YouTube, Google Play and AR glasses. Another way to recoup the investment could be to license the technology.

With Stadia, Google wanted to create its own gaming service in competition with cloud gaming alternatives from Microsoft, Sony or Nvidia and at the same time compete with the game consoles. The Stadia app was available for Android and iOS, but current games should also be played via browser and thus also on Google’s cheap Chromebooks. Stadia was available in two versions — Stadia and Stadia Pro.

Zero Trust SIM: Cloudflare Launches eSIM To Secure Smartphones And Networks

Cloudflare Zero Trust SIM

Cloudflare, Inc. announced the development of Zero Trust SIM — this is the first solution to secure every packet of data from a mobile device. 

The Zero Trust SIM in development at Cloudflare will enable organizations to quickly and securely connect mobile devices to Cloudflare’s global network, directly onboard devices with Cloudflare’s Zero Trust platform, and connect the network and protect employees, regardless of where they are working. 

Additionally, Cloudflare will also launch Zero Trust for mobile operators, a new mobile carrier partner program that will allow operators to seamlessly offer comprehensive mobile security tools to their subscribers by leveraging the Cloudflare Zero Trust platform.

As organizations become more distributed through remote working and employee bring-your-own-device (BYOD), securing all devices of employees used to become increasingly difficult. To solve this problem, most companies use a secure agent or application running on employees’ devices to help secure them. 

However, while applications and endpoint agents are an important part of the security stack, they cannot secure all traffic passing through each device. This system can be difficult to implement at scale. To fill this gap, Cloudflare is now developing Zero Trust SIM, the industry’s first zero trust solution for securing employee mobile devices at the SIM level, protecting every packet of data.

The Cloudflare Zero Trust SIM will seamlessly integrate with Cloudflare’s entire Zero Trust stack, enabling security policy enforcement for all traffic exiting the device. And since Zero Trust SIM gives priority to eSIM (embedded SIM), which reduces the risk of SIM swapping attacks, saving time for security professionals. 

With Cloudflare’s Zero Trust SIM, businesses can:

  1. As software agents are flawed, they may be unable to manage all sorts of traffic. Since all packets of data leaving a device go through the SIM, Cloudflare Zero Trust SIM can help secure all of an organization’s data.
  2. Building on modern eSIM technology means the Zero Trust SIM can be automatically deployed and activated on all devices within an organization using existing MDM (mobile device management) solutions. This allows Cloudflare Zero Trust SIM to seamlessly roll out without the labour-intensive shipping of physical SIM cards.
  3. The Zero Trust SIM can be used standalone or deployed with WARP, Cloudflare’s mobile agent, to enable device status checks and HTTPS inspections in more demanding organizations.
  4. As more and more objects are connected to the internet — from vehicles to payment terminals and shipping containers to vending machines — these things must also be secured. Cloudflare is actively working on new solutions based on the Zero Trust SIM to provide industry-leading connectivity and Zero Trust security for the Internet of Things.

Cloudflare’s approach also makes the setup process easy, as all the employee has to scan a QR to enjoy the benefits of this solution. Nothing more. 

This proposal also protects all outgoing or incoming traffic when the device is connected through a mobile network. It makes no difference what app or what type of content is used. But when the device is connected to a Wi-Fi network, it does not intervene. 

Cloudflare, however, is not just looking for companies to use their own SIM cards. It also encourages operators to implement this solution in their business products. 

Of course, Cloudflare SIM cards do not protect customers from all types of threats. However, it is a strong layer of protection that should help reduce a wide range of attacks.